UI实现 从第一张图开始,先来拆分结构,分为左右两个view,左边view是日历+天气,右边是4个功能入口,整体是一个medium尺寸的,然后来实现:
左边的view代码如下:
再来看右侧4个功能入口,再创建入口之前,先来考虑一下创建入口对应的Item,这个Item要有哪些字段?显示需要图片和标题,点击后跳转需要链接,另外SwiftUI中forEach遍历需要id。
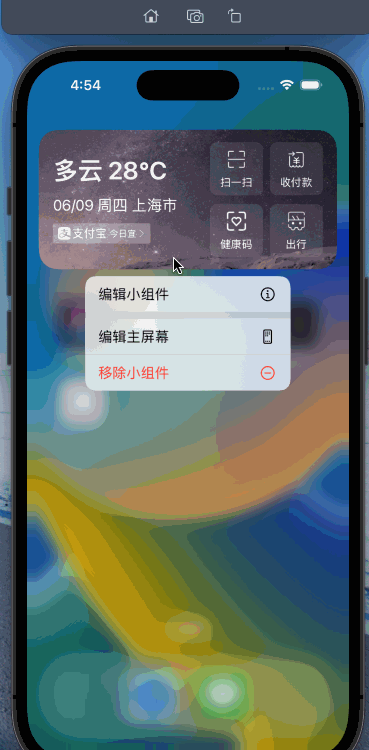
然后再看下支付宝widget,长按 -> 编辑小组件 -> 选择功能,能看到所有可选的功能,所以这里需要定义一个type,用于枚举所有的功能,这里仅以8个来示例。资源文件放在AlipayWidgetImages文件夹下。
所以功能入口对应的单个item整体定义如下:
1 2 3 4 5 6 7 8 9 10 11 12 13 14 15 16 17 18 19 20 21 22 23 24 25 26 27 28 29 30 31 32 33 34 35 36 37 38 39 40 41 42 43 44 45 46 47 48 49 50 51 52 53 54 55 56 57 58 59 60 61 62 63 64 65 66 67 68 69 70 71 72 import Foundationpublic enum ButtonType : String case Scan = "扫一扫" case pay = "收付款" case healthCode = "健康码" case travelCode = "行程卡" case trip = "出行" case stuck = "卡包" case memberpoints = "会员积分" case yuebao = "余额宝" } extension ButtonType : Identifiable public var id: String { return rawValue } public var displayName: String { return rawValue } public var urlStr: String { let imageUrl: (image: String , url: String ) = imageAndUrl(from: self ) return imageUrl.url } public var imageName: String { let imageUrl: (image: String , url: String ) = imageAndUrl(from: self ) return imageUrl.image } func imageAndUrl (from type : ButtonType )String , String ) { switch self { case .Scan : return ("widget_scan" , "https://www.baidu.com/" ) case .pay: return ("widget_pay" , "https://www.baidu.com/" ) case .healthCode: return ("widget_healthCode" , "https://www.baidu.com/" ) case .travelCode: return ("widget_travelCode" , "https://www.baidu.com/" ) case .trip: return ("widget_trip" , "https://www.baidu.com/" ) case .stuck: return ("widget_stuck" , "https://www.baidu.com/" ) case .memberpoints: return ("widget_memberpoints" , "https://www.baidu.com/" ) case .yuebao: return ("widget_yuebao" , "https://www.baidu.com/" ) } } } struct AlipayWidgetButtonItem var title: String var imageName: String var urlStr: String var id: String { return title } static func generateWidgetBtnItem (from originalItem : AlipayWidgetButtonItem )AlipayWidgetButtonItem { let newItem = AlipayWidgetButtonItem (title: originalItem.title, imageName: originalItem.imageName, urlStr: originalItem.urlStr) return newItem } }
然后来看右半边按钮组的实现,创建AlipayWidgetGroupButtons.swift,用于封装展示4个按钮的view,代码如下:
1 2 3 4 5 6 7 8 9 10 11 12 13 14 15 16 17 18 19 import SwiftUIstruct AlipayWidgetGroupButtons : View var buttonList: [[AlipayWidgetButtonItem ]] var body: some View { VStack () { ForEach (0 ..< buttonList.count, id: \.self ) { index in HStack { ForEach (buttonList[index], id: \.id) { buttonItem in AlipayWidgetButton (buttonItem: buttonItem) } } } } } }
然后创建左半边的view,分为三个部分,天气、日期、和提示条,其中提示条单独封装。代码如下:
提示条view:
1 2 3 4 5 6 7 8 9 10 11 12 13 14 15 16 17 18 19 20 21 22 23 24 25 26 27 28 29 30 31 32 33 34 35 36 37 38 39 40 41 42 43 44 45 46 47 48 import SwiftUIstruct AlipayWidgetLunarView : View var body: some View { ZStack (alignment: .leading) { ZStack { AliPayLunarSubview () .hidden() } .background(.white) .opacity(0.27 ) .cornerRadius(2.0 ) AliPayLunarSubview () } } } struct AliPayLunarSubview : View var body: some View { HStack { Image ("alipay" ) .resizable() .frame(width: 16.0 , height: 16.0 ) .padding(EdgeInsets (top: 0 , leading: 5 , bottom: 0 , trailing: 0 )) Text ("支付宝" ) .font(Font .custom("Montserrat-Bold" , size: 13.0 )) .minimumScaleFactor(0.5 ) .foregroundColor(.white) .padding(EdgeInsets (top: 4.0 , leading: - 7.0 , bottom: 4.0 , trailing: 0.0 )) Text ("今日宜" ) .font(Font .system(size: 10.0 )) .minimumScaleFactor(0.5 ) .foregroundColor(.white) .padding(EdgeInsets (top: 0.0 , leading: - 5.0 , bottom: 0.0 , trailing: 0.0 )) Image ("right_Arrow" ) .resizable() .frame(width: 10 , height: 10 ) .padding(EdgeInsets (top: 0.0 , leading: - 7.0 , bottom: 0.0 , trailing: 5.0 )) } } }
左半边view整体:
1 2 3 4 5 6 7 8 9 10 11 12 13 14 15 16 17 18 19 20 21 22 23 24 25 26 27 28 29 import SwiftUIstruct AlipayWidgetWeatherDateView : View var body: some View { VStack (alignment: .leading) { Spacer () Text ("多云 28℃" ) .font(.title) .foregroundColor(.white) .fontWeight(.semibold) .minimumScaleFactor(0.5 ) .padding(EdgeInsets (top: 0.0 , leading: 0.0 , bottom: 4.0 , trailing: 0.0 )) Text ("06/09 周四 上海市" ) .lineLimit(1 ) .font(.body) .foregroundColor(.white) .minimumScaleFactor(0.5 ) .padding(EdgeInsets (top: 0.0 , leading: 0.0 , bottom: 4.0 , trailing: 0.0 )) AlipayWidgetLunarView () Spacer () } } }
最后把左半边view和右半边的按钮组结合起来,代码如下:
1 2 3 4 5 6 7 8 9 10 11 12 13 14 15 16 17 18 19 20 21 struct AlipayWidgetMeidumView : View @ObservedObject var mediumItem: AliPayWidgetMediumItem var body: some View { ZStack { Image ("widget_background_test" ) .resizable() HStack { AlipayWidgetWeatherDateView () Spacer () AlipayWidgetGroupButtons (buttonList: mediumItem.dataButtonList()) } .padding() } } }
其中定义的AliPayWidgetMediumItem,是类似于VM,将model转为view需要的数据输出,代码如下:
1 2 3 4 5 6 7 8 9 10 11 12 13 14 15 16 17 18 19 20 21 22 23 24 25 26 27 28 29 30 31 32 33 34 35 36 37 38 39 40 41 42 43 44 45 46 47 48 49 50 51 52 53 54 55 56 57 58 59 60 61 class AliPayWidgetMediumItem : ObservableObject @Published private var groupButtons: [[AlipayWidgetButtonItem ]] = [[]] init () self .groupButtons = AliPayWidgetMediumItem .createMeidumWidgetGroupButtons() } init (with widgetGroupButtons : [AlipayWidgetButtonItem ]? ) guard let items = widgetGroupButtons else { self .groupButtons = AliPayWidgetMediumItem .createMeidumWidgetGroupButtons() return } var list: [[AlipayWidgetButtonItem ]] = [[]] var rowList: [AlipayWidgetButtonItem ] = [] for i in 0 ..< items.count { let originalItem = items[i] let newItem = AlipayWidgetButtonItem .generateWidgetBtnItem(from: originalItem) if i != 0 && i % 2 == 0 { list.append(rowList) rowList = [] } rowList.append(newItem) } if rowList.count > 0 { list.append(rowList) } self .groupButtons = list } private static func createMeidumWidgetGroupButtons ()AlipayWidgetButtonItem ]] { let scanType = ButtonType .Scan let scanItem = AlipayWidgetButtonItem (title: scanType.rawValue, imageName: scanType.imageName, urlStr: scanType.urlStr) let payType = ButtonType .pay let payItem = AlipayWidgetButtonItem (title: payType.rawValue, imageName: payType.imageName, urlStr: payType.urlStr) let healthCodeType = ButtonType .healthCode let healthCodeItem = AlipayWidgetButtonItem (title: healthCodeType.rawValue, imageName: healthCodeType.imageName, urlStr: healthCodeType.urlStr) let travelCodeType = ButtonType .travelCode let travelCodeItem = AlipayWidgetButtonItem (title: travelCodeType.rawValue, imageName: travelCodeType.imageName, urlStr: travelCodeType.urlStr) return [[scanItem, payItem], [healthCodeItem, travelCodeItem]] } func dataButtonList ()AlipayWidgetButtonItem ]] { return groupButtons } }
然后创建入口和Provider,代码如下:
1 2 3 4 5 6 7 8 9 10 11 12 13 14 15 16 17 18 19 20 21 22 23 24 25 26 27 28 29 30 31 32 33 34 35 36 37 38 39 40 41 42 43 44 45 46 47 48 49 50 51 52 53 54 55 56 57 import WidgetKitimport SwiftUIstruct AlipayWidgetProvider : TimelineProvider typealias Entry = AlipayWidgetEntry func placeholder (in context : Context )AlipayWidgetEntry { AlipayWidgetEntry (date: Date ()) } func getSnapshot (in context : Context , completion : @escaping (AlipayWidgetEntry ) -> Void ) let entry = AlipayWidgetEntry (date: Date ()) completion(entry) } func getTimeline (in context : Context , completion : @escaping (Timeline <AlipayWidgetEntry >) -> Void ) let entry = AlipayWidgetEntry (date: Date ()) let expireDate = Calendar .current.date(byAdding: .hour, value: 2 , to: Date ()) ?? Date () let timeline = Timeline (entries: [entry], policy: .after(expireDate)) completion(timeline) } } struct AlipayWidgetEntry : TimelineEntry let date: Date } struct AlipayWidgetEntryView : View var entry: AlipayWidgetProvider .Entry let mediumItem = AliPayWidgetMediumItem () var body: some View { AlipayWidgetMeidumView (mediumItem: mediumItem) } } struct AlipayWidget : Widget let kind: String = "AlipayWidget" var title: String = "支付宝Widget" var desc: String = "支付宝Widget描述" var body: some WidgetConfiguration { StaticConfiguration (kind: kind, provider: AlipayWidgetProvider ()) { entry in AlipayWidgetEntryView (entry: entry) } .configurationDisplayName(title) .description(desc) .supportedFamilies([.systemMedium]) } }
最后在WidgetBundle中使用,如下:
1 2 3 4 5 6 7 8 9 10 11 12 import SwiftUIimport WidgetKit@main struct WidgetBundleDemo : WidgetBundle @WidgetBundleBuilder var body: some Widget { AlipayWidget (title: "支付宝" , desc: "这是支付宝Widget" ) } }
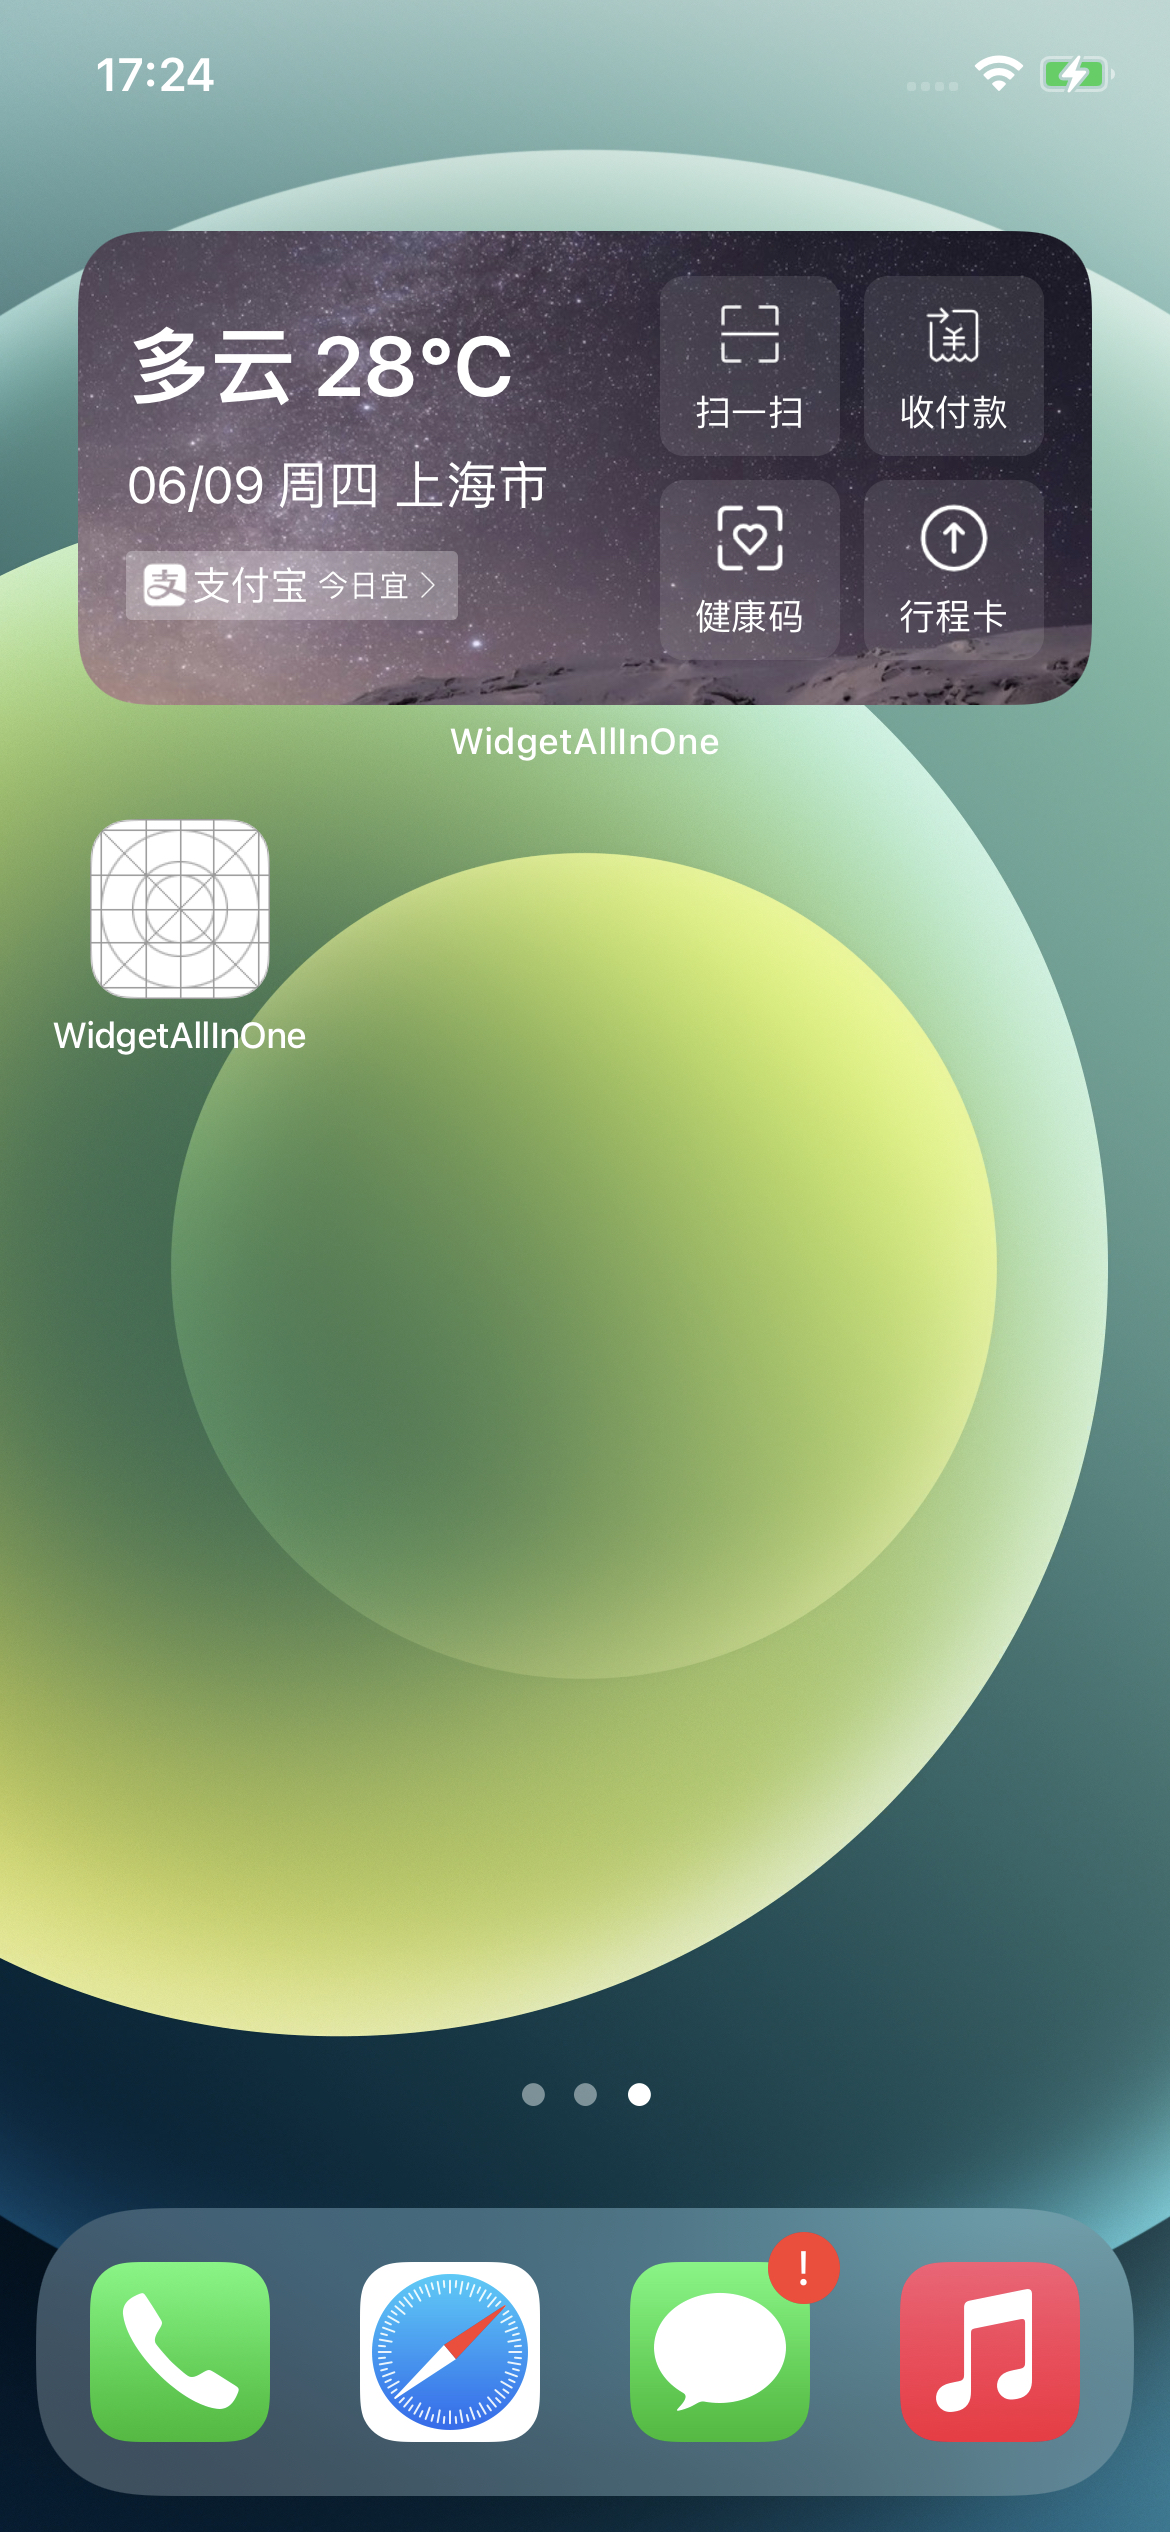
最终显示效果如下:
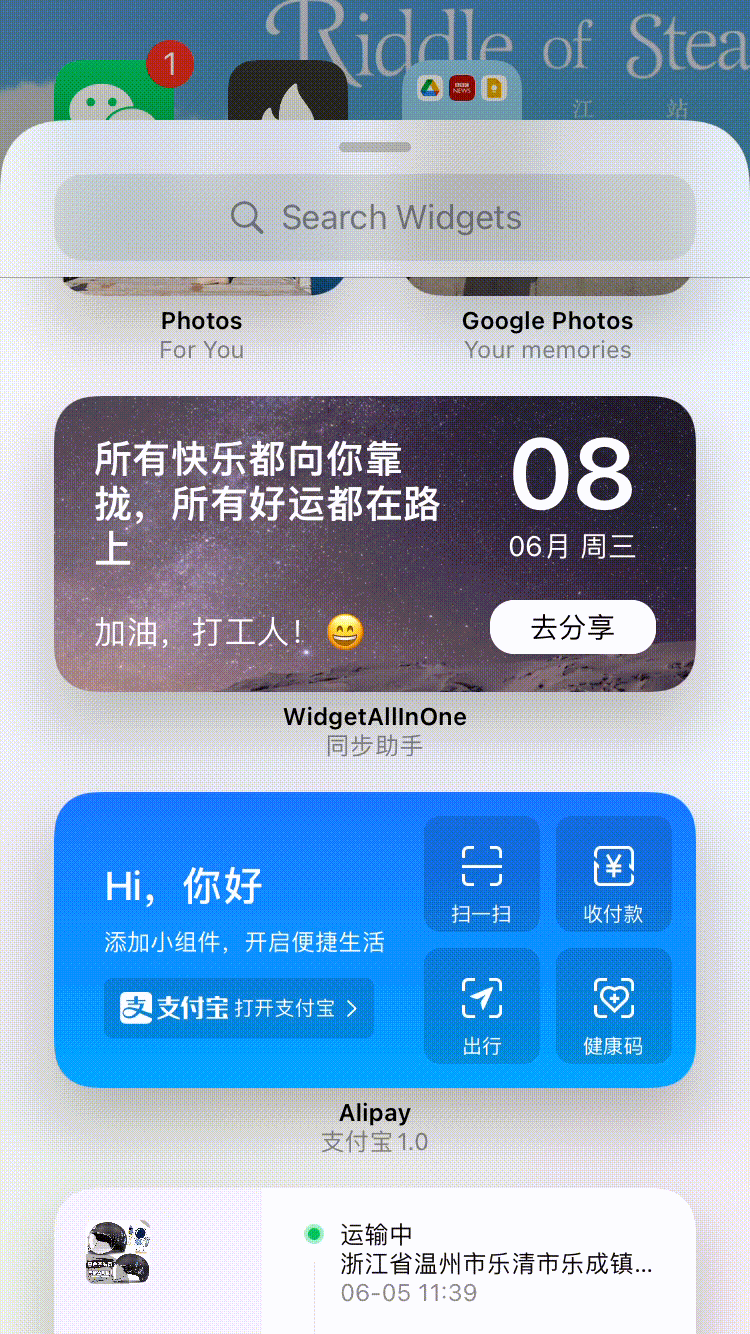
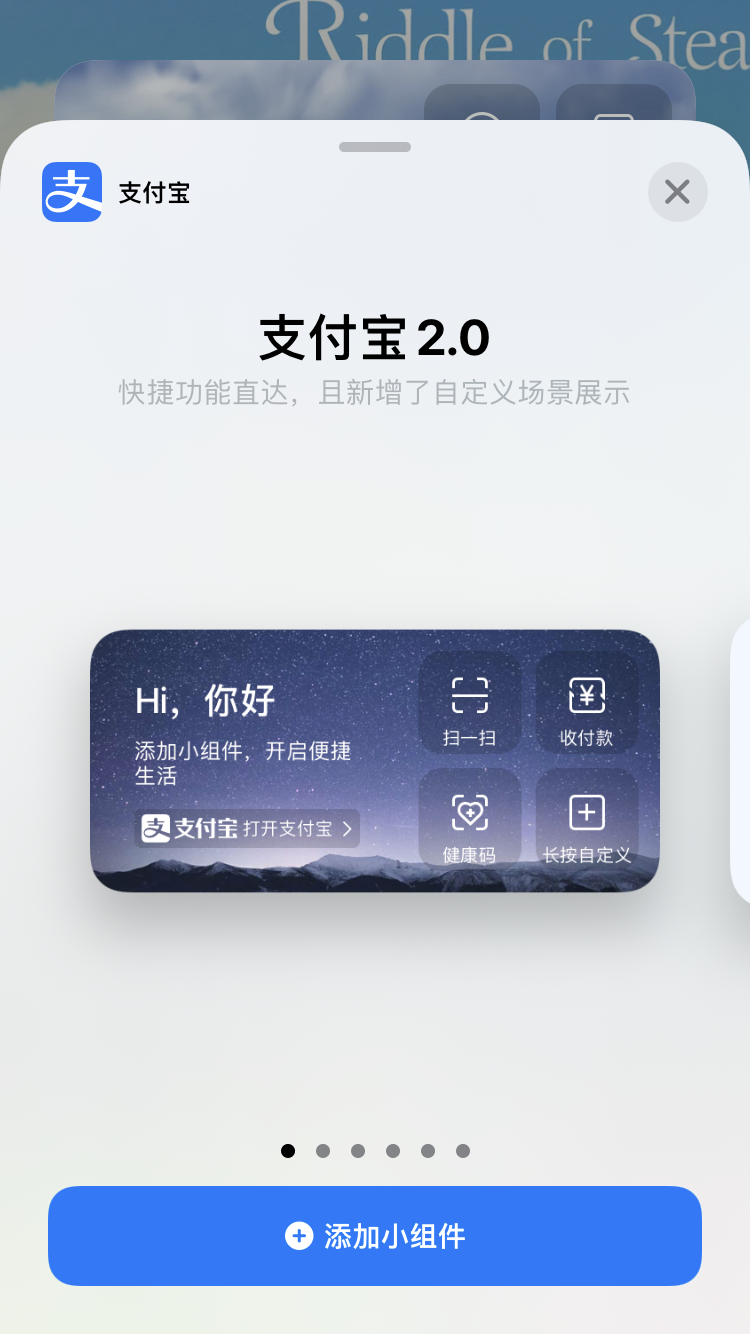
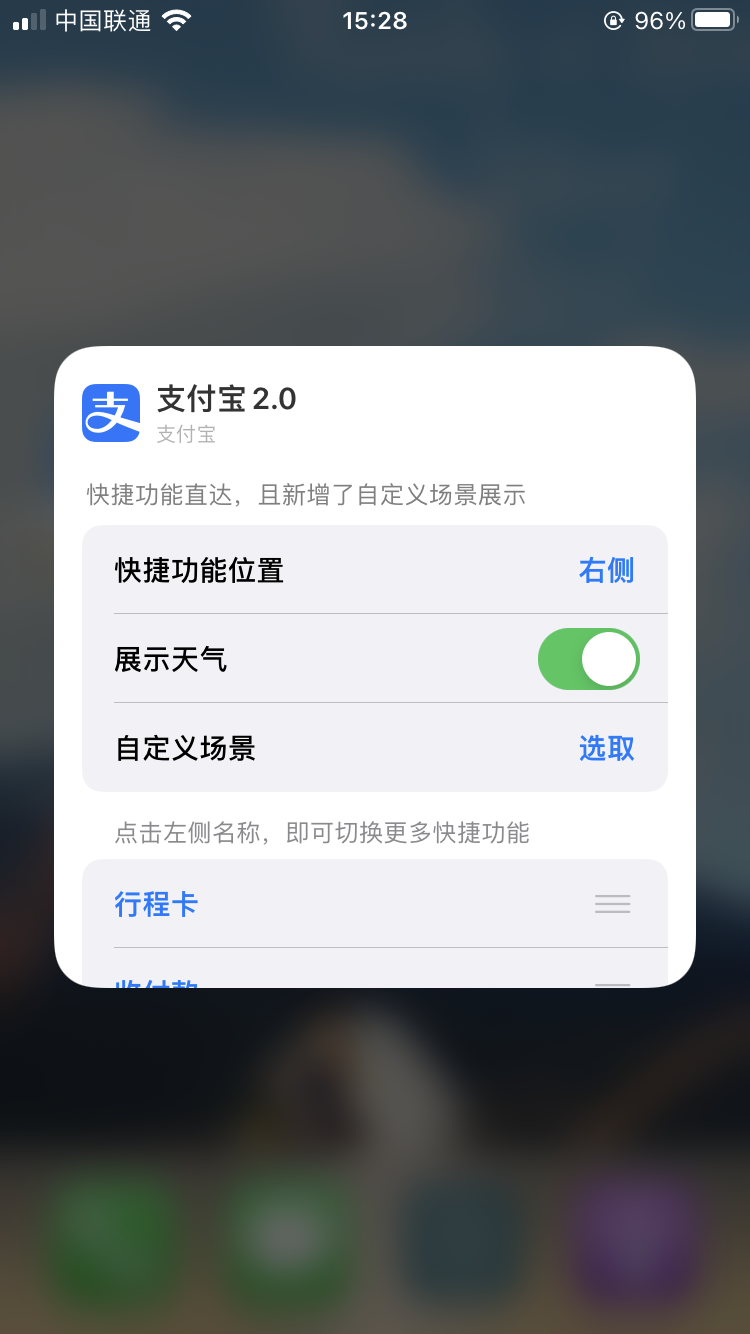
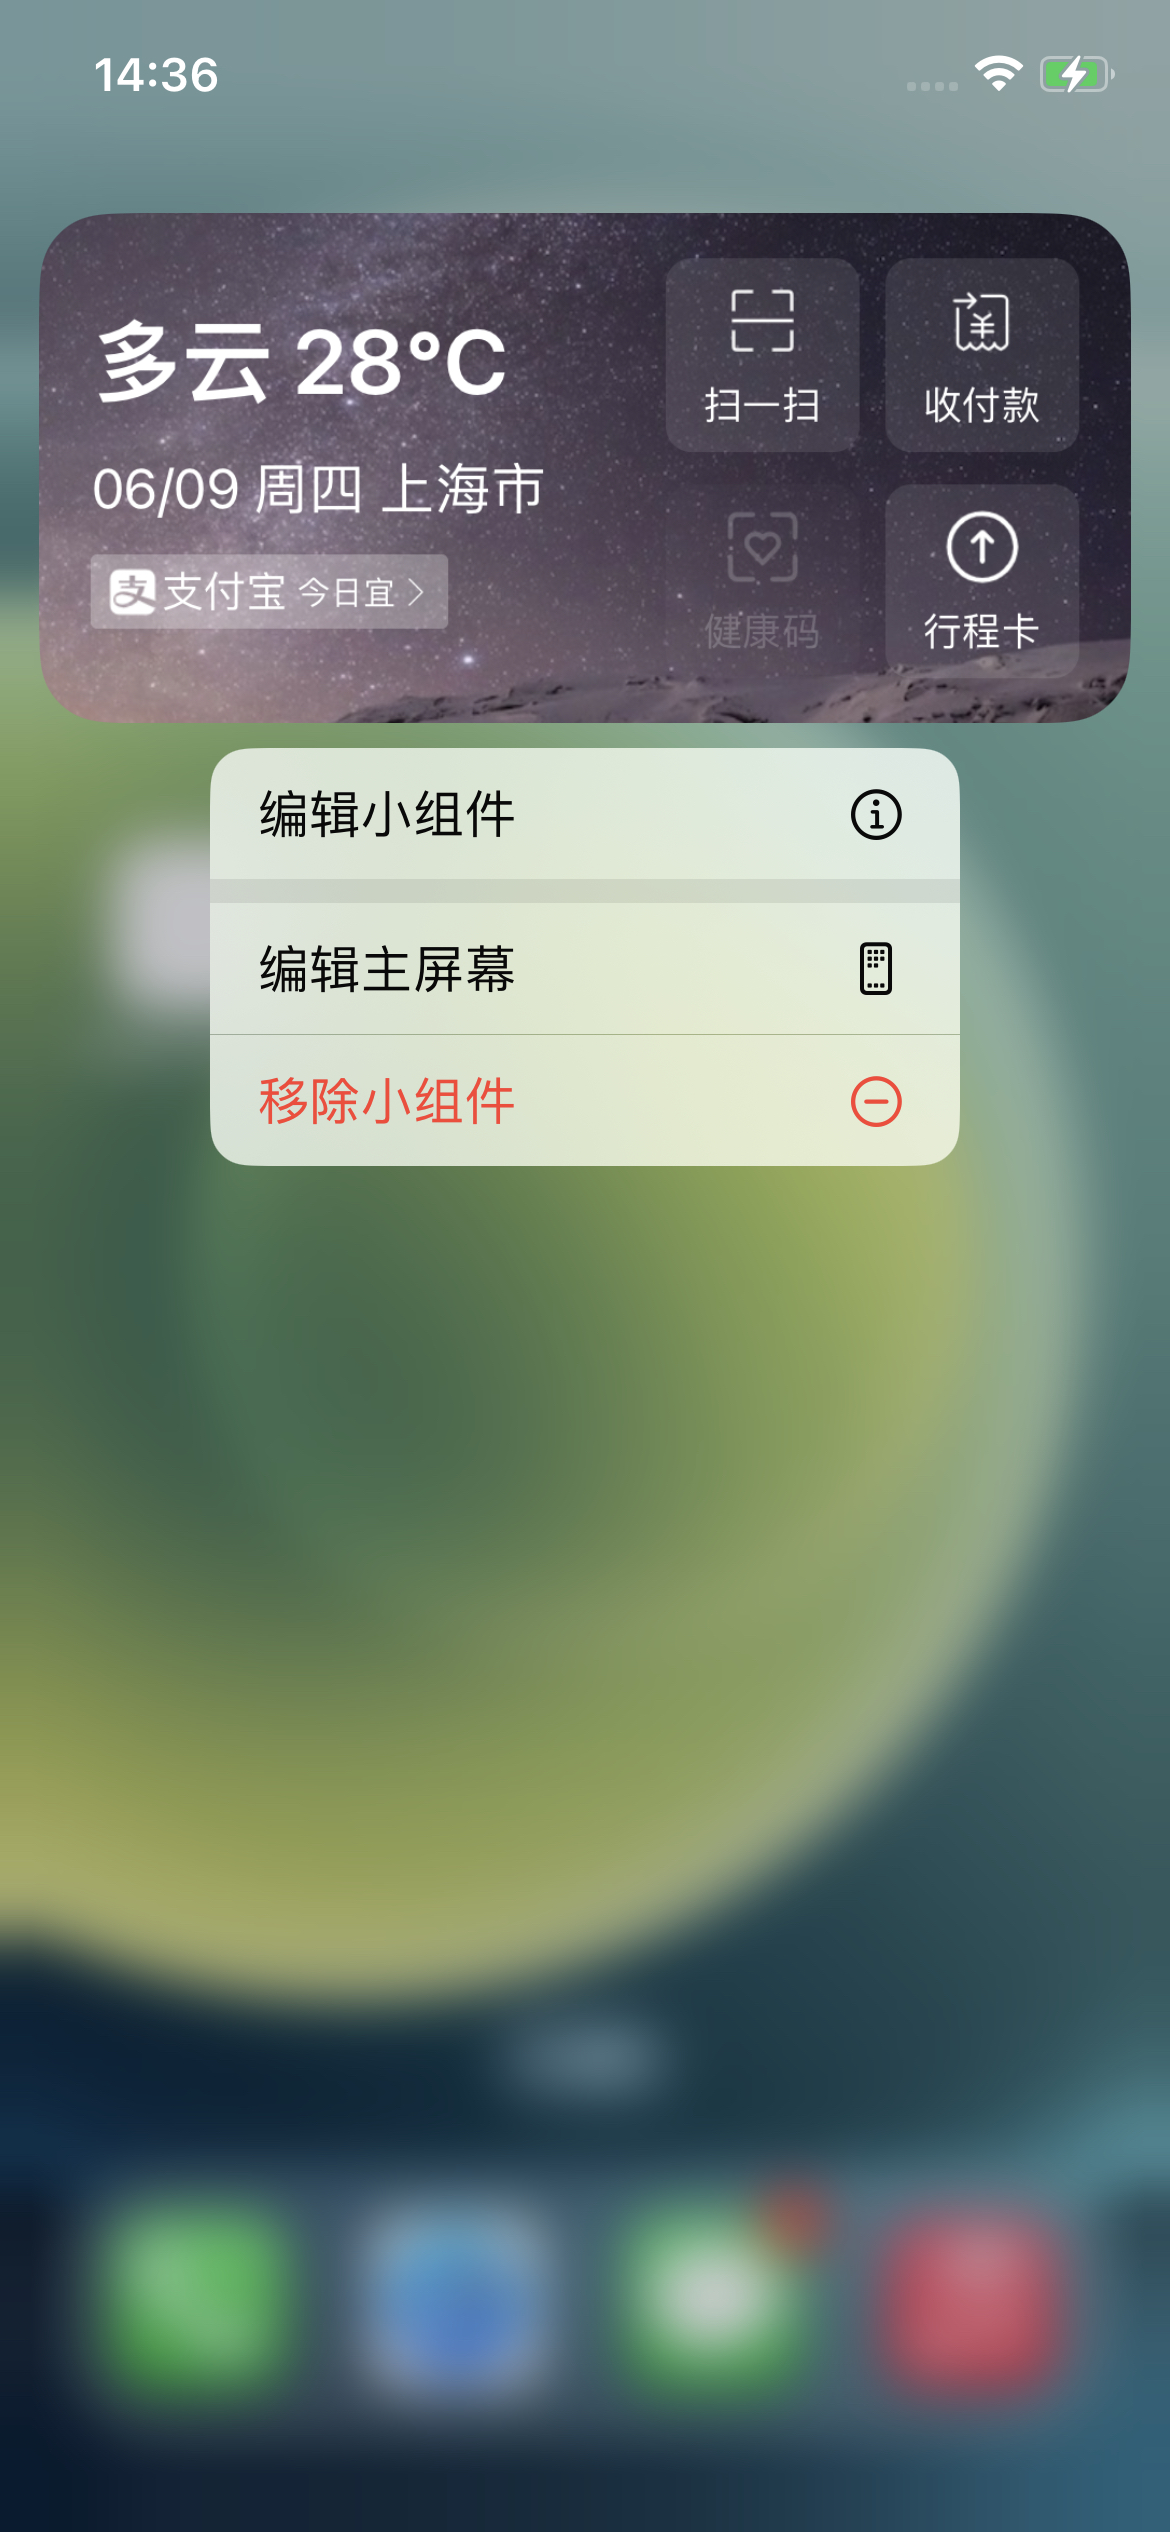
Static Intent Configuration 接着上面的来看,对比支付宝widget,可以看到支付宝widget长按后会出现编辑小组件的入口,而上面实现的没有,下面就来看下如何实现这个的显示。
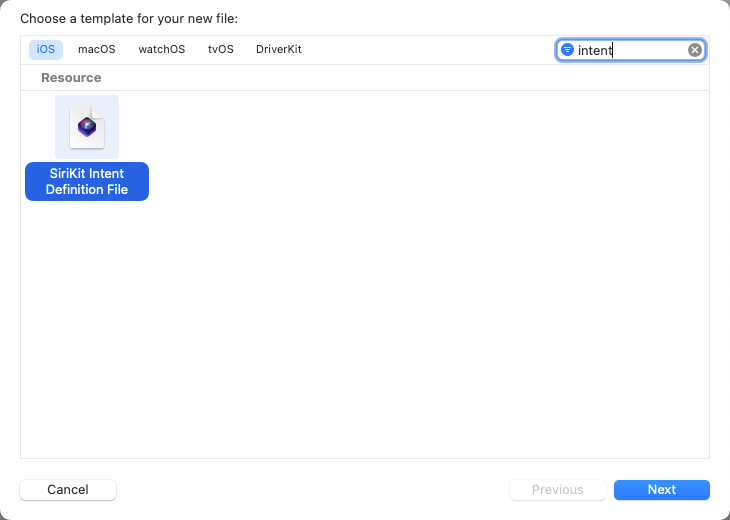
编辑小组件入口的出现,需要创建Intent,然后CMD+N新建,搜索intent,如下图,点击下一步
然后输入名字,需注意的是这里的target要主Target和Widget Target都要勾选,点击Create
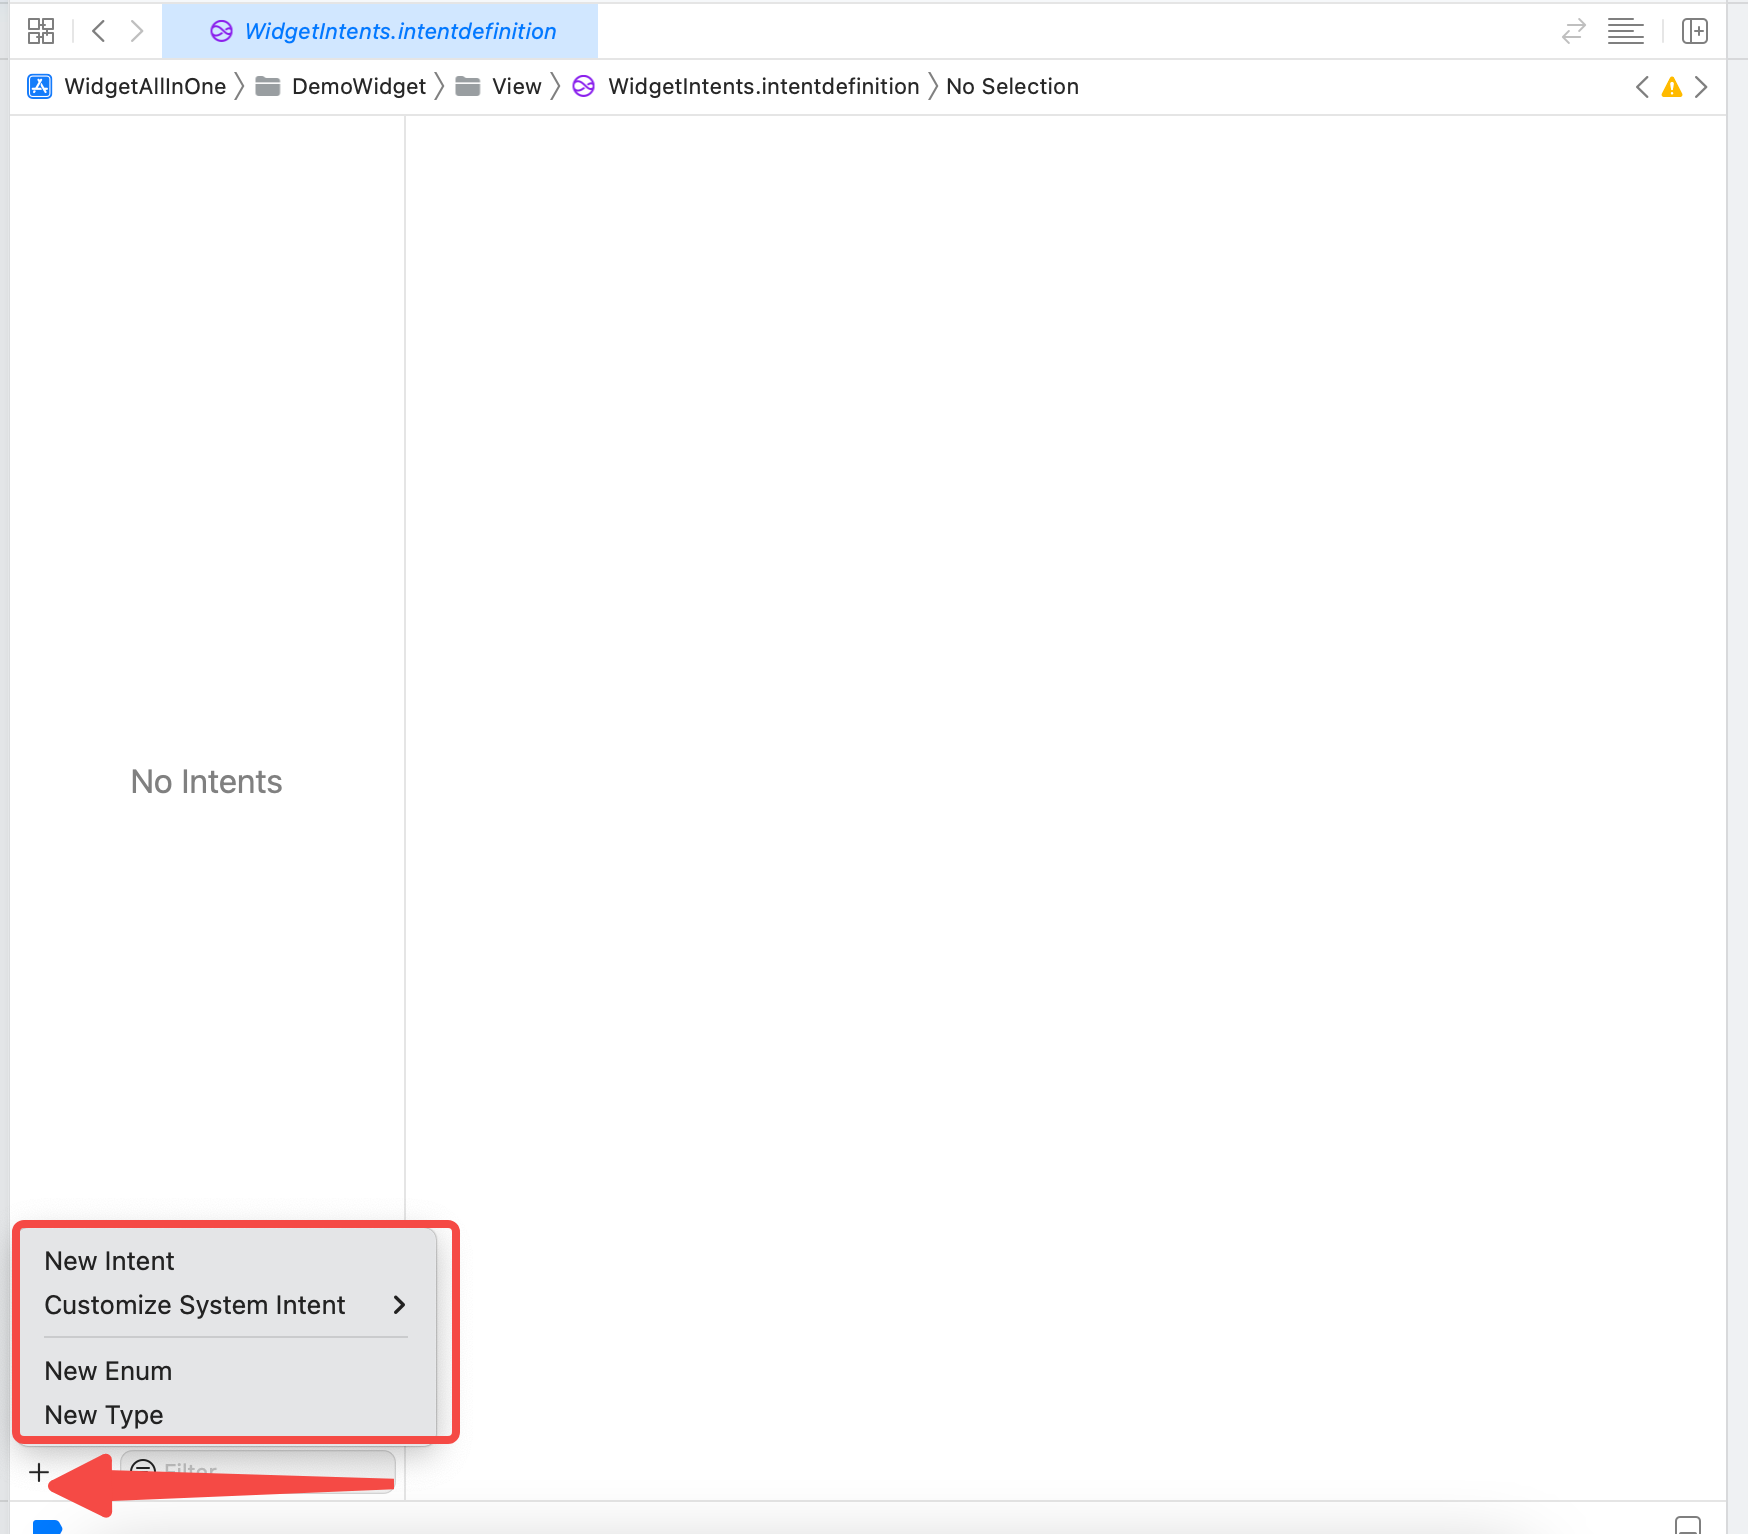
打开新建的WidgetIntents,里面目前是空白,点击左下角的+,如下图
可以看到,有4个按钮可供选择,分别是New Intent、Customize System Intent、New Enum、New Type。这里选择New Intent。
Ps: 几个入口中Customize System Intent不常用,New Intent几乎是必须要添加的;New Enum是新建一个枚举,这个枚举和代码中的枚举名字不能相同,所以使用时需要转换;New Type新建一个类,后面会有示范。
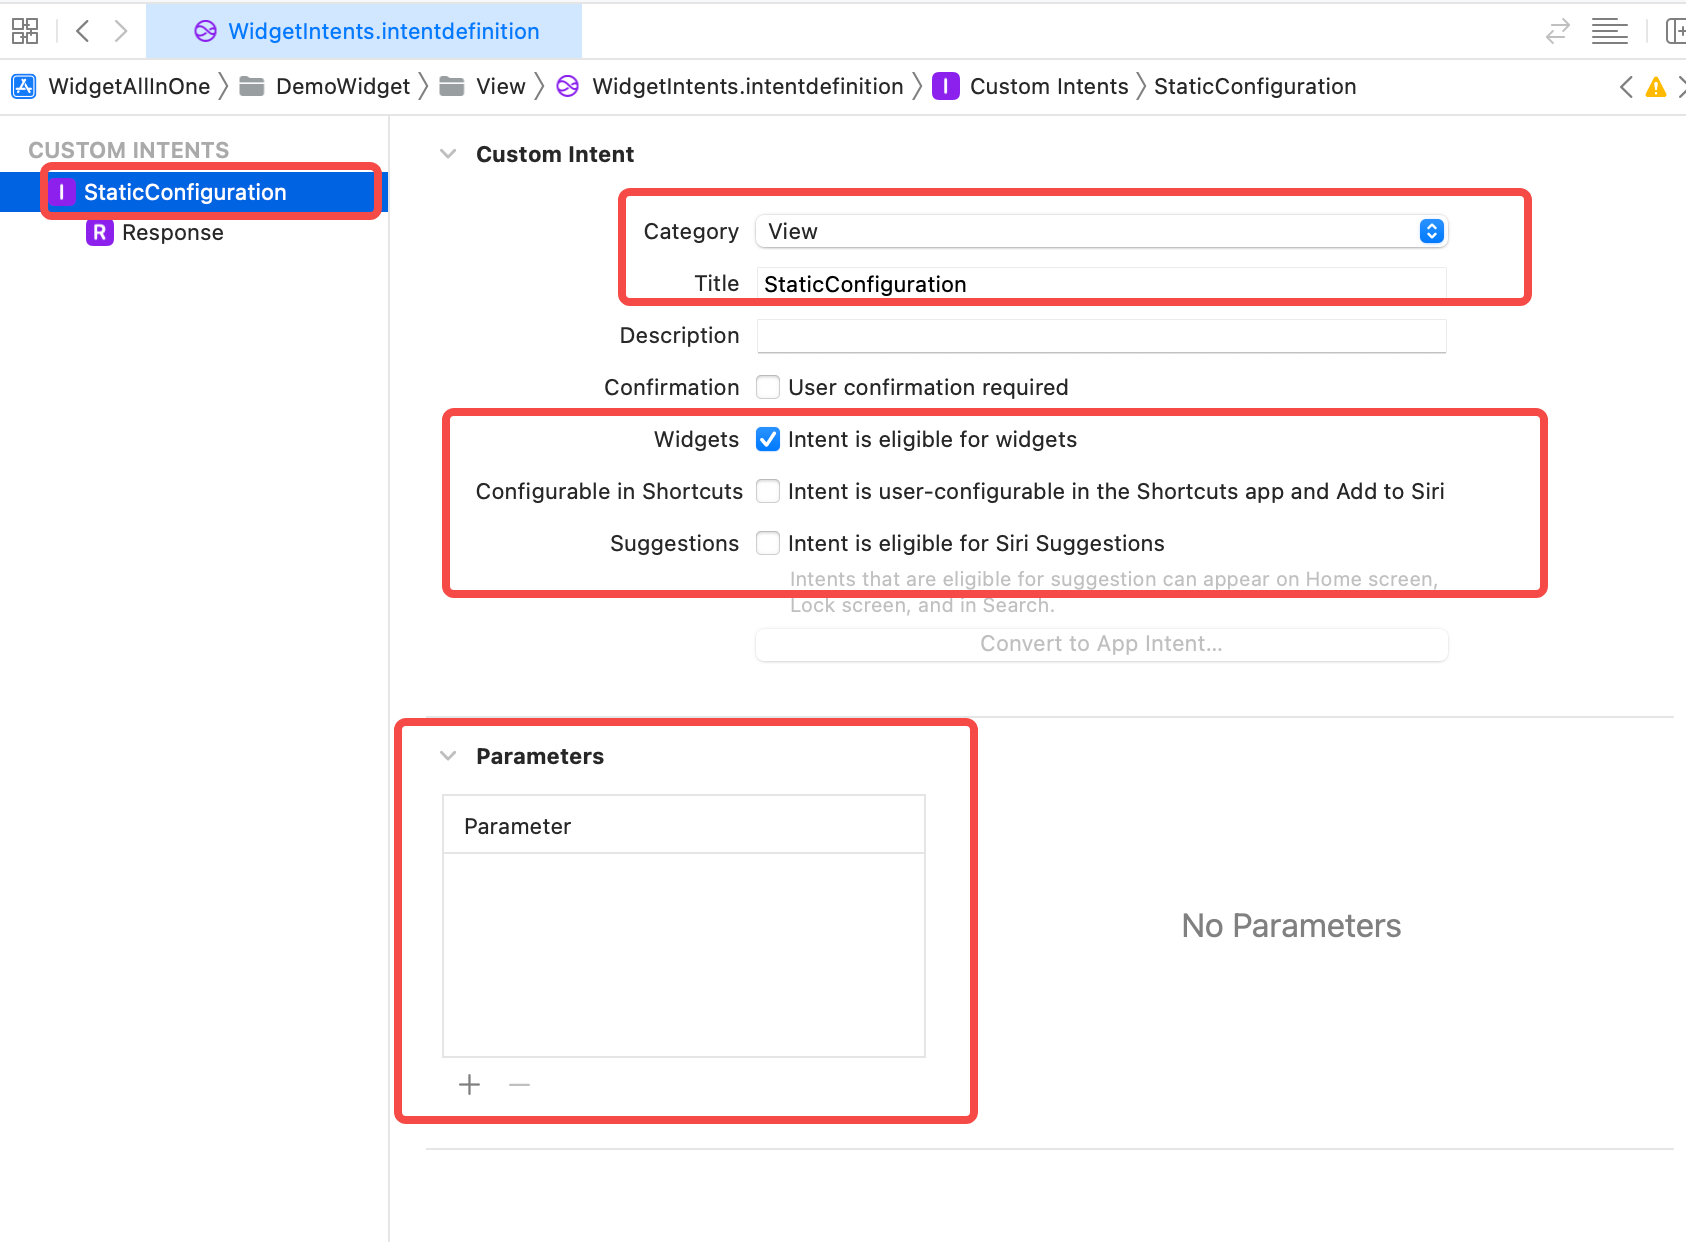
点击New Intent后,需要注意几个方面:
Intent的名字需要修改,因为默认为Intent,而项目中可能有不止一个Intent文件,所以需要修改命名,修改命名时要注意的是在项目中使用时,会自动在修改的名字后面添加Intent,比如修改为XXX,项目中使用时的名字是XXXIntent,所以要注意不要重复
然后是Intent的Category,这里修改为View,其他几个类型,感兴趣的可以一一尝试,下面的title也修改为文件的名字
再然后是下面内容的勾选,默认勾选了Configurable in Shortcuts和Suggestions,这里取消勾选这两个,改为勾选Widgets,意义很好理解。勾选的越多要设置的就越多,所以刚开始只需要勾选Widgets就够了,后面熟悉了,想要设置Siri建议或者快捷指令,再来勾选另外两个,尝试设置。
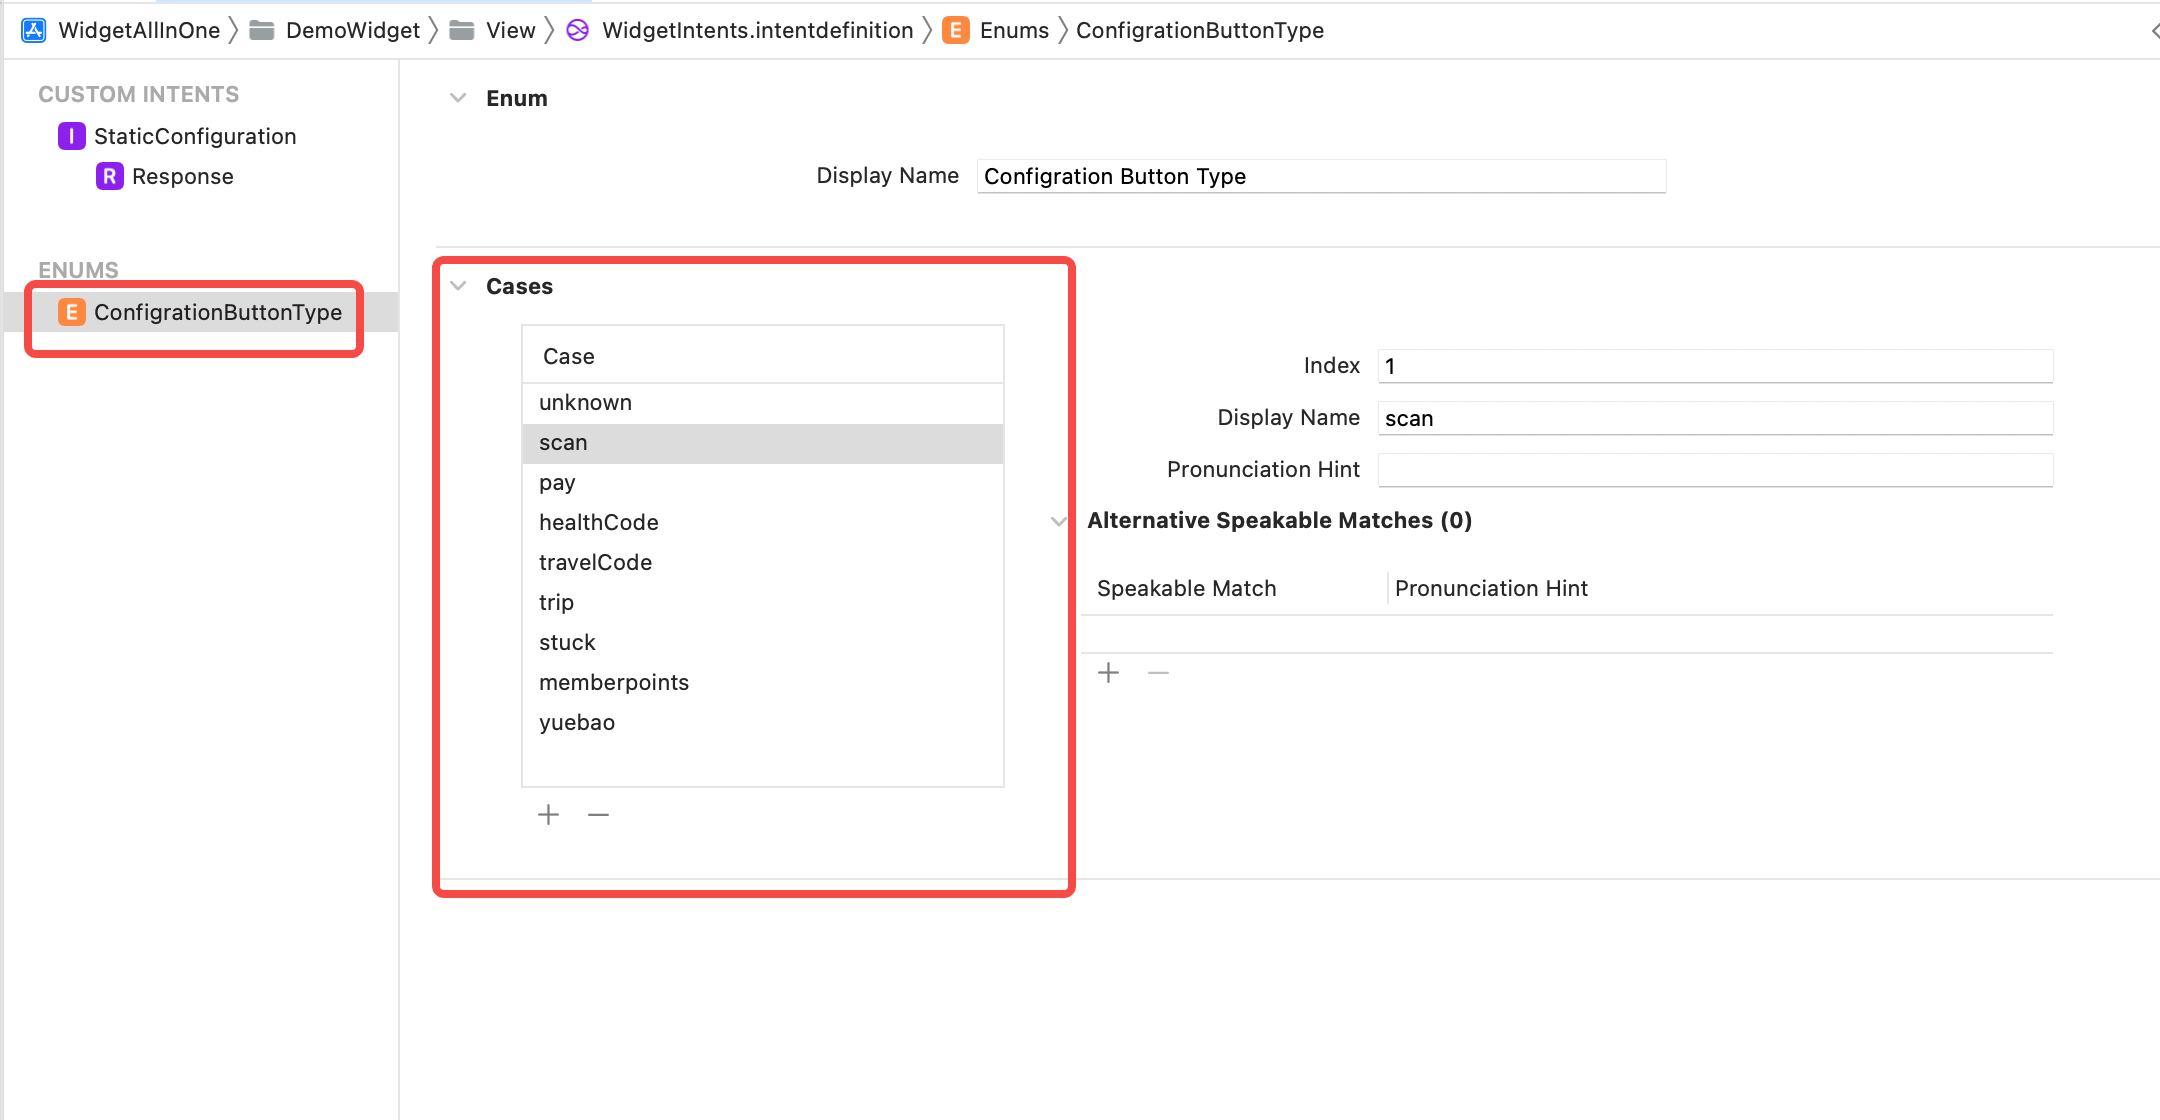
然后再来点击左下角的+,新增一个Enum,要注意的是Enum的类名不能和项目中Enum的名字一样,Enum是用来选择,点击编辑小组件后进行选择的,所以Enum中的内容是根据实际来定义的,添加case的displayName可以为中文,在这里就是和项目中ButtonType的内容一致,如下图。
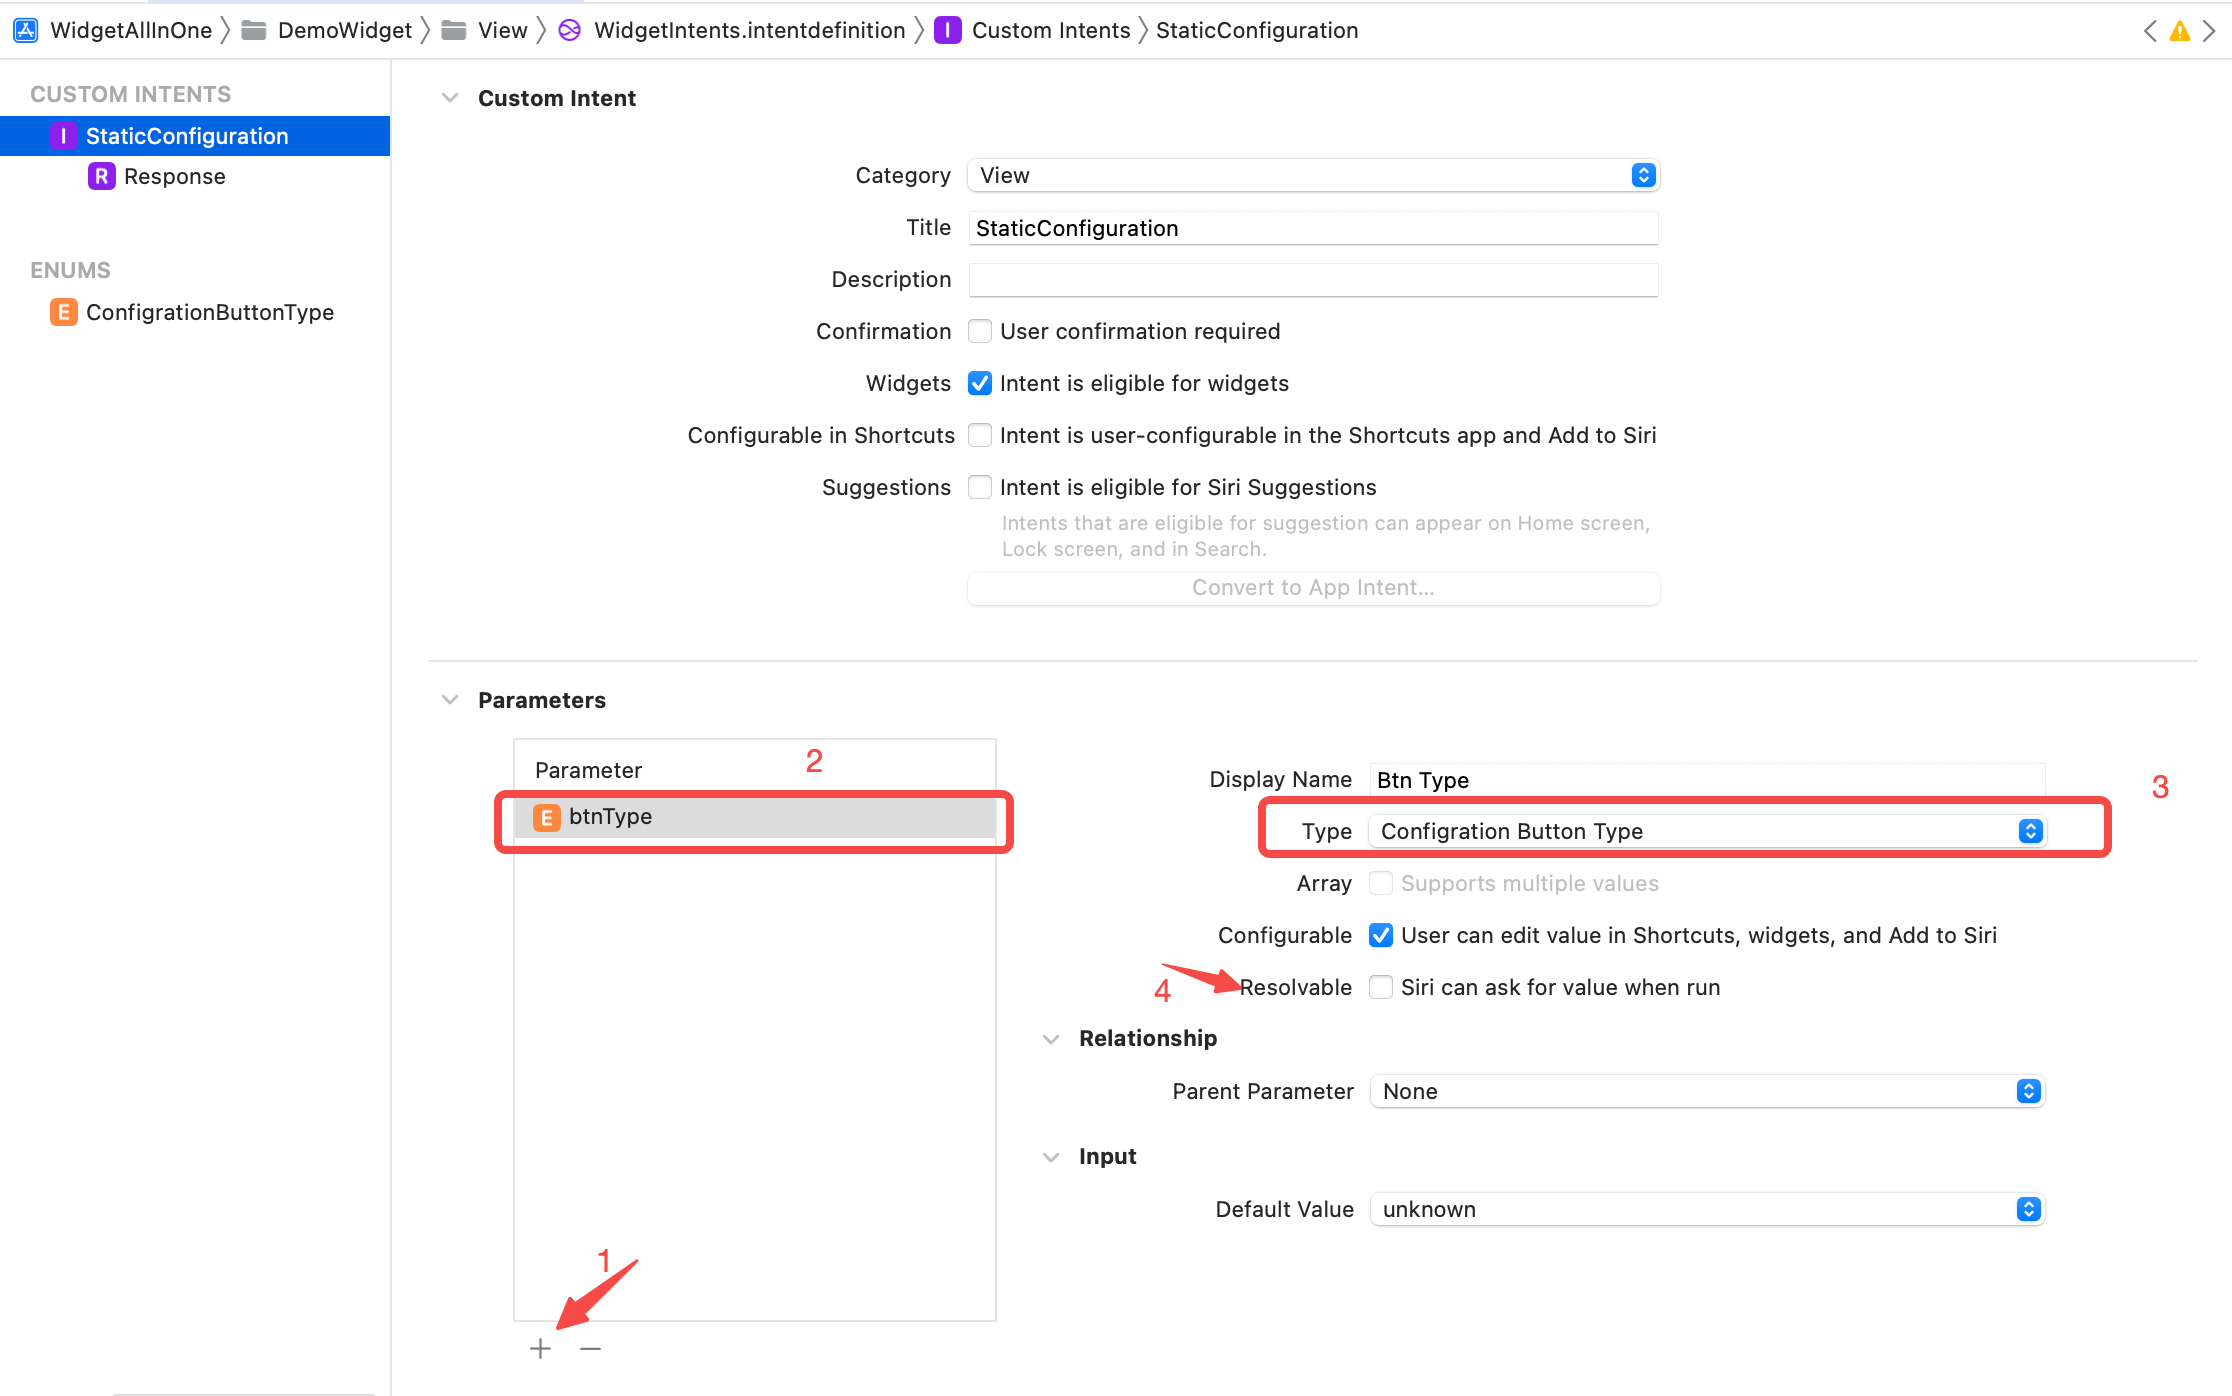
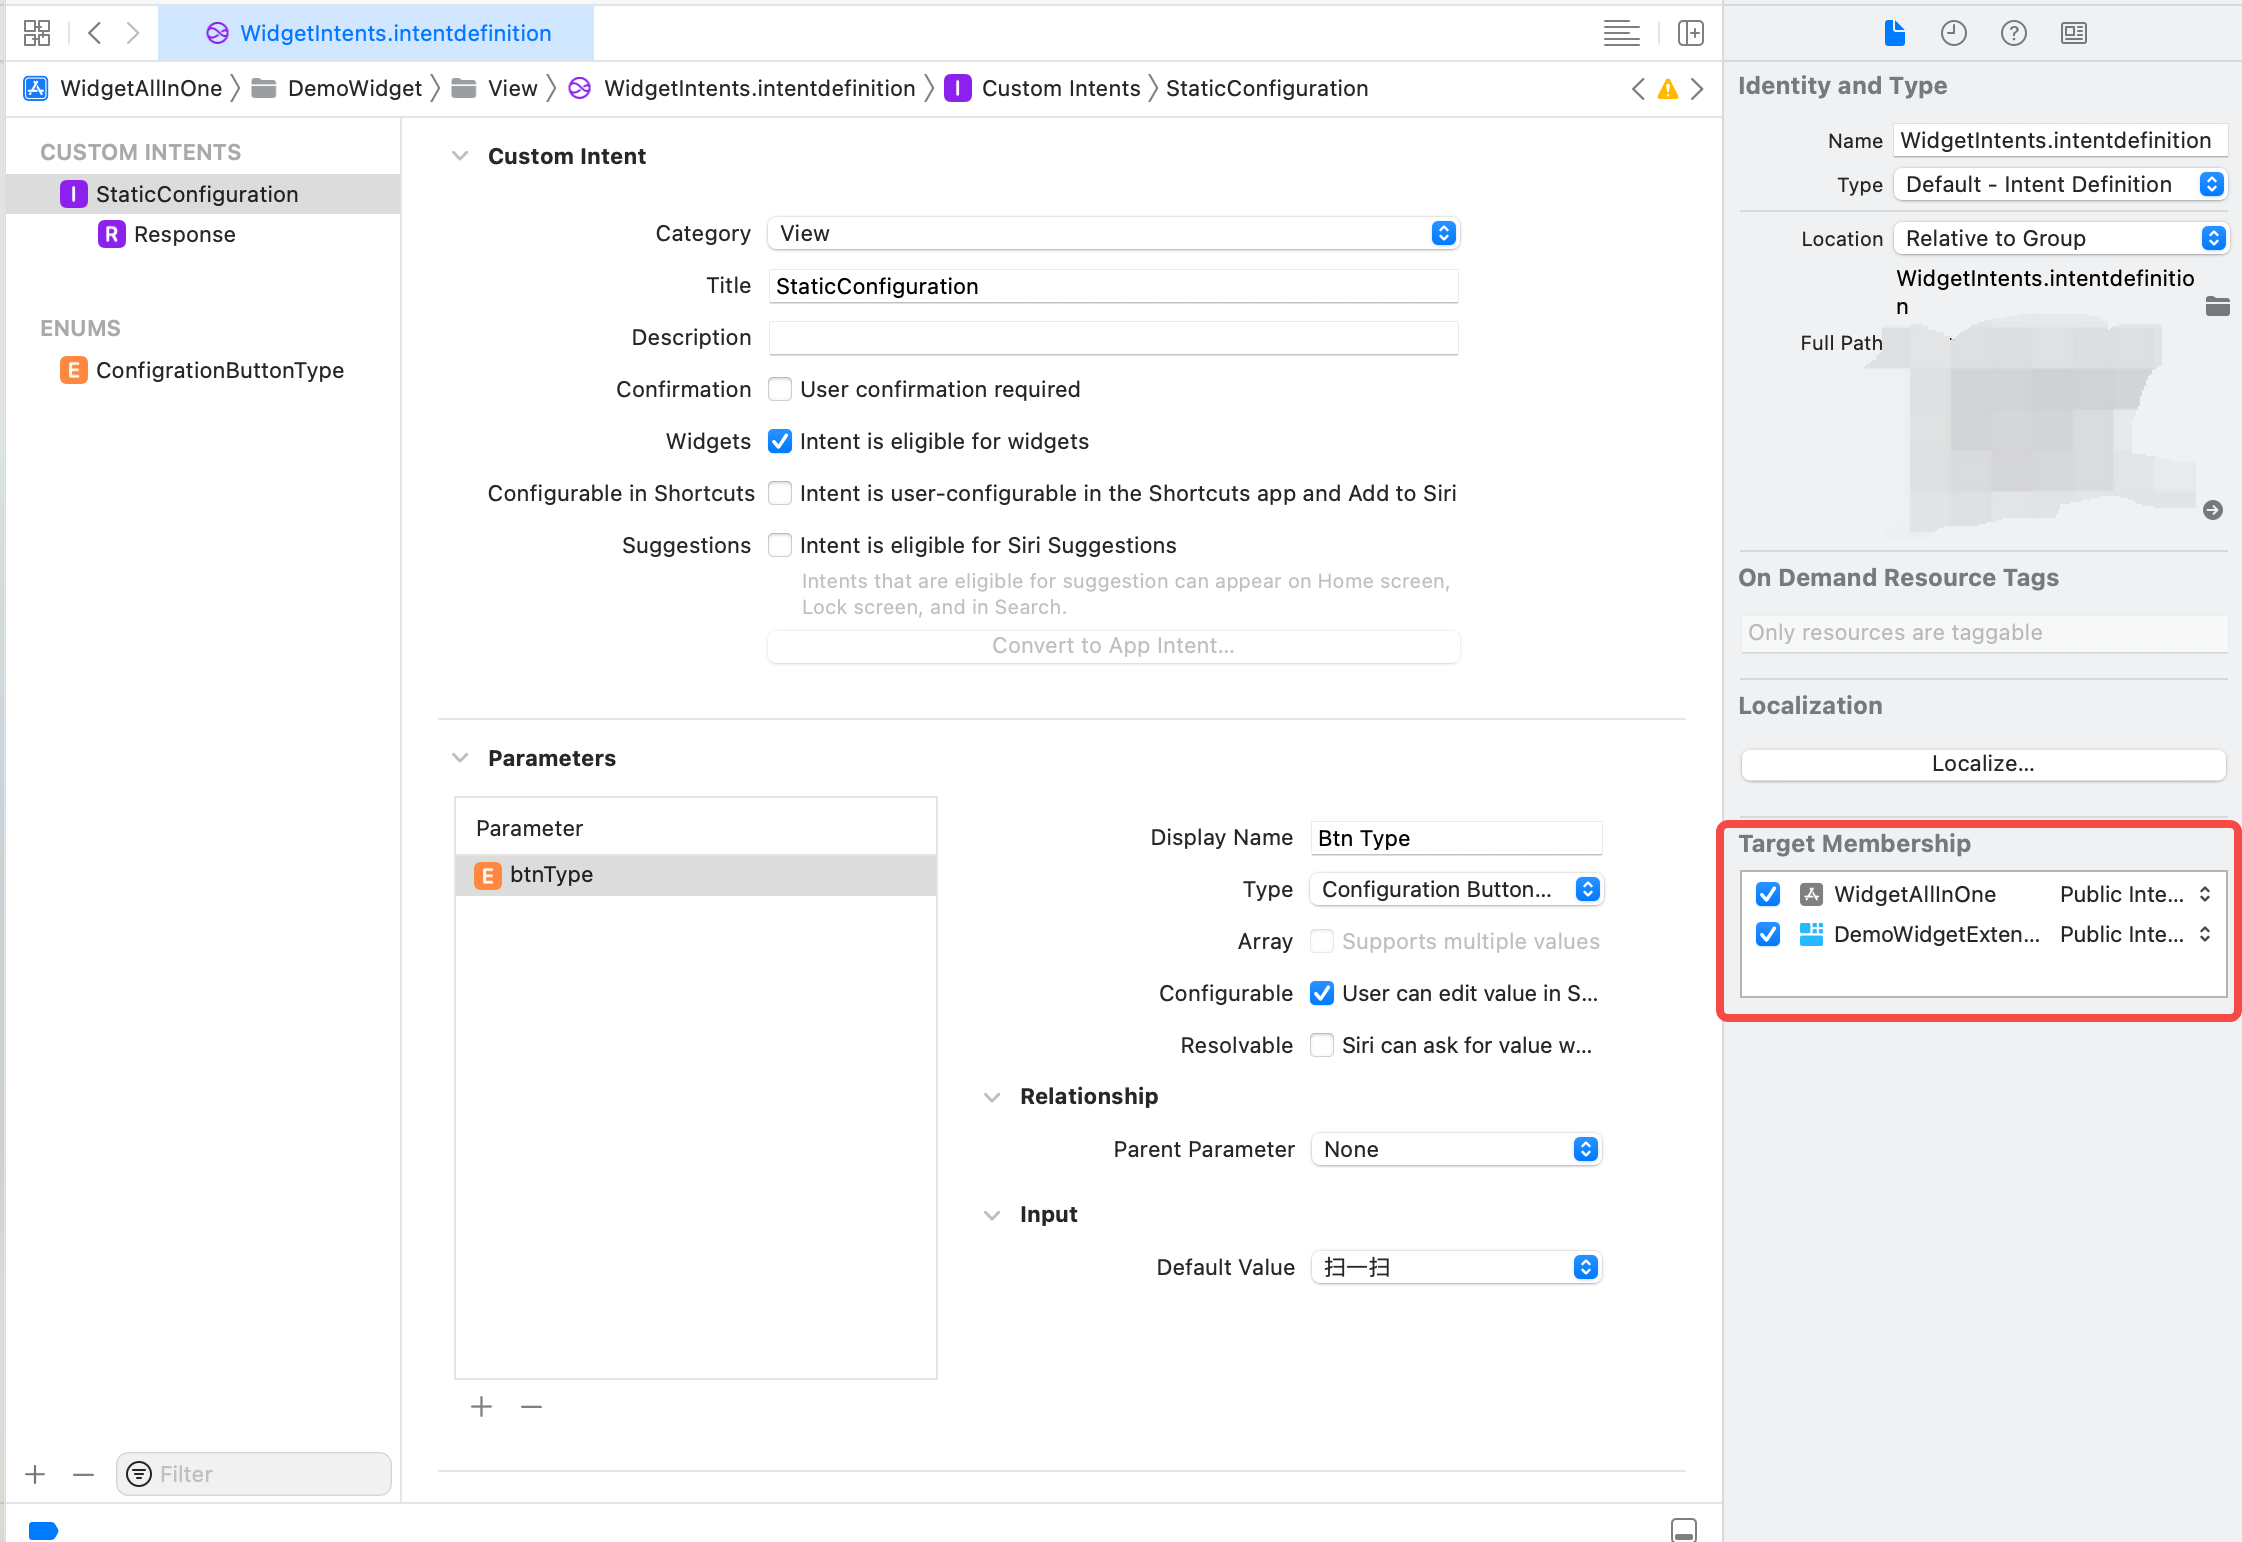
Enum新增好了之后,再点击刚刚创建的StaticConfiguration,在Parameter部分点击新增,然后命名为btnType,修改Type为创建的Enum类型,取消勾选Resolvable,如下:
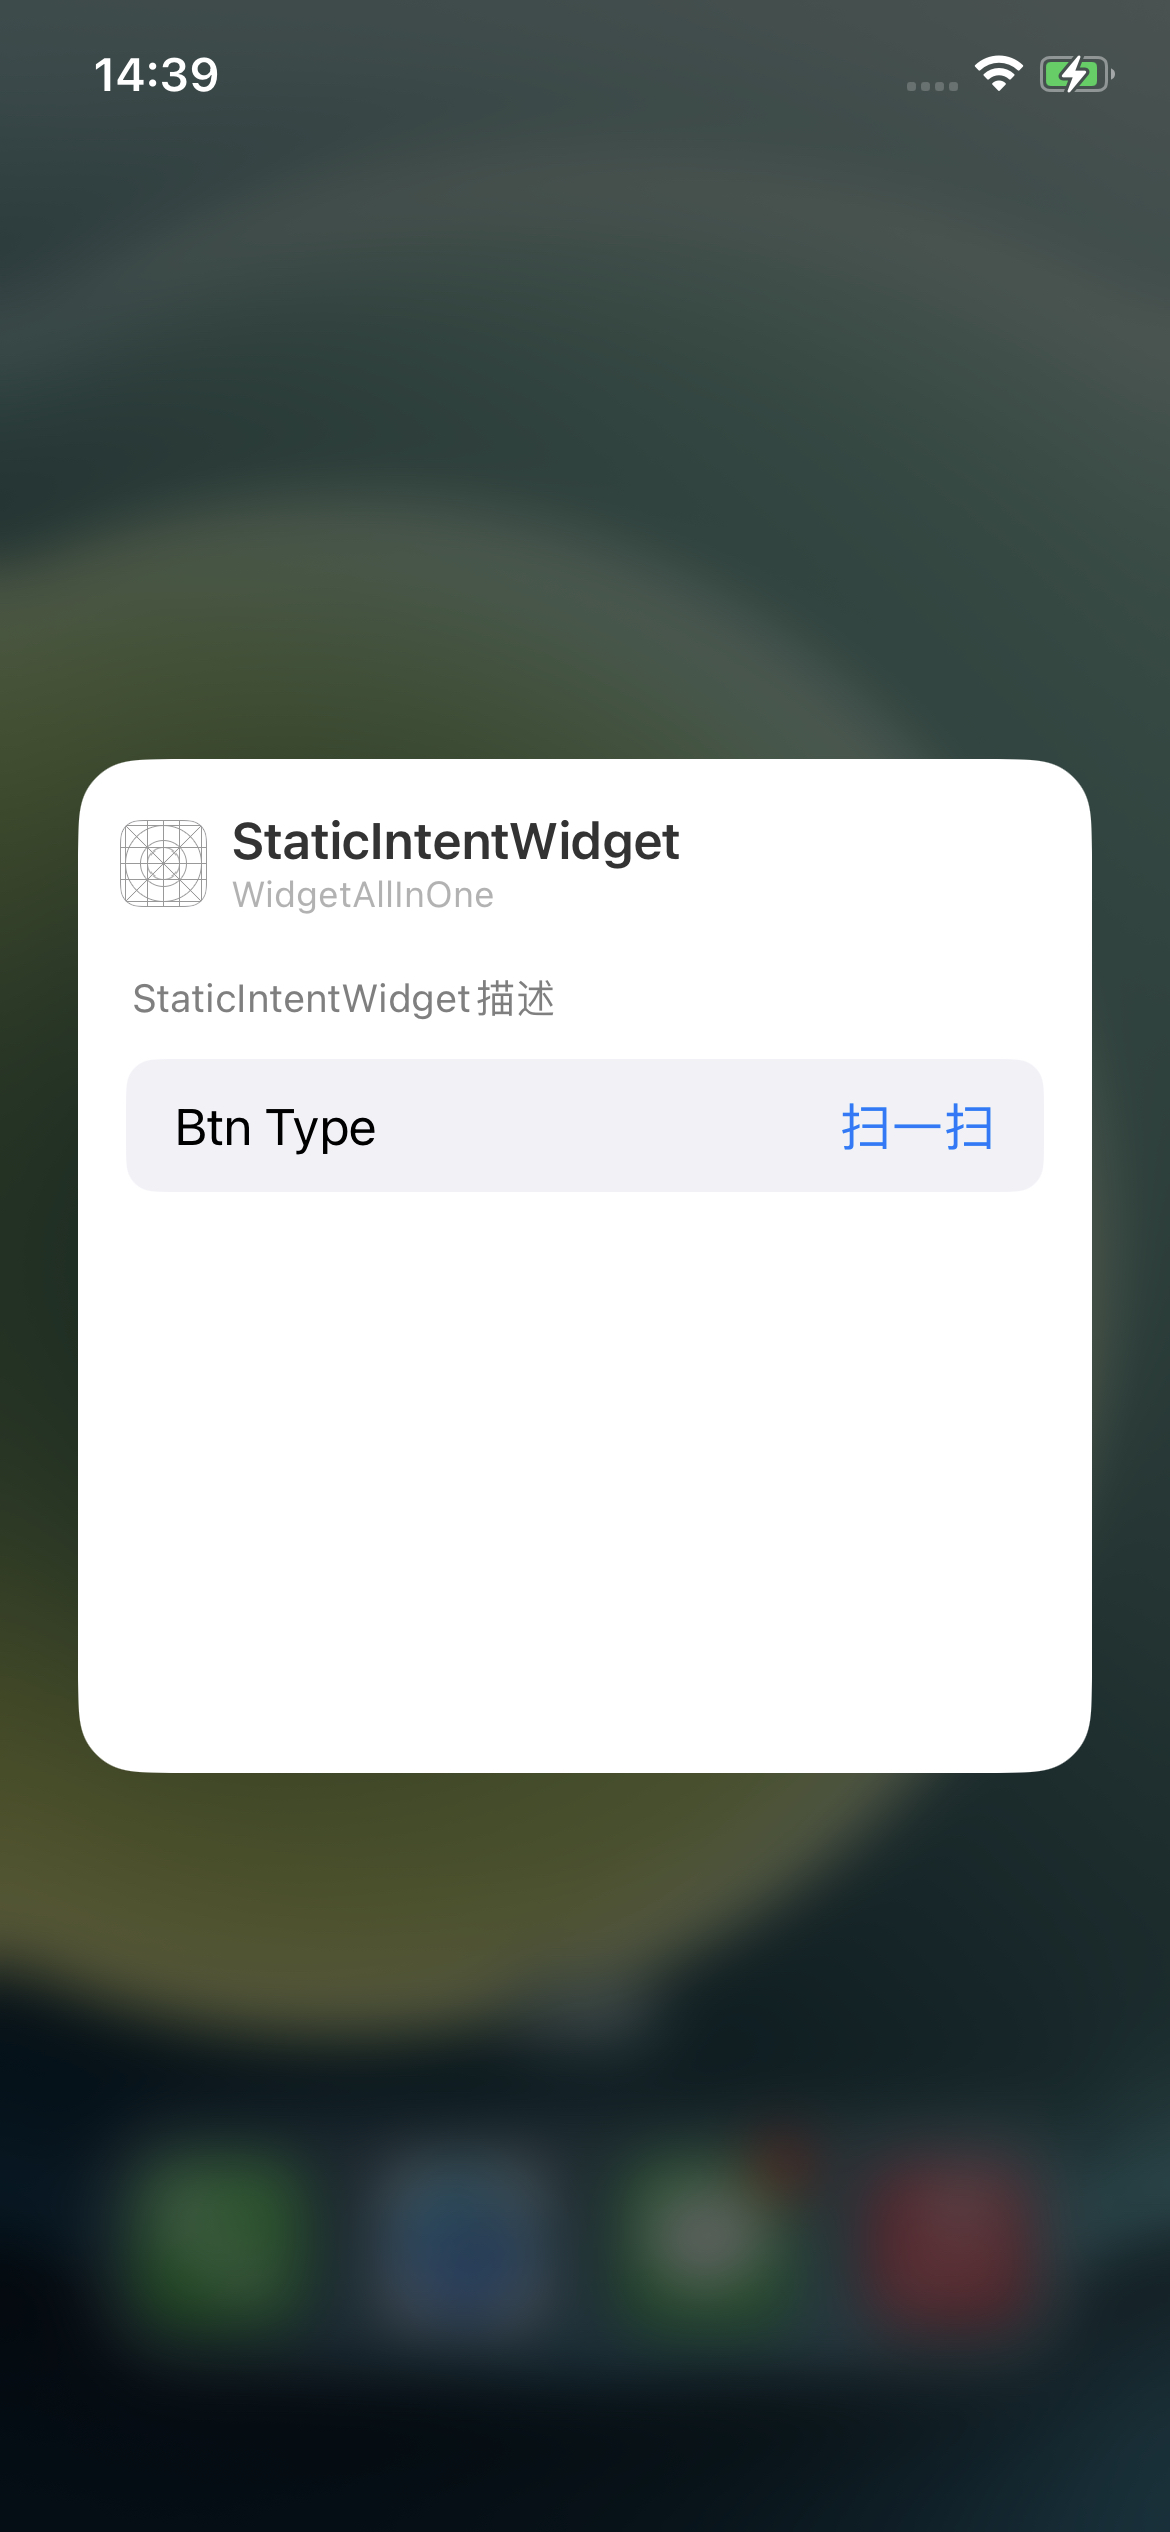
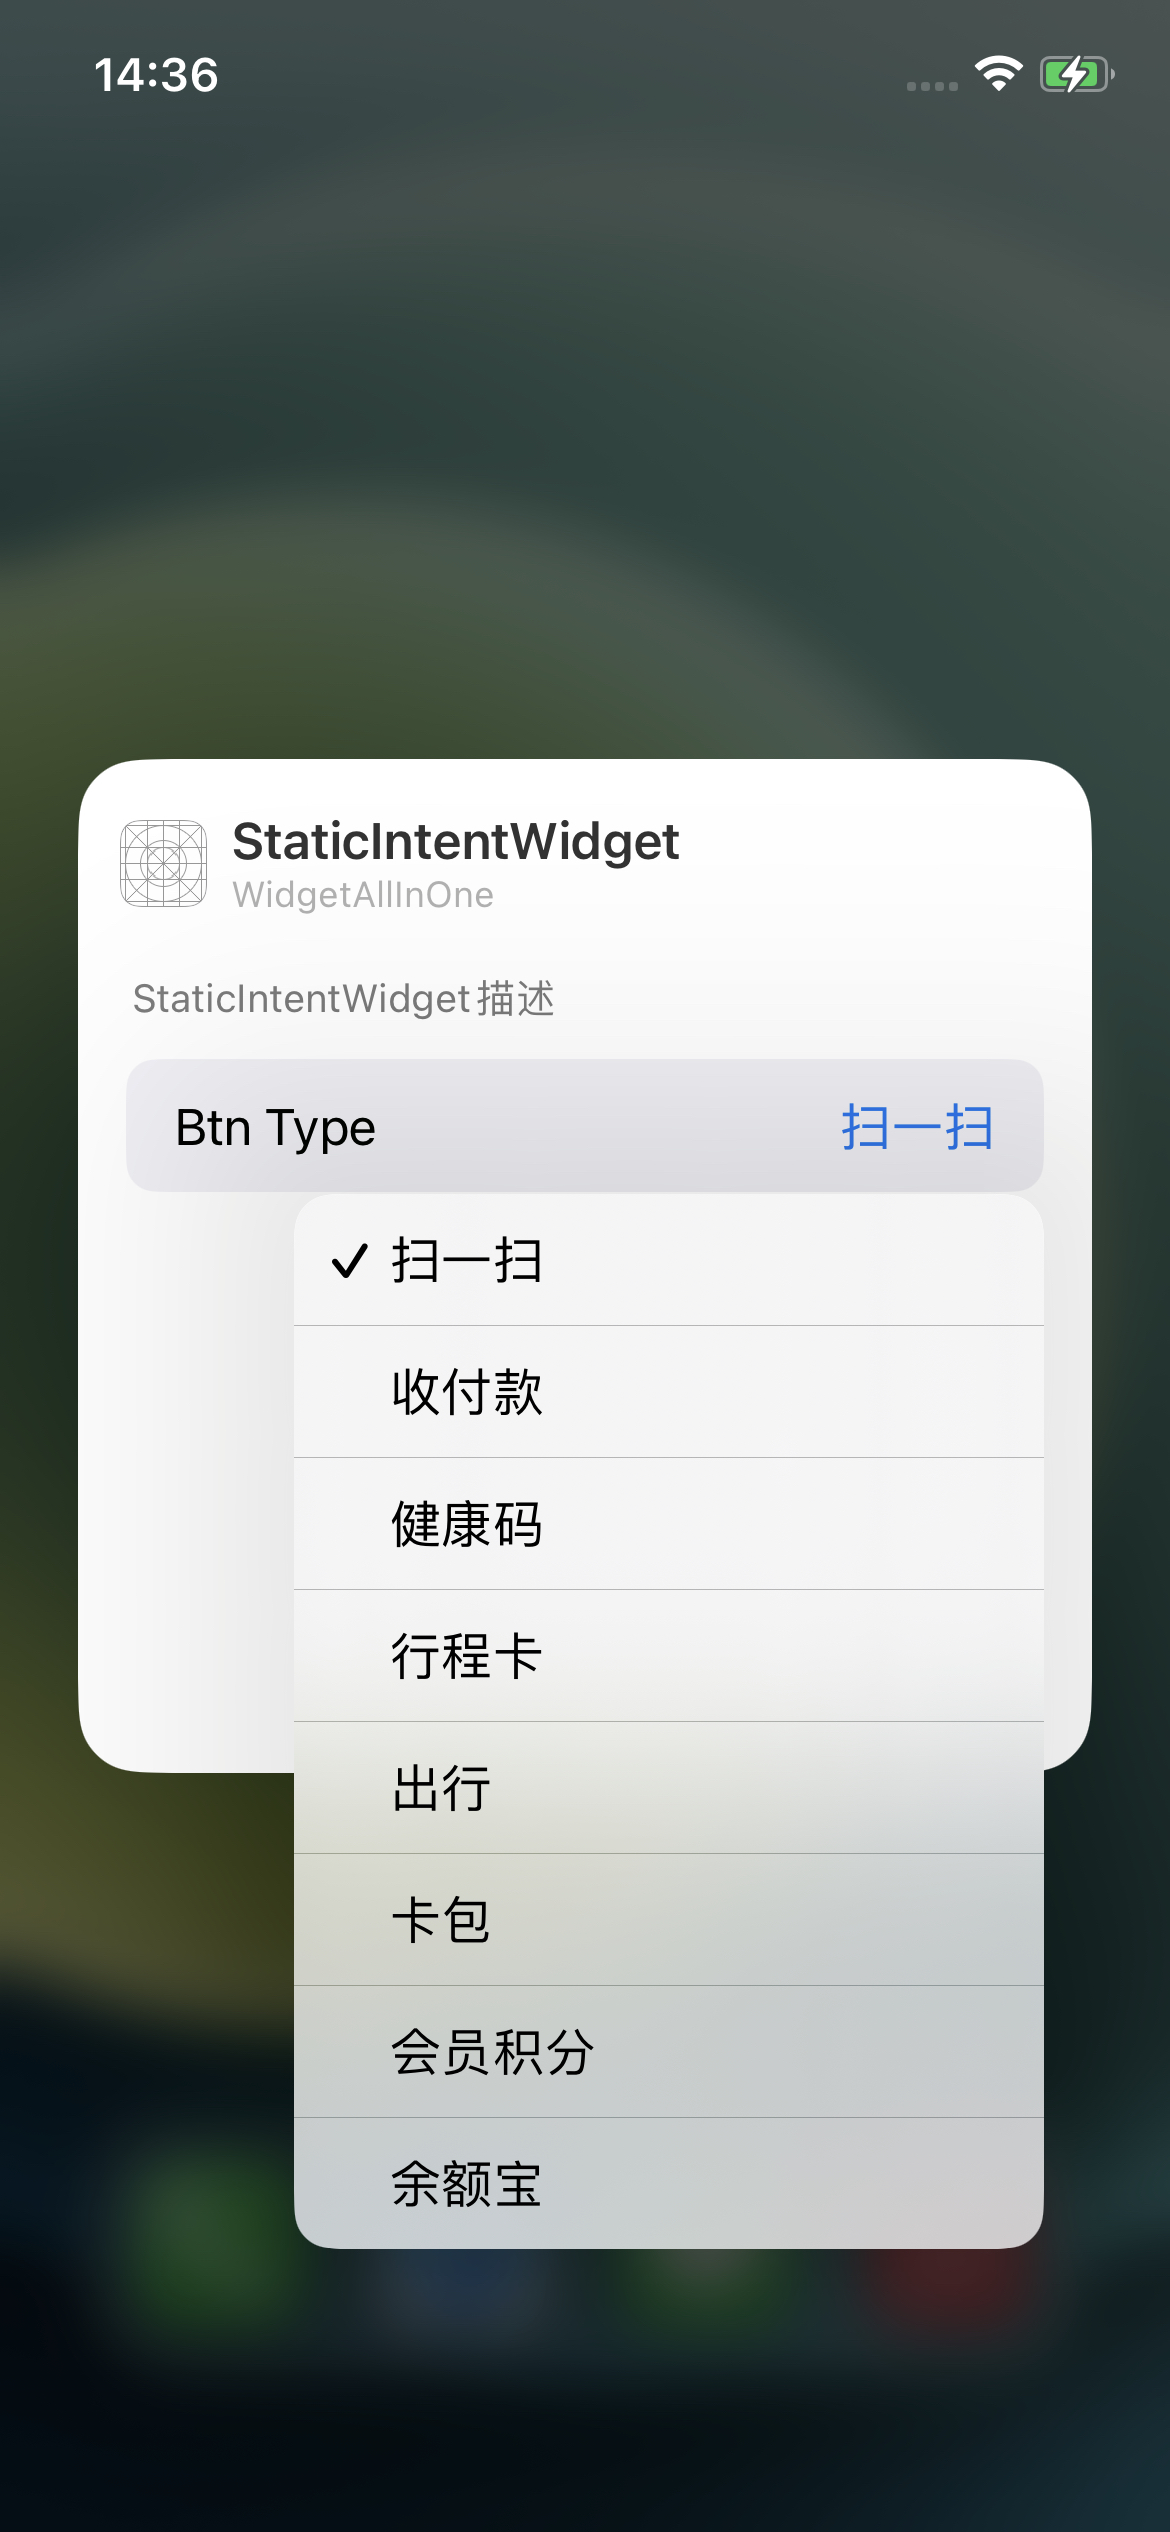
至此,Intent添加完成,运行,查看效果,发现,依旧没有编辑小组件入口,为啥呢?
虽然创建了Intent,但是并没有使用Intent的小组件,所以需要新增一个使用Intent的小组件,步骤如下:
新建StaticIntentWidgetProvider类,其中代码如下:
1 2 3 4 5 6 7 8 9 10 11 12 13 14 15 16 17 18 19 20 21 22 23 24 25 26 27 28 29 30 31 32 33 34 35 36 37 38 39 40 41 42 43 44 45 46 47 48 49 50 51 52 53 54 55 56 57 58 59 60 61 62 63 64 65 66 67 68 69 70 71 72 73 74 75 76 77 78 79 80 81 82 83 84 85 86 87 import Foundationimport WidgetKitimport SwiftUIstruct StaticIntentWidgetProvider : IntentTimelineProvider typealias Entry = StaticIntentWidgetEntry typealias Intent = StaticConfigurationIntent func buttonType (from configuration : Intent )ButtonType { switch configuration.btnType { case .scan: return .scan case .pay: return .pay case .healthCode: return .healthCode case .travelCode: return .travelCode case .trip: return .trip case .stuck: return .stuck case .memberpoints: return .memberpoints case .yuebao: return .yuebao case .unknown: return .unknown } } func placeholder (in context : Context )StaticIntentWidgetEntry { StaticIntentWidgetEntry (date: Date ()) } func getSnapshot (for configuration : StaticConfigurationIntent , in context : Context , completion : @escaping (StaticIntentWidgetEntry ) -> Void ) let buttonType = buttonType(from: configuration) let entry = StaticIntentWidgetEntry (date: Date ()) completion(entry) } func getTimeline (for configuration : StaticConfigurationIntent , in context : Context , completion : @escaping (Timeline <StaticIntentWidgetEntry >) -> Void ) let entry = StaticIntentWidgetEntry (date: Date ()) let expireDate = Calendar .current.date(byAdding: .hour, value: 2 , to: Date ()) ?? Date () let timeline = Timeline (entries: [entry], policy: .after(expireDate)) completion(timeline) } } struct StaticIntentWidgetEntry : TimelineEntry let date: Date } struct StaticIntentWidgetEntryView : View var entry: StaticIntentWidgetProvider .Entry let mediumItem = AliPayWidgetMediumItem () var body: some View { AlipayWidgetMeidumView (mediumItem: mediumItem) } } struct StaticIntentWidget : Widget let kind: String = "StaticIntentWidget" var title: String = "StaticIntentWidget" var desc: String = "StaticIntentWidget描述" var body: some WidgetConfiguration { IntentConfiguration (kind: kind, intent: StaticConfigurationIntent .self , provider: StaticIntentWidgetProvider ()) { entry in StaticIntentWidgetEntryView (entry: entry) } .configurationDisplayName(title) .description(desc) .supportedFamilies([.systemMedium]) } }
在WidgetBundle中添加显示,如下:
1 2 3 4 5 6 7 8 9 10 11 12 import SwiftUIimport WidgetKit@main struct WidgetBundleDemo : WidgetBundle @WidgetBundleBuilder var body: some Widget { StaticIntentWidget () } }
运行查看效果如下:
备注:
如果运行后,出现了编辑小组件,但是点击后,编辑界面为空,没有显示上面步骤二和三的图片,可以查看Intent是否勾选到主项目,如下:
Dynamic Intent Configuration 继续对比支付宝的Widget,可以看到上面的实现的Static Intent Configuration样式和支付宝的并不相同,支付宝的展示了多个,且每个点击选择的样式也和上面实现的样式不同,所以是怎么实现的呢?
答案是Dynamic Intent Configuration,接着往下看:
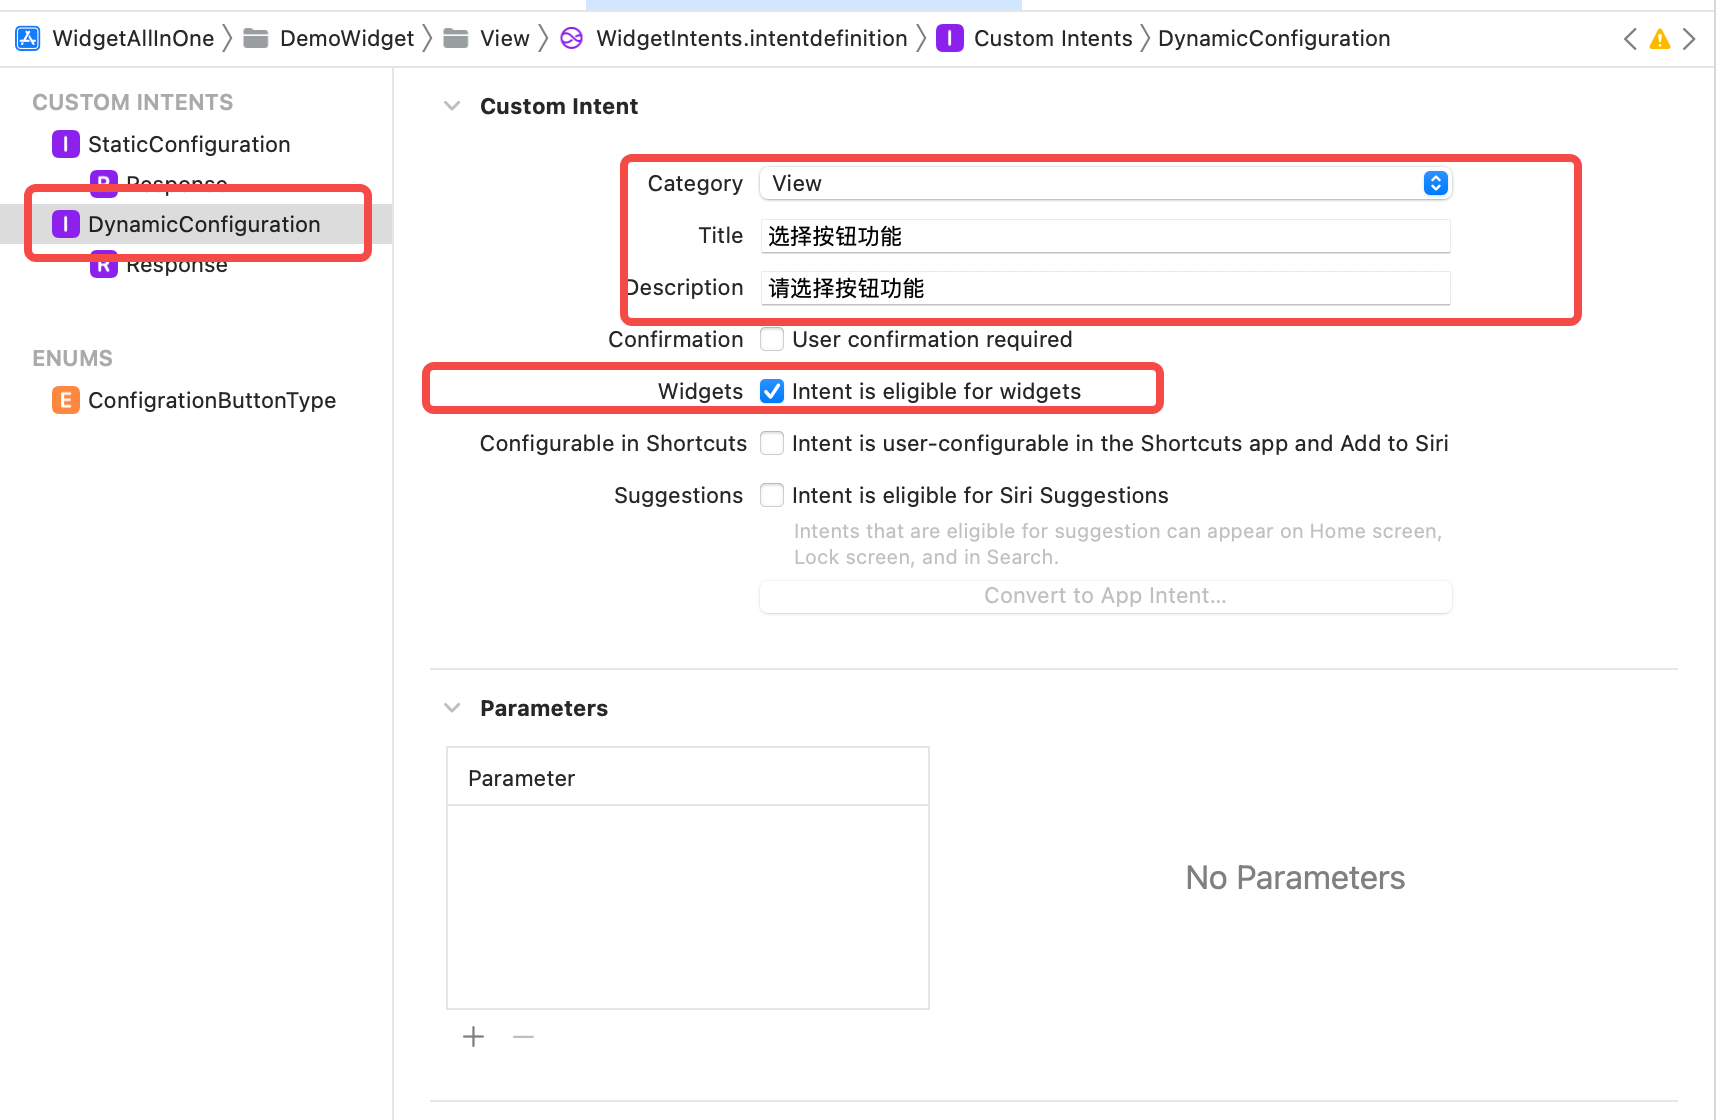
选中Intent,点击添加New Intent,命名为DynamicConfiguration,修改Category为View,勾选Widgets,取消勾选Configurable in Shortcuts和Suggestions,如下:
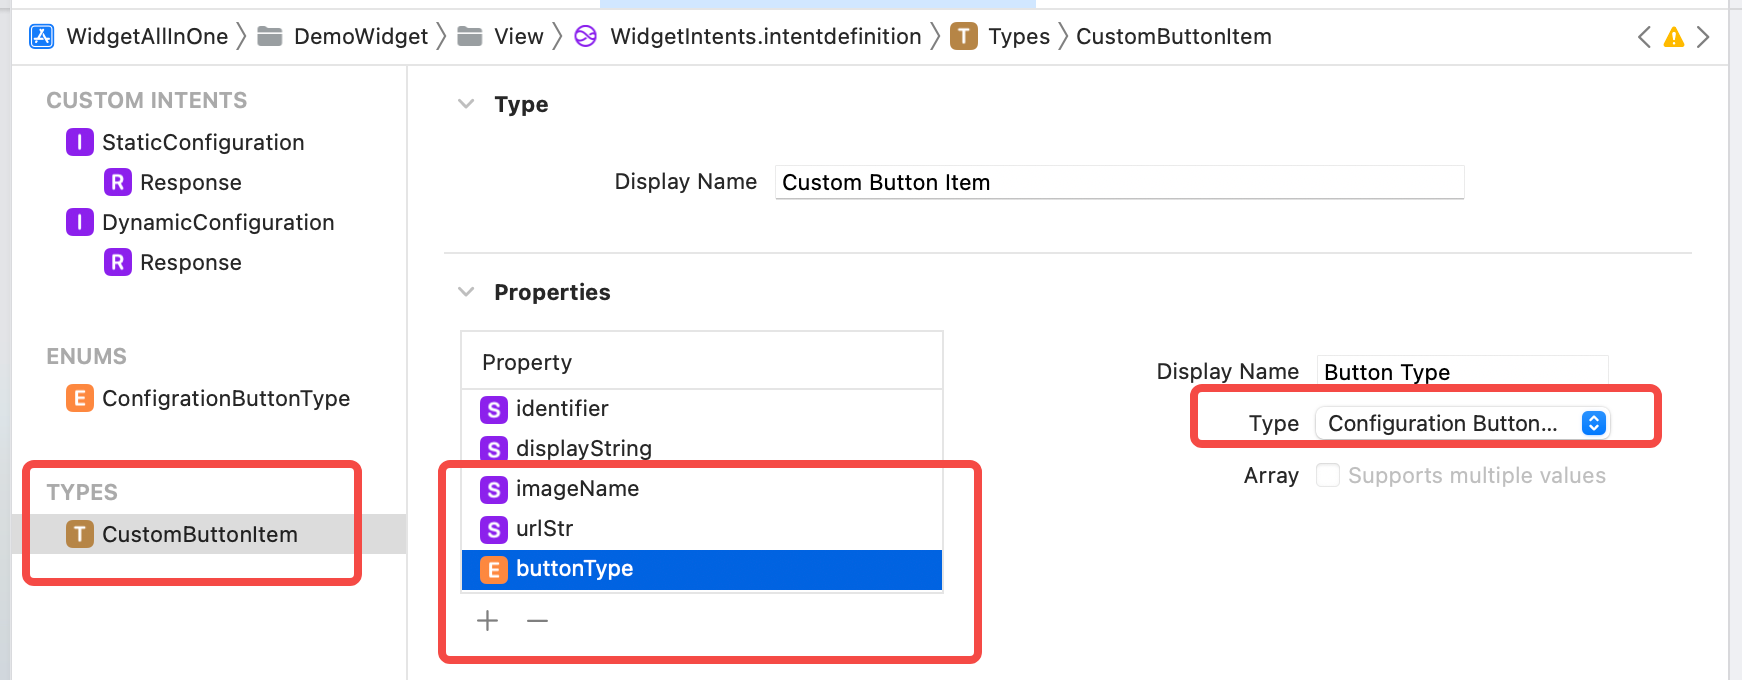
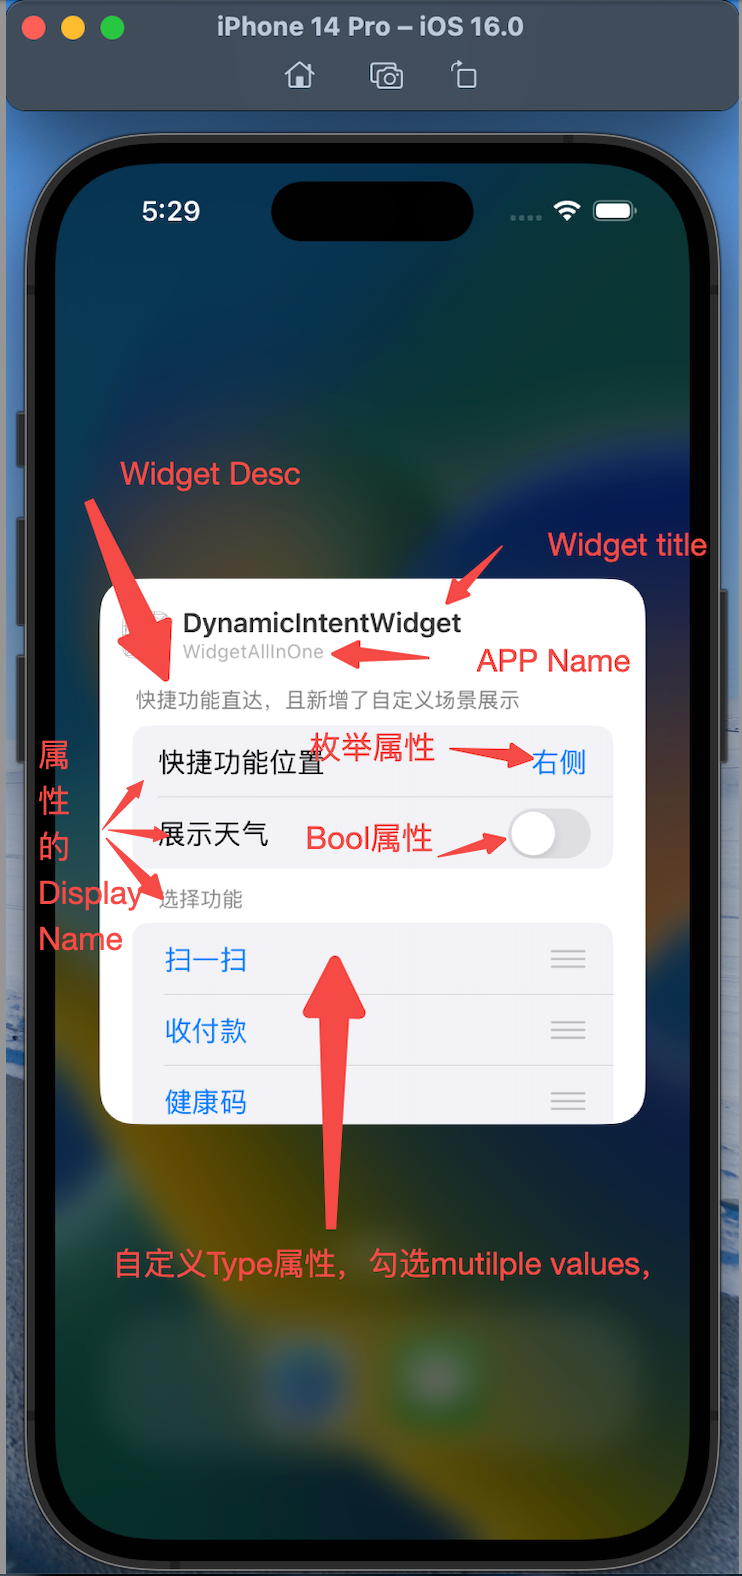
继续,点击添加New Type,命名为CustomButtonItem,用于DynamicConfiguration中添加Parameter时使用。在Properties中添加urlStr和imageName属性为String类型,再添加buttonType属性是定义的Enum类型——ConfigrationButtonType,如下:
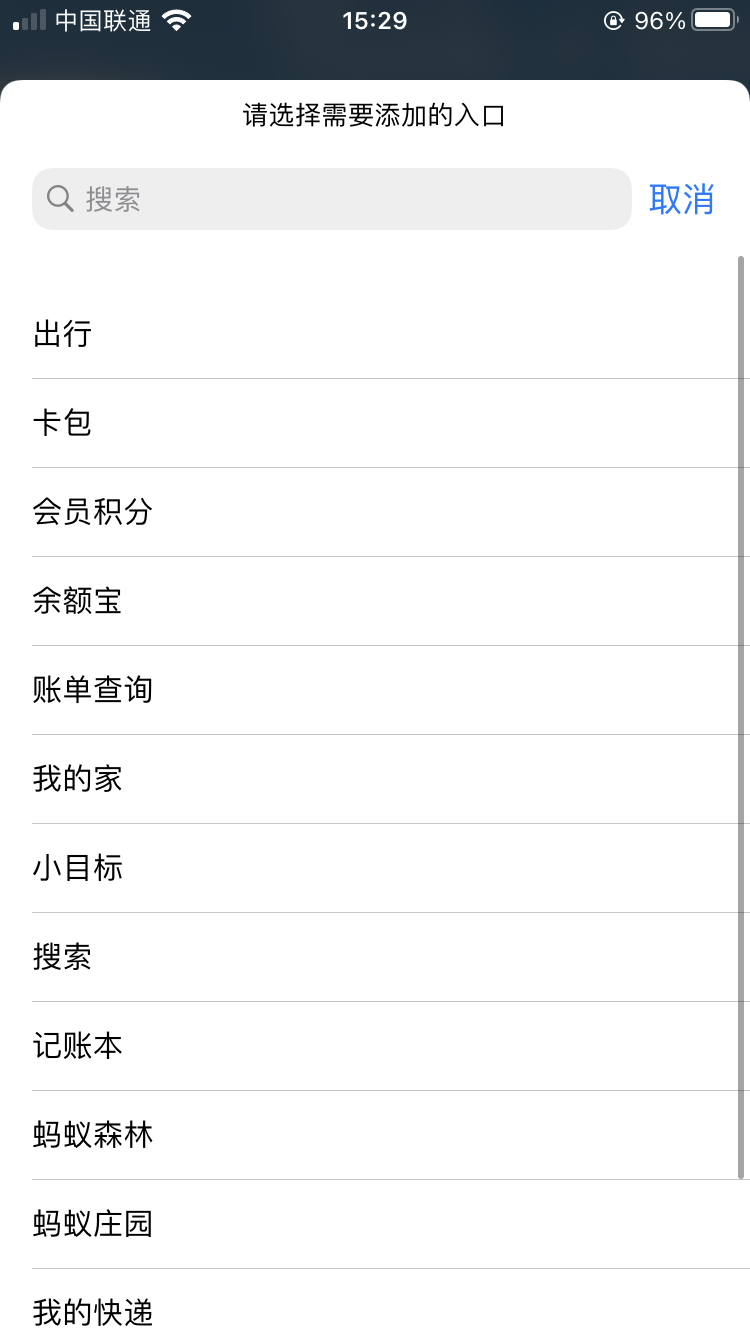
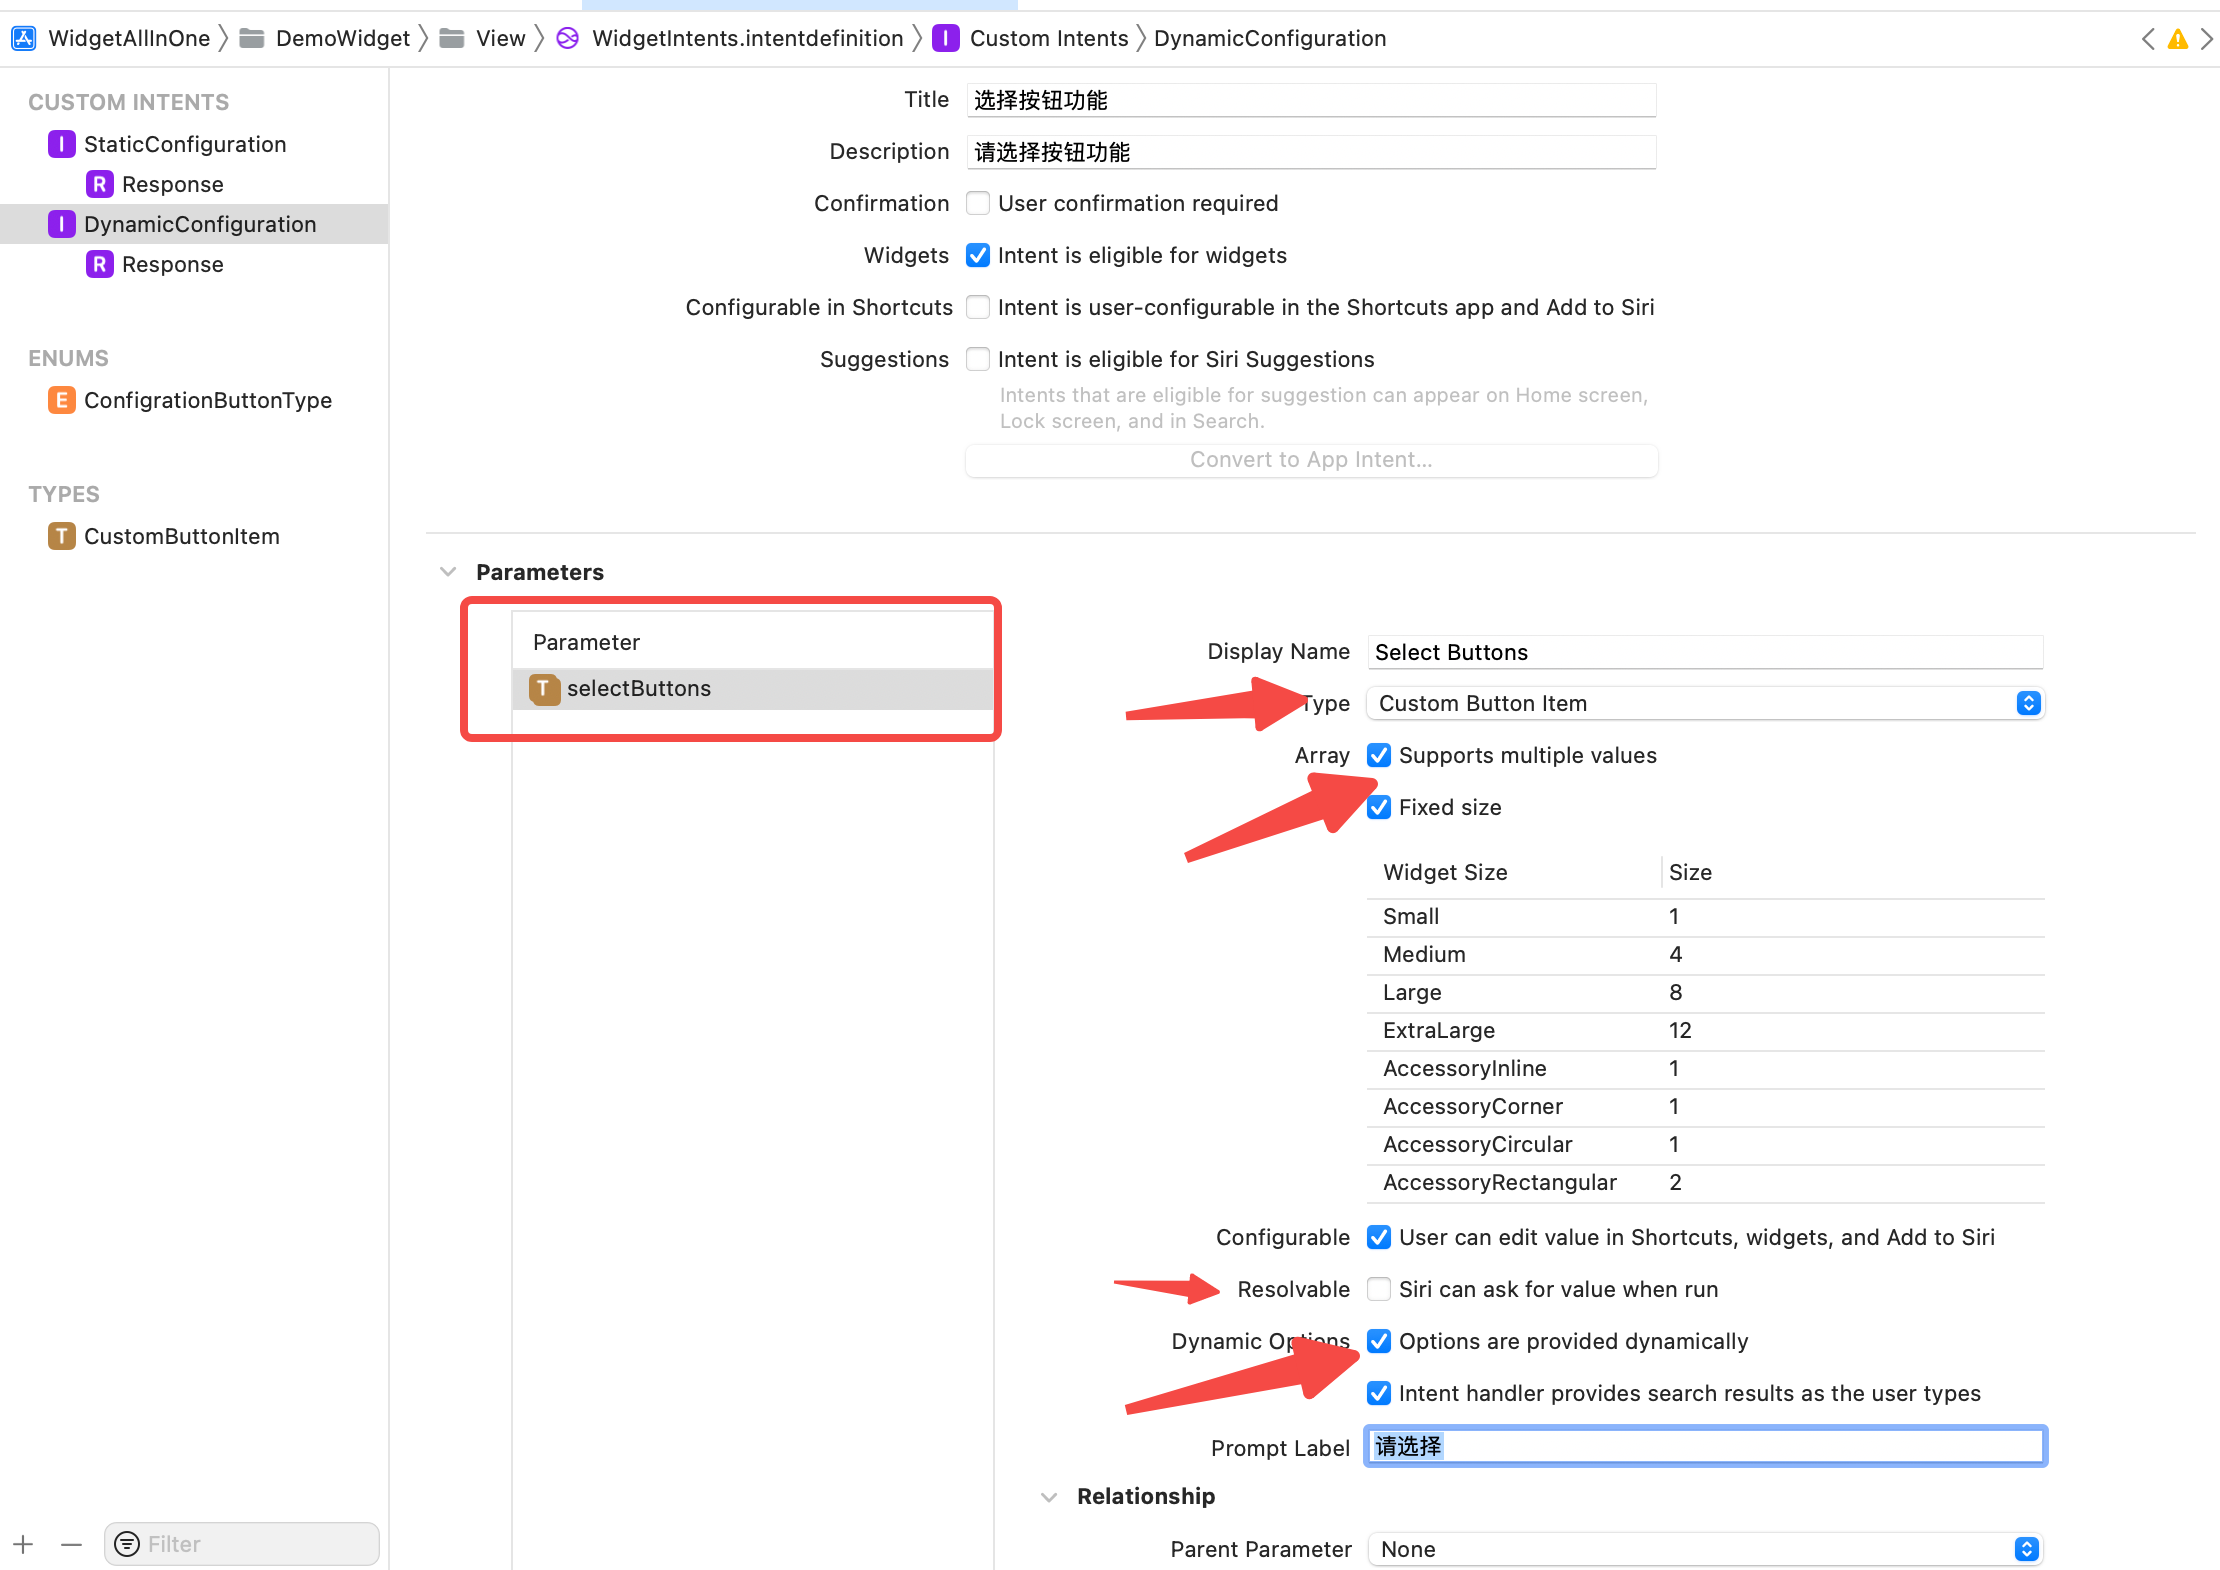
然后,为DynamicConfiguration添加Parameter,选择Type为CustomButtonItem,勾选Supports multiple values、Fixed Size、Dynamic Options,取消勾选Resolvable,在Dynamic Options下的Prompt Label中输入文案请选择,Fixed Size`中不同样式下的Size可修改。如下:
到这里,Intent中的设置已经完成了,但是还有个问题,虽然Intent中勾选了Supports multiple values,数据从哪里来,点击编辑小组件后,默认展示的几个数据是哪里来的?点击单个按钮时,跳转后展示的所有的数据是哪里来的?
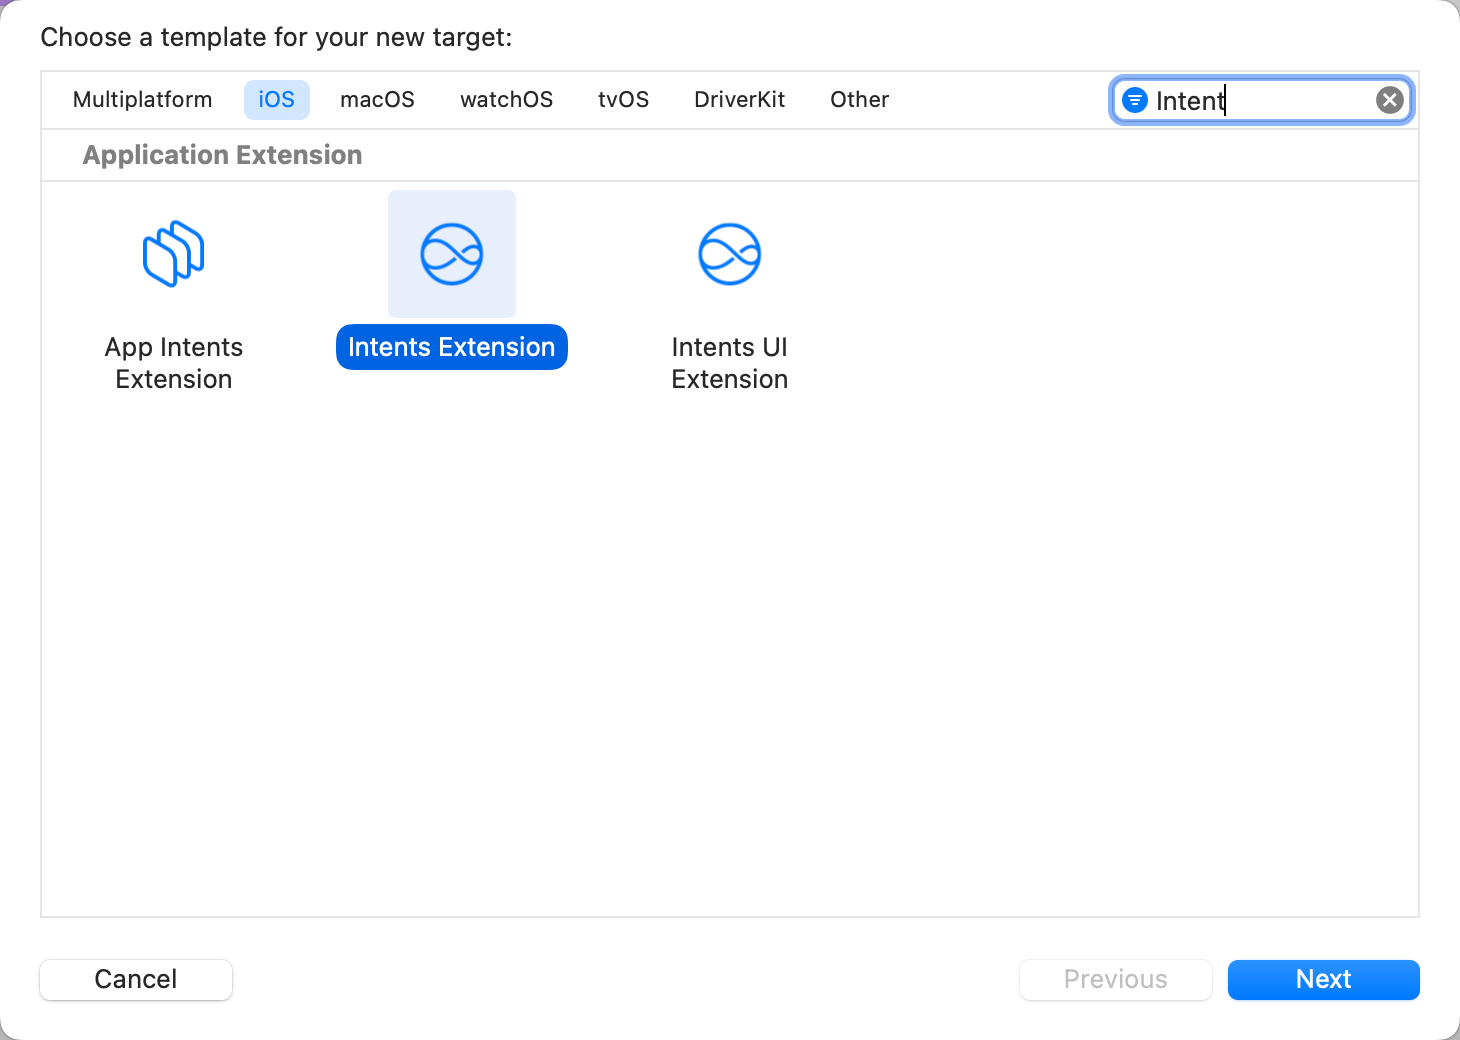
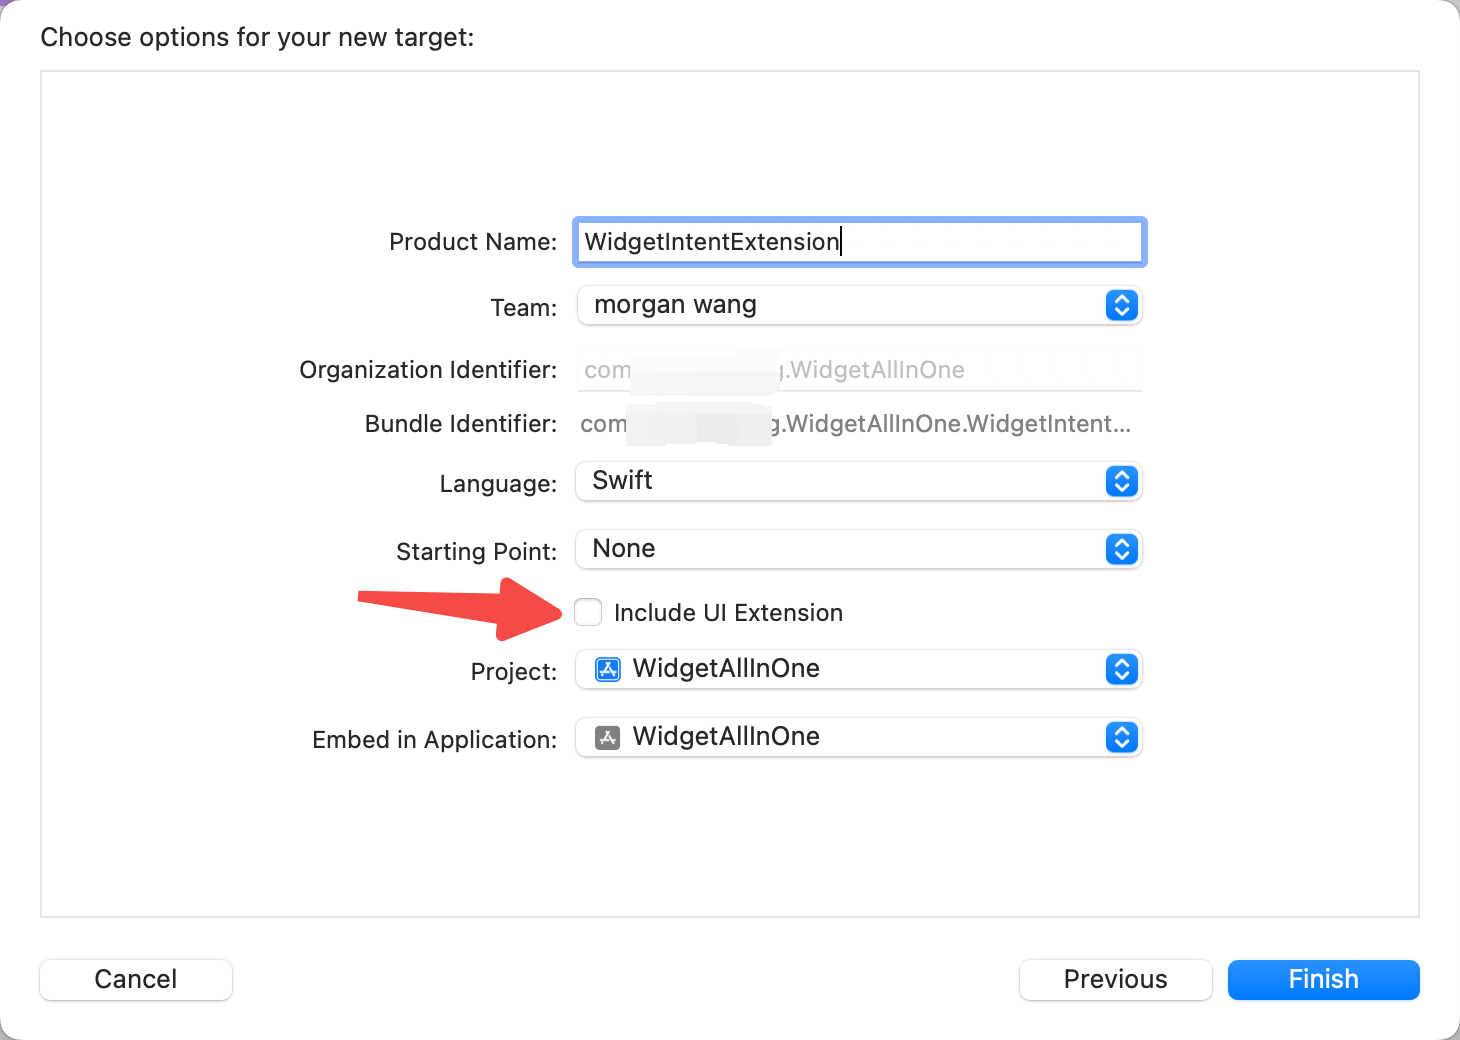
答案是Intent Extension,点击File -> New -> Target,这里注意,这个是Target ,搜索Intent,选择Intent Extension,如下,点击下一步,取消勾选Includes UI Extension,点击完成,如下:
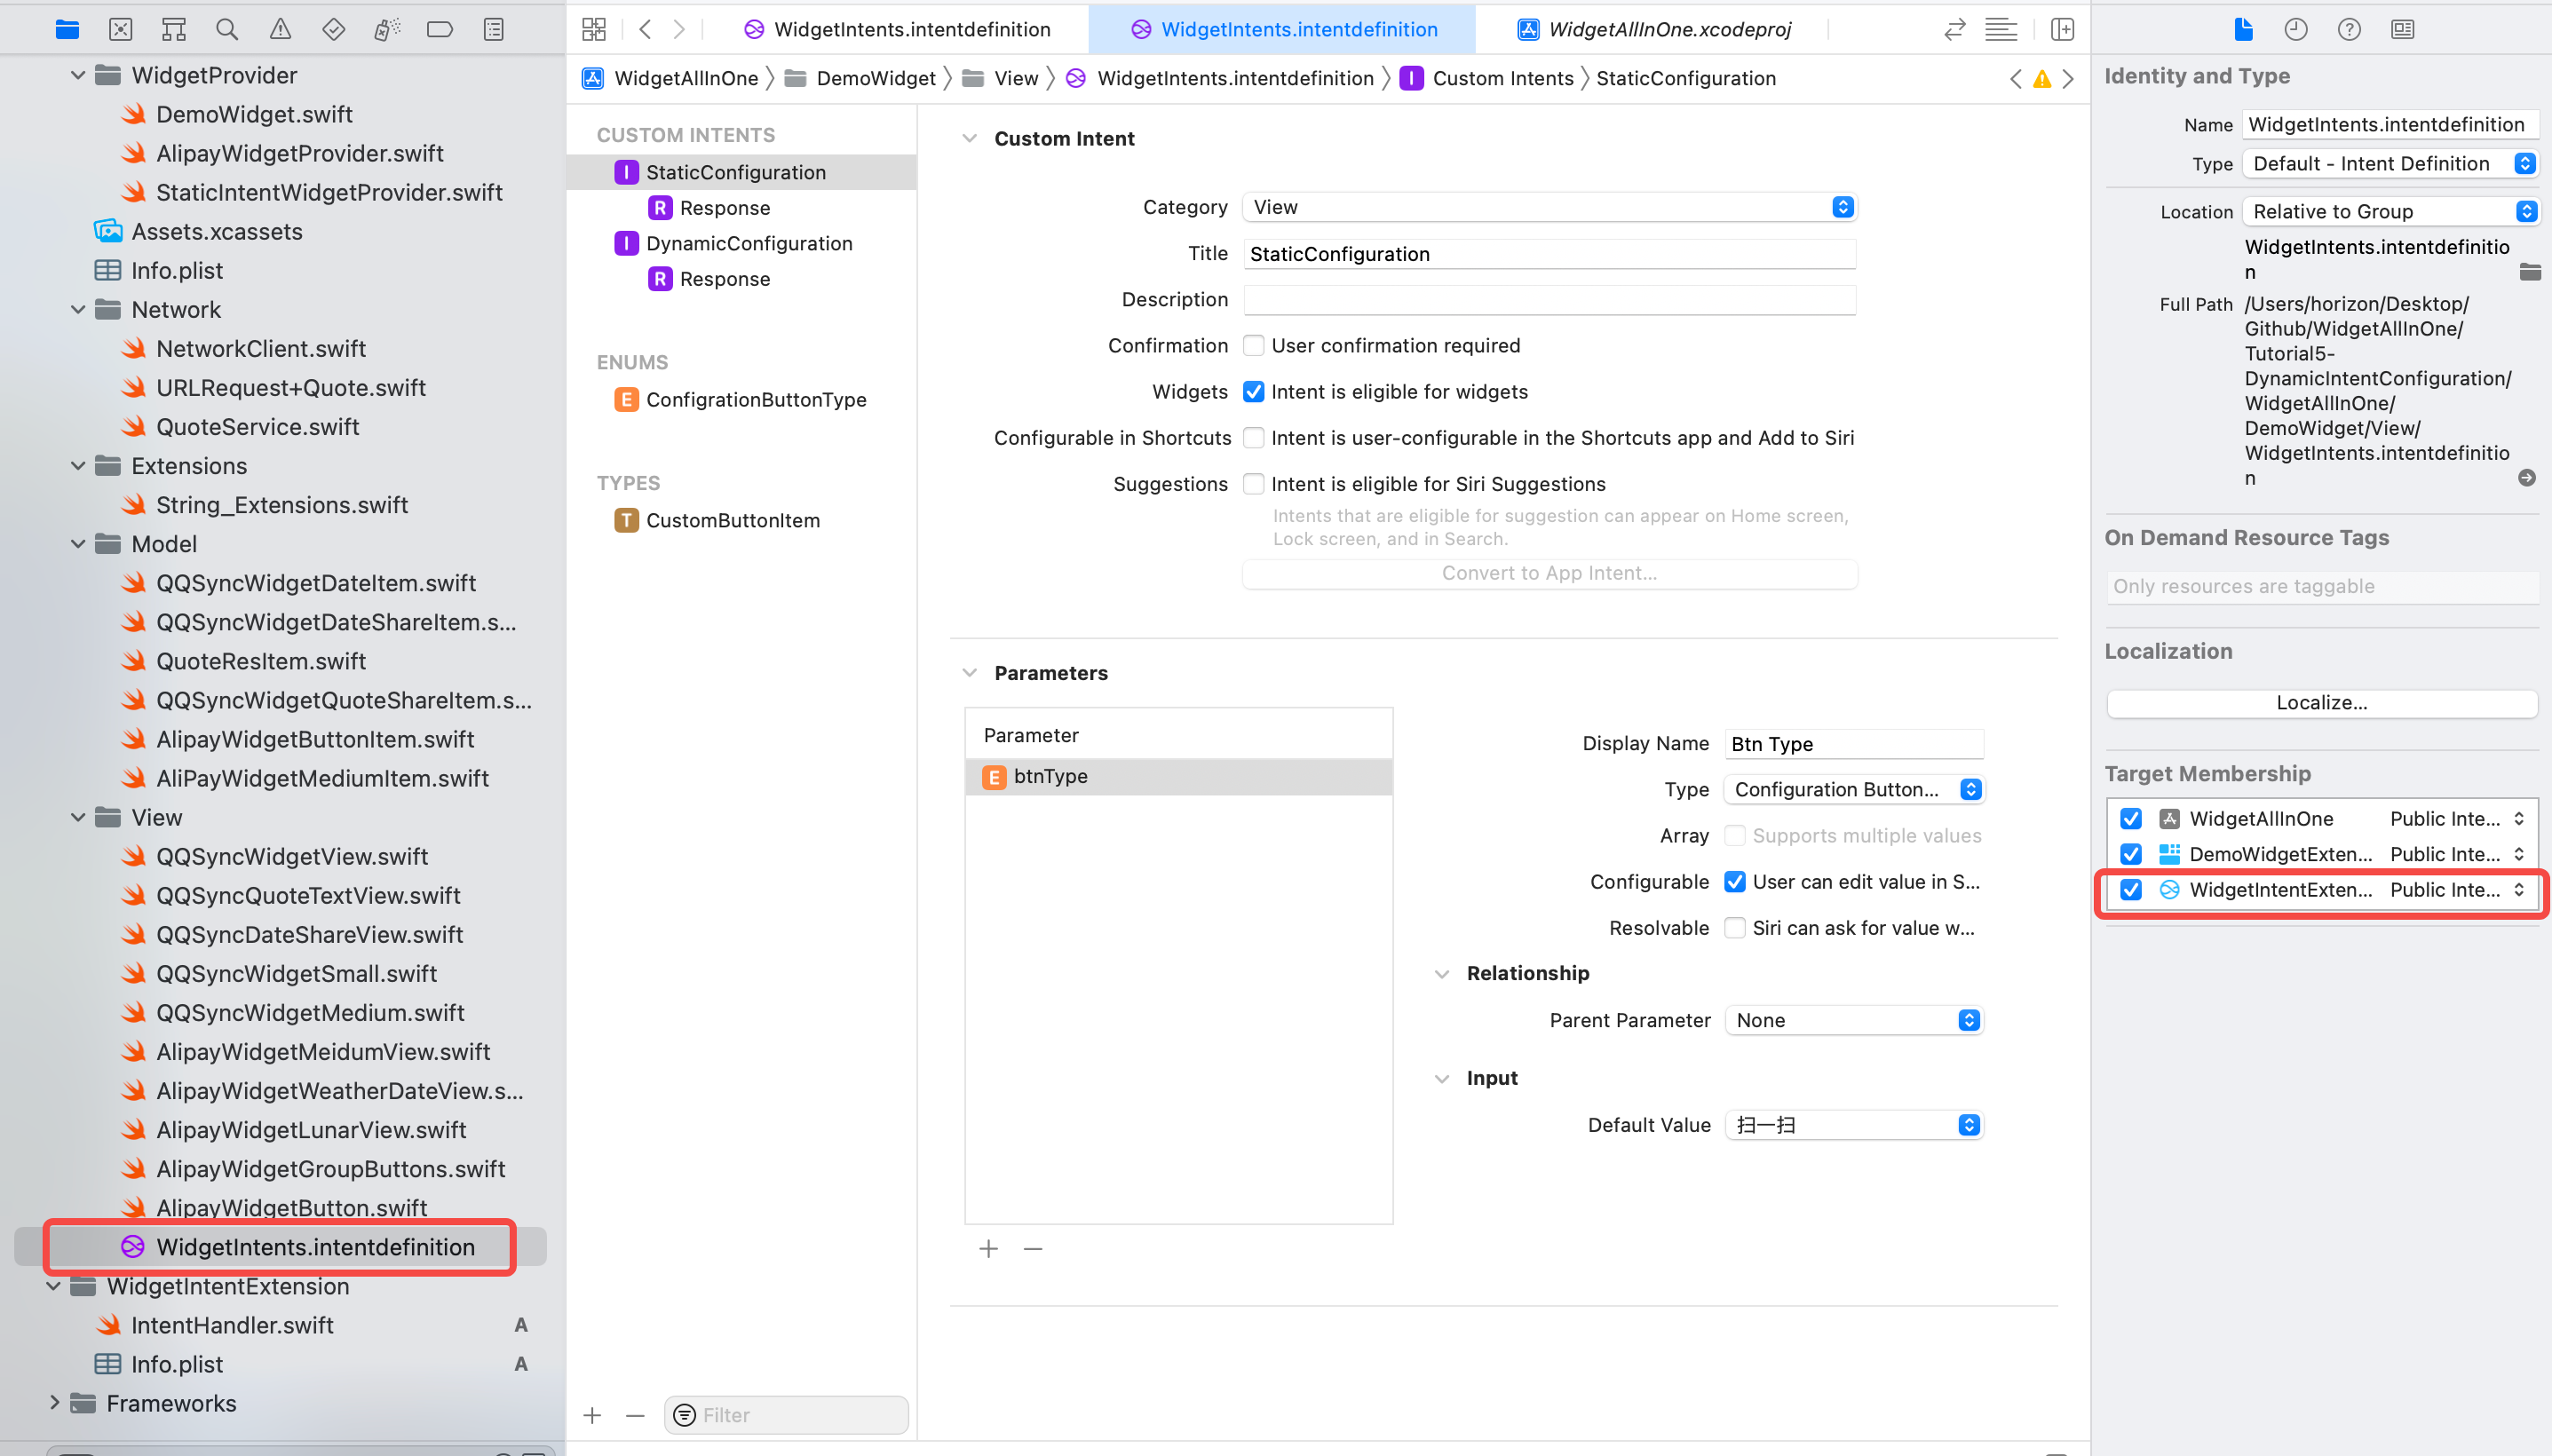
然后,选中.intentdefinition文件,Target MemberShip中把刚刚创建的Target也勾选上,如下图:
再然后,选中项目,选中WidgetIntentExtensionTarget,修改Deployment Info为15.0,在Supported Intents中点击+,然后输入DynamicConfigurationIntent,如下:
由于Intent Extension中要使用Widget中的ButtonType,所以选中ButtonType所在的类,在Target MemberShip中勾选Intent Extension的Target,如下:
然后选中IntentHandler,这里面就是数据来源的地方,修改内容如下:
1 2 3 4 5 6 7 8 9 10 11 12 13 14 15 16 17 18 19 20 21 22 23 24 25 26 27 28 29 30 31 32 33 34 35 36 37 38 39 40 41 42 43 44 45 46 47 48 49 50 51 52 53 54 55 56 57 58 59 60 61 62 63 64 65 import Intentsclass IntentHandler : INExtension override func handler (for intent : INIntent )Any { return self } } extension IntentHandler : DynamicConfigurationIntentHandling func provideSelectButtonsOptionsCollection (for intent : DynamicConfigurationIntent , searchTerm : String ?, with completion : @escaping (INObjectCollection <CustomButtonItem >?, Error ?) -> Void ) let typeList: [ConfigrationButtonType ] = [.scan, .pay, .healthCode, .trip, .travelCode, .stuck, .memberpoints, .yuebao] let itemList = generateItemList(from: typeList) completion(INObjectCollection (items: itemList), nil ) } func defaultSelectButtons (for intent : DynamicConfigurationIntent )CustomButtonItem ]? { let defaultBtnTypeList: [ConfigrationButtonType ] = [.scan, .pay, .healthCode, .trip] let defaultItemList = generateItemList(from: defaultBtnTypeList) return defaultItemList } fileprivate func generateItemList (from typeList : [ConfigrationButtonType ])CustomButtonItem ] { let defaultItemList = typeList.map({ let formatBtnType = buttonType(from: $0 ) let item = CustomButtonItem (identifier: formatBtnType.id, display: formatBtnType.displayName) item.buttonType = $0 item.urlStr = formatBtnType.urlStr item.imageName = formatBtnType.imageName return item }) return defaultItemList } func buttonType (from configurationType : ConfigrationButtonType )ButtonType { switch configurationType { case .scan: return .scan case .pay: return .pay case .healthCode: return .healthCode case .travelCode: return .travelCode case .trip: return .trip case .stuck: return .stuck case .memberpoints: return .memberpoints case .yuebao: return .yuebao case .unknown: return .unknown } } }
最后,创建新的IntentTimelineProvider,来显示这个效果,代码如下:
1 2 3 4 5 6 7 8 9 10 11 12 13 14 15 16 17 18 19 20 21 22 23 24 25 26 27 28 29 30 31 32 33 34 35 36 37 38 39 40 41 42 43 44 45 46 47 48 49 50 51 52 53 54 55 56 57 58 59 import Foundationimport WidgetKitimport SwiftUIstruct DynamicIntentWidgetProvider : IntentTimelineProvider typealias Entry = DynamicIntentWidgetEntry typealias Intent = DynamicConfigurationIntent func placeholder (in context : Context )DynamicIntentWidgetEntry { DynamicIntentWidgetEntry (date: Date ()) } func getSnapshot (for configuration : DynamicConfigurationIntent , in context : Context , completion : @escaping (DynamicIntentWidgetEntry ) -> Void ) let entry = DynamicIntentWidgetEntry (date: Date (), groupBtns: configuration.selectButtons) completion(entry) } func getTimeline (for configuration : DynamicConfigurationIntent , in context : Context , completion : @escaping (Timeline <DynamicIntentWidgetEntry >) -> Void ) let entry = DynamicIntentWidgetEntry (date: Date (), groupBtns: configuration.selectButtons) let expireDate = Calendar .current.date(byAdding: .hour, value: 1 , to: Date ()) ?? Date () let timeline = Timeline (entries: [entry], policy: .after(expireDate)) completion(timeline) } } struct DynamicIntentWidgetEntry : TimelineEntry let date: Date var groupBtns: [CustomButtonItem ]? } struct DynamicIntentWidgetEntryView : View var entry: DynamicIntentWidgetProvider .Entry var body: some View { AlipayWidgetMeidumView (mediumItem: AliPayWidgetMediumItem (with: entry.groupBtns)) } } struct DynamicIntentWidget : Widget let kind: String = "DynamicIntentWidget" var title: String = "DynamicIntentWidget" var desc: String = "DynamicIntentWidget描述" var body: some WidgetConfiguration { IntentConfiguration (kind: kind, intent: DynamicConfigurationIntent .self , provider: DynamicIntentWidgetProvider ()) { entry in DynamicIntentWidgetEntryView (entry: entry) } .configurationDisplayName(title) .description(desc) .supportedFamilies([.systemMedium]) } }
效果如下:
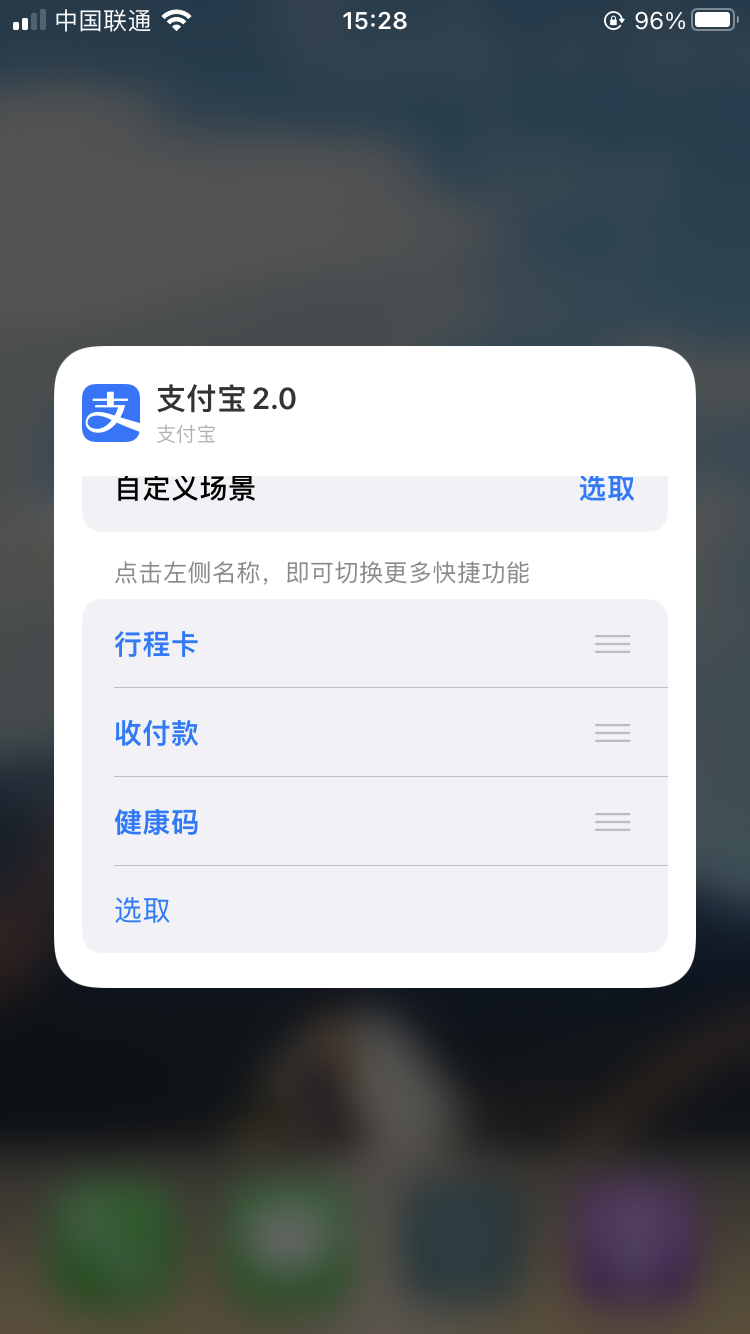
到此差不多就完成了,对比支付宝widget,可以看到,还有展示天气和选择功能位置的样式,在DynamicConfiguration的Parameter中,直接添加两个属性,选择功能位置为Enum类型,展示天气为Bool类型,然后调整位置,把selectButtons属性移到最下方,详细步骤大家自己尝试一下。
最终效果如下:
总结:
完整项目代码已放在github : https://github.com/mokong/WidgetAllInOne
补充:
如果想要刷新widget,widget默认刷新时机是根据timiline设置来的,但是如果想要强制刷新,比如在APP中操作了,状态发生了改变,想要widget里吗刷新,可以用如下代码,在触发刷新的地方调用即可:
1 2 3 4 5 6 7 8 9 10 11 12 13 14 15 16 import WidgetKit@objc class WPSWidgetCenter : NSObject @available (iOS 14 , * ) static func reloadTimelines (_ kind : String ) WidgetCenter .shared.reloadTimelines(ofKind: kind) } @available (iOS 14 , * ) @objc static func reloadAllTimelines () WidgetCenter .shared.reloadAllTimelines() } }
参考