图片压缩 mac 应用开发 背景 3年前有个项目BatchProssImage ,使用 Python 写的批量压缩图片的,最新再次使用时,发现忘记了怎么使用,所以就有了把这个Python 实现的工具,做成一个简单的 mac app 的想法。
过程 想法很简单:印象中当时这个工具是使用 tinypng 的 api 压缩的,所以开发一个 mac客户端,调用压缩的接口,导出照片就可以。开始动工。
首先 mac 客户端的 UI 从哪里来?之前有个项目OtoolAnalyse ——分析Mach-O文件中无用的类和方法,是借LinkMap UI 来实现的。这里想了想,嗯,还可以用这个方法。打开项目一看,OC 的,还是用 Swift 写一遍吧。
UI 实现 想一下大致需要哪些功能,
选择文件 || 目录
选择导出目录
开始压缩
压缩进度显示
噢噢,还有一个,tinypng apikey 输入
再考虑一下,选择导出目录是否必要?之前笔者自己使用其他 APP 选择导出时,打断先有的操作且不说,对于选择困难来说,每次考虑要导出到哪里都是一个问题,要不要新建一个文件夹,还选择同目录会是什么效果等等。
改为 check 按钮,默认同目录直接替换,因为目标的使用场景是,选择项目文件夹,扫描文件夹中的图片,压缩,然后直接替换原文件;取消 check 选中时,则在选中目录下创建 output 文件夹,把压缩后的图片输出到output 中,这样就避免了选择导出目录的麻烦。
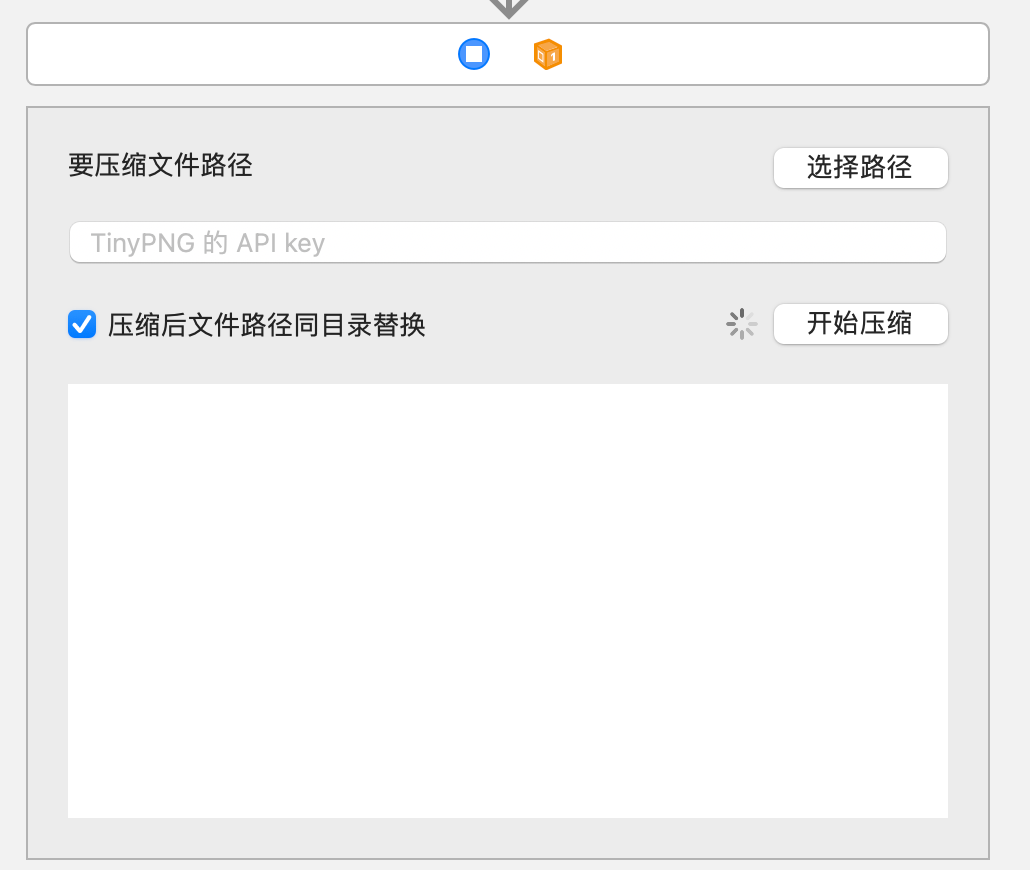
所以最终效果图如下:
UI 描述:
要压缩文件路径,用于显示选择路径的路径——如果选择多个文件,则显示已选择多个文件;如果选择单个文件或文件夹,则显示路径;
选择路径按钮,选择文件或者目录;
TinyPng 的API Key,用于输入TinyPNG网站获取到的API key,接口调用使用。
压缩后文件路径同目录替换按钮,(这个名字按钮起的有点长[捂脸]),默认选中,选中时压缩后的图片直接替换原图片;取消选中时,压缩后的图片输出到选择目录同级的output文件夹下;
indicator,用于开始压缩时表示正在压缩;
开始压缩按钮,获取文件夹下的支持压缩的图片,调用开始压缩的接口压缩,压缩后输出;
代码实现
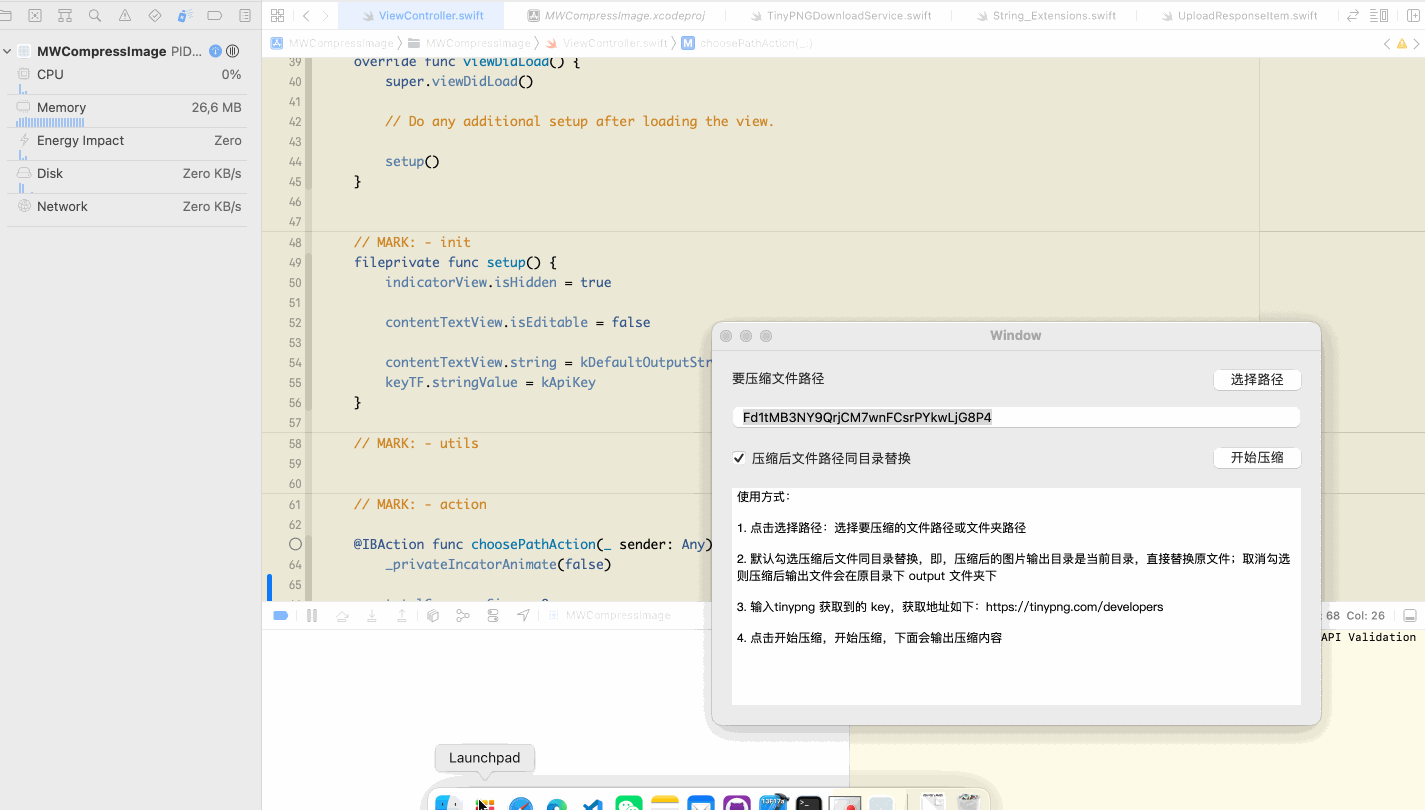
选择路径按钮点击事件逻辑,支持多选,支持选择目录,选择完成后,更新文件路径的显示
1
2
3
4
5
6
7
8
9
10
11
12
13
14
15
16
17
18
19
20
21
22
23
24
25
26
27
28
29
30
31
32
33
fileprivate var fileUrls: [URL ]? @IBAction func choosePathAction (_ sender : Any ) let panel = NSOpenPanel () panel.allowsMultipleSelection = true panel.canChooseDirectories = true panel.canChooseFiles = true panel.begin { response in if response == .OK { self .fileUrls = panel.urls self ._privateUpdateFilePathLabelDisplay() } } } fileprivate func _privateUpdateFilePathLabelDisplay () guard let fileUrls = fileUrls else { filePath.stringValue = "要压缩文件路径" return } if fileUrls.count == 1 { filePath.stringValue = "已选择:" + (fileUrls.first? .absoluteString ?? "" ) } else { filePath.stringValue = "已选择多个文件" } }
上传逻辑实现
上传逻辑首先需要知道tinypng上传的方式是什么样的,打开tinypng api reference ,可以看到支持HTTP、RUBY、PHP、NODE.JS、PYTHON、JAVA、.NET方式的上传,其中除了HTTP外,其他的都是提供已经编译好的库,所以,在这里只能用HTTP方式来上传。
先思考一下,之前做的项目的图片上传,都需要哪些字段,然后浏览文档,对比找到这些字段,然后验证。
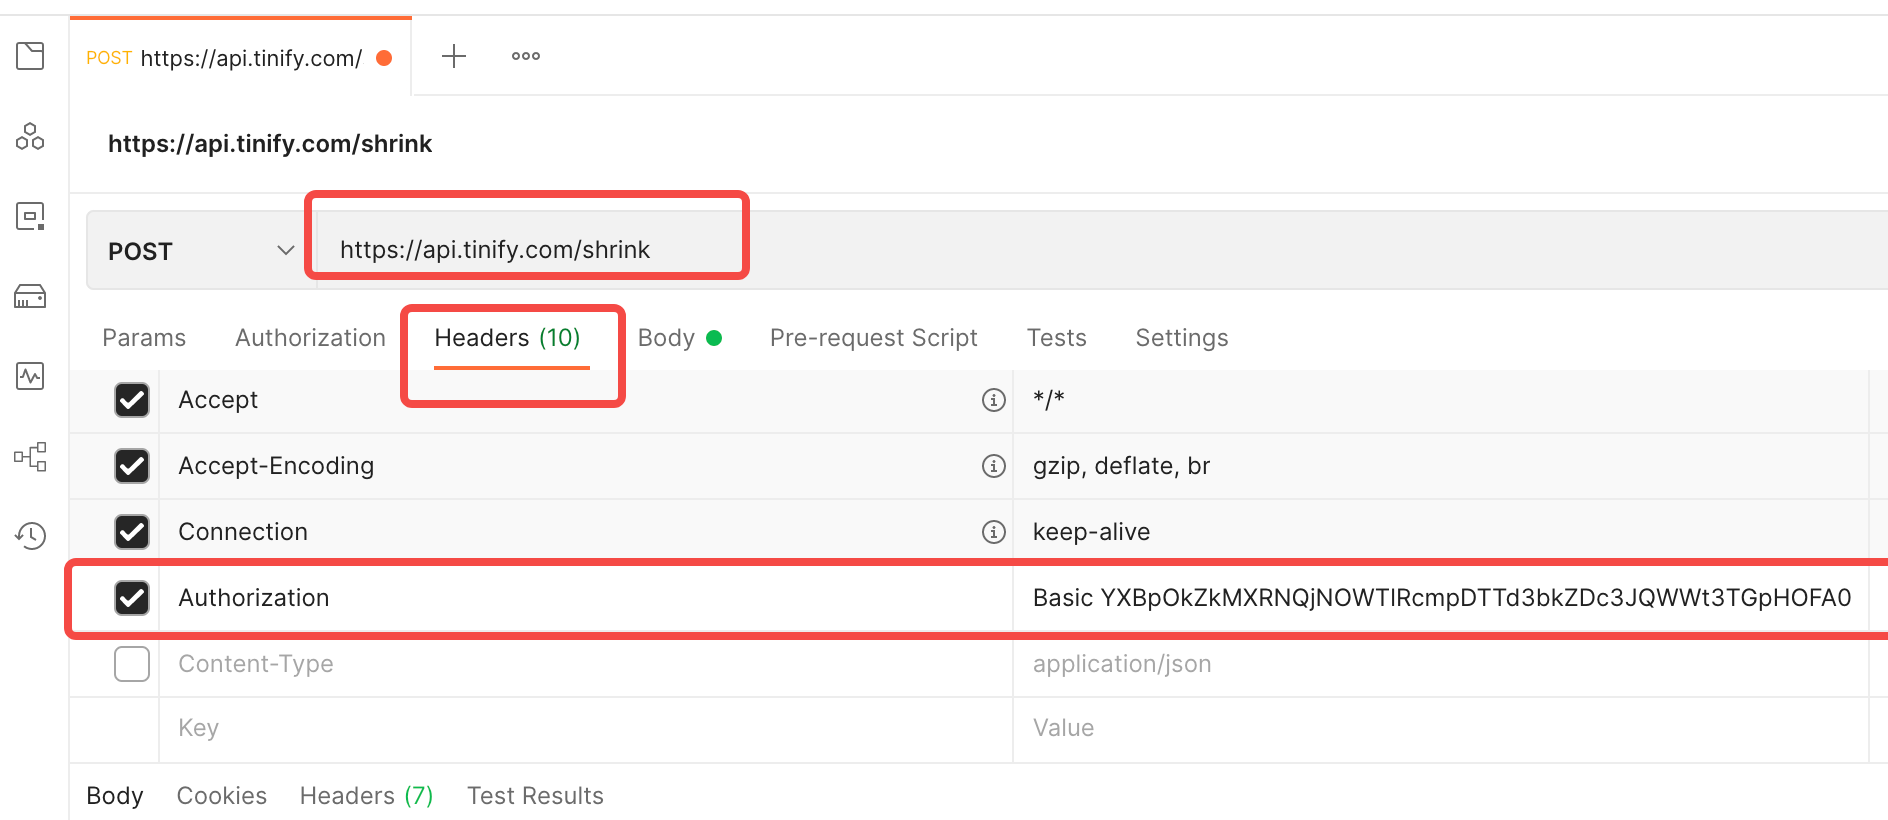
确认了,上传的域名是https://api.tinify.com/shrink;上传需要认证,认证的方式是HTTP Basic Auth,格式是获取到的 APIKEY,加上 api:APIKEY,再通过base64 Encode 得到一个字符串xxx,再在字符串前拼接Basic xxx,最后放到 HTTPHeader 的 Authorization中;最后上传需要图片data 数据,放在 body 中。
在动手前,先验证一下,这个接口是不是这样工作的,能不能正常使用,打开 Postman,新建一个接口,接口链接为https://api.tinify.com/shrink,post格式,在 Headers 中 添加key 为Authorization, value 为Basic Base64EncodeStr(api:YourAPIKey),如下:
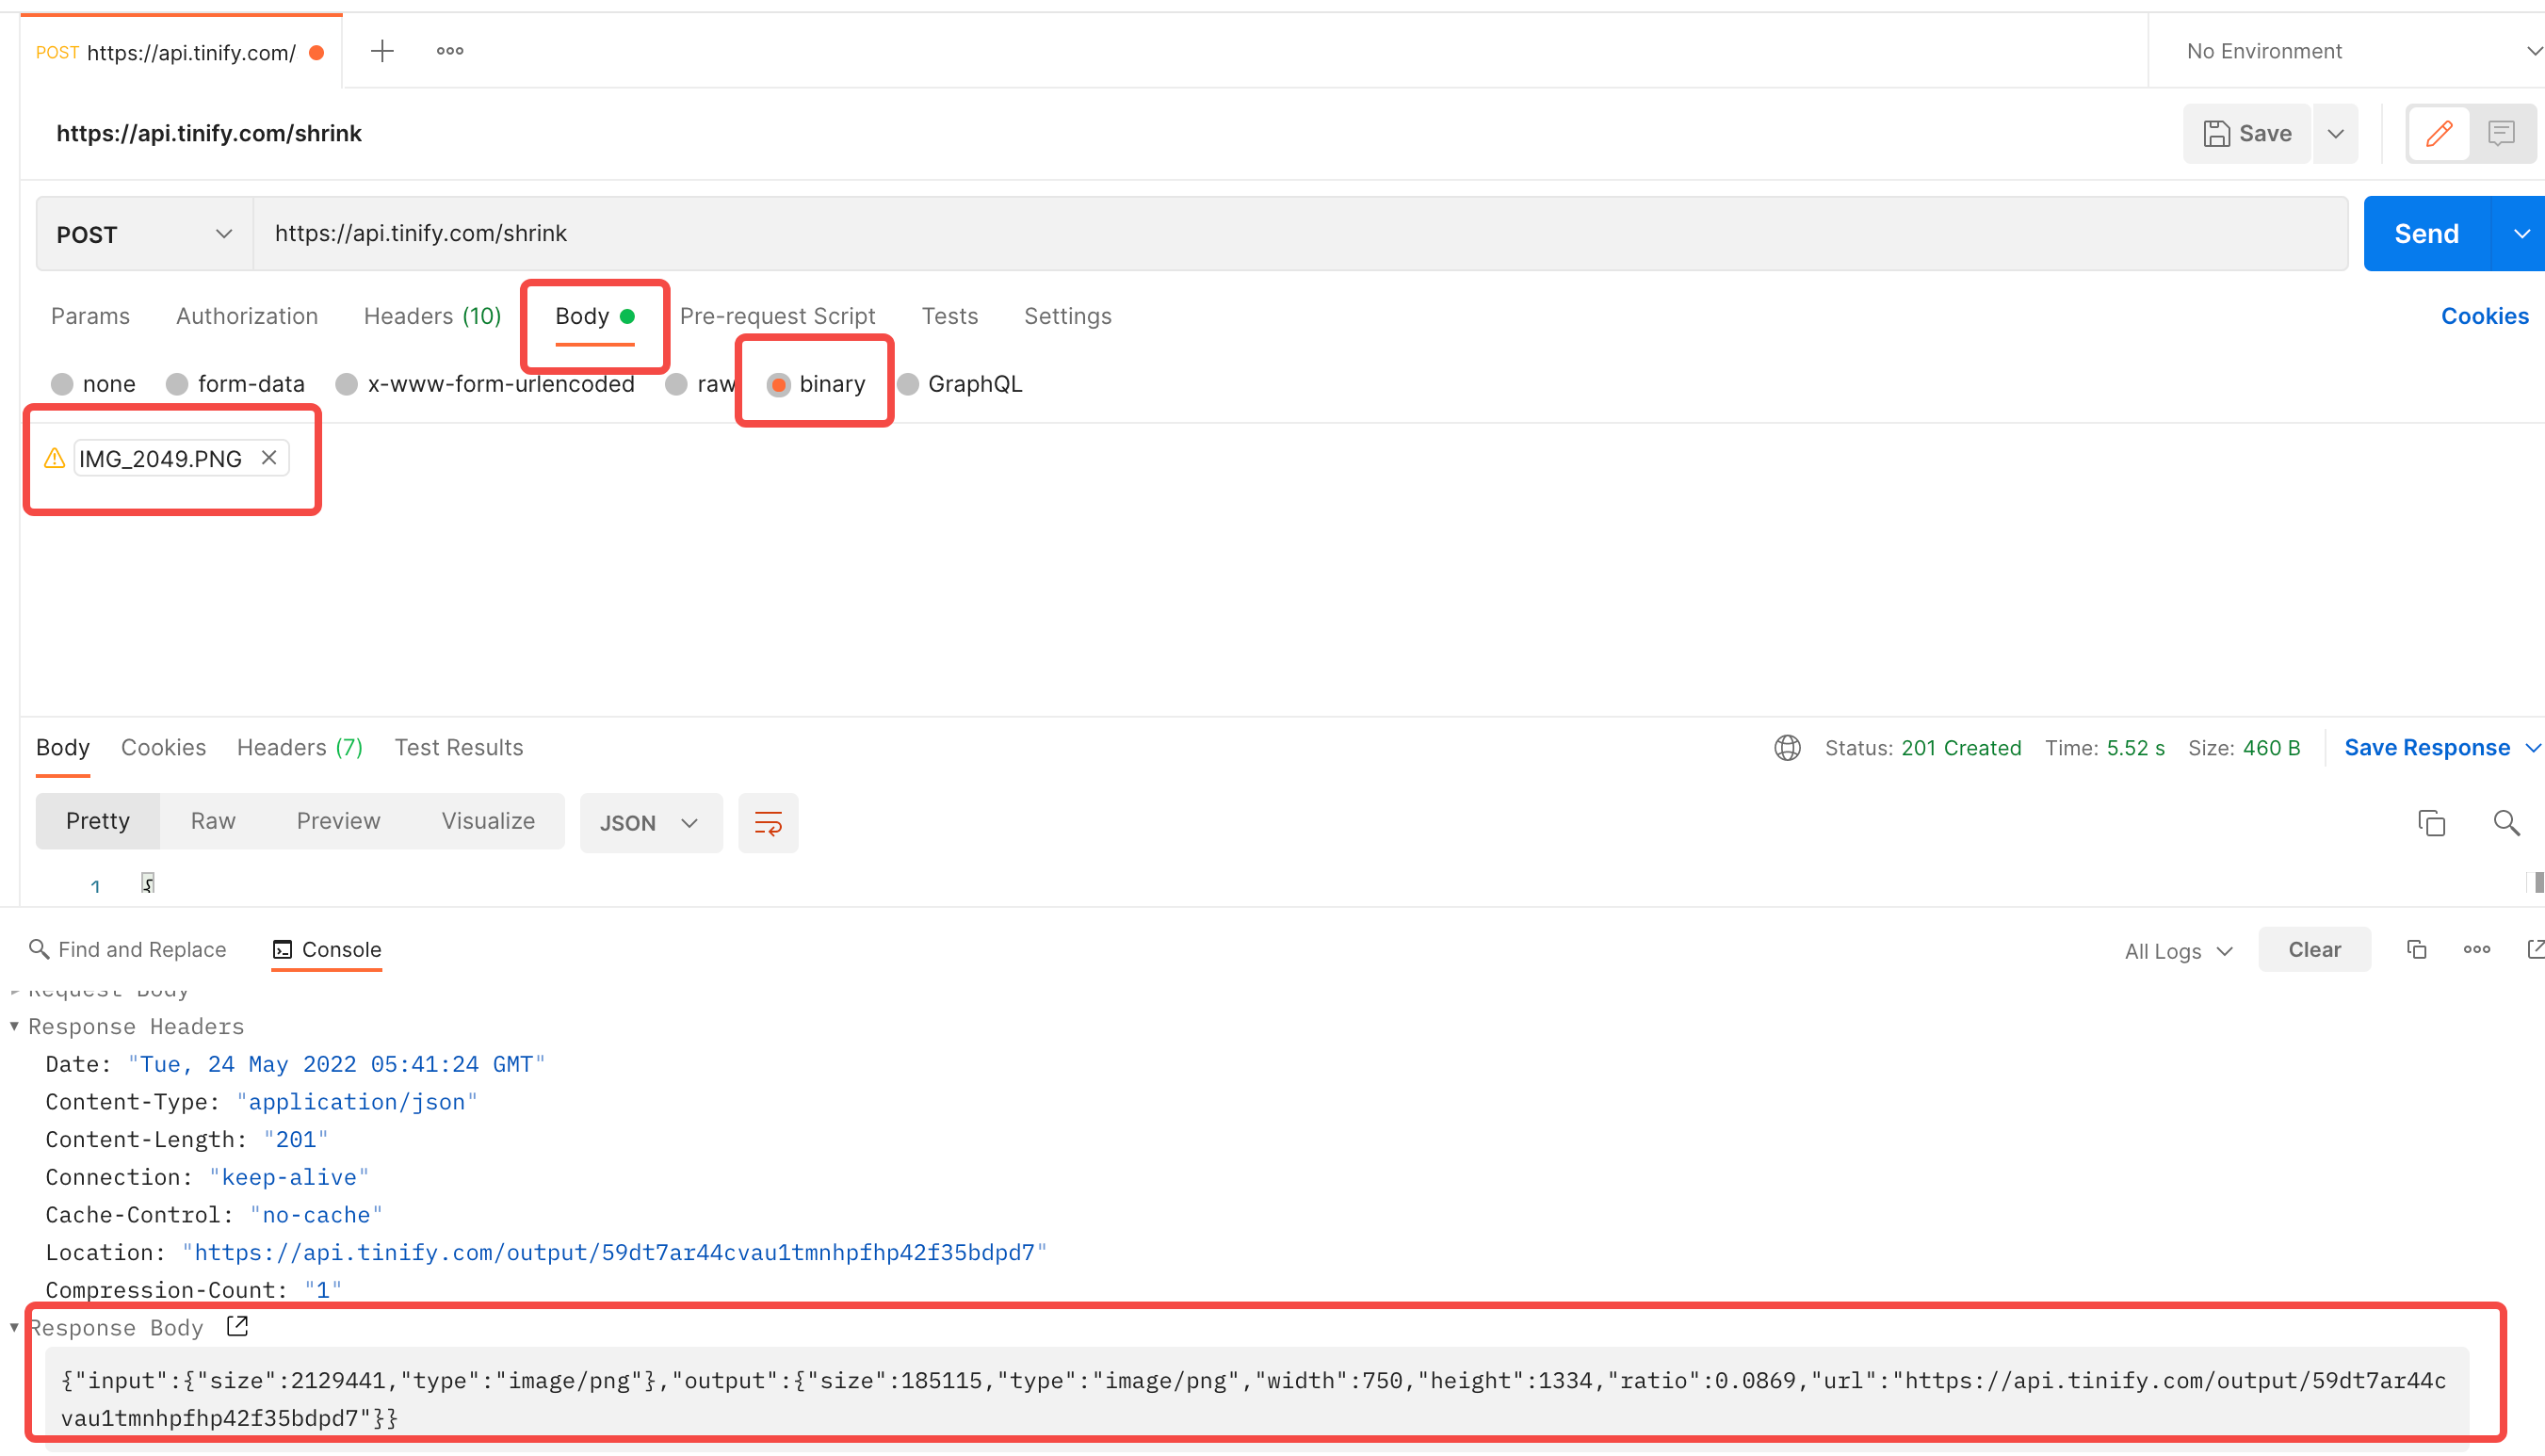
然后切到 Body,选择 Binary,添加一张图片,点击 Send,可以看到接口返回成功了,如下:
说明上传压缩接口可以正常工作,然后在来到 APP 中实现类似的逻辑:
创建下载类TinyPNGUploadService,使用 Alamofire上传文件方法。
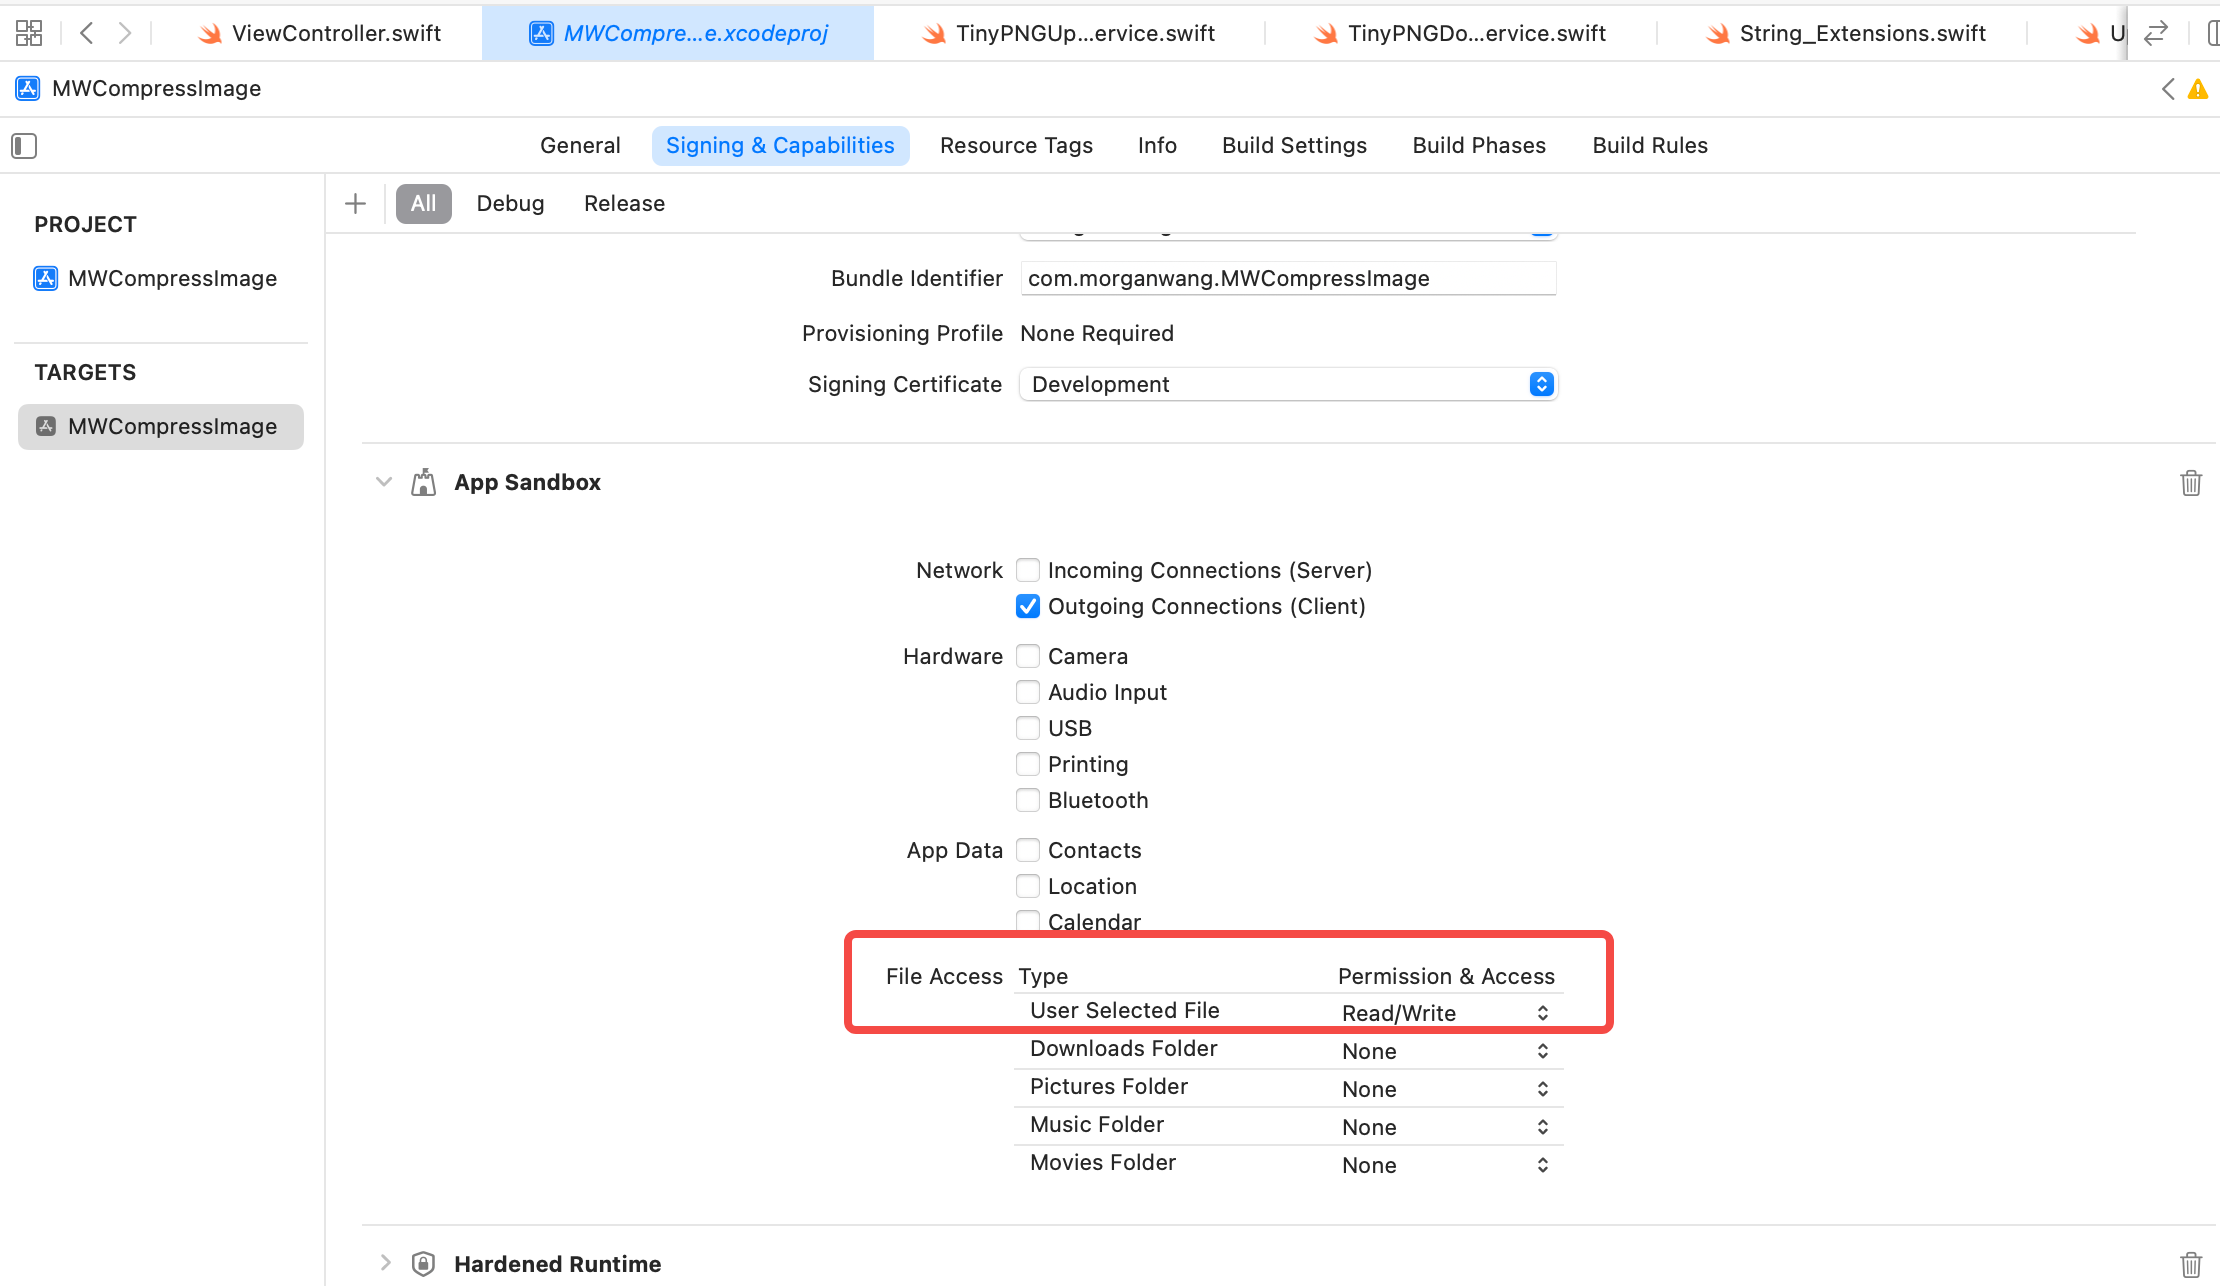
注意一: 上传时,一直报错,Domain=NSPOSIXErrorDomain Code=1 "Operation not permitted",排查后发现,需要mac app网络请求需在 Target——>Signing && Capabilities 中,勾选App Sandbox 下的Network 选项中的Outgoing Connections(Client)。
注意二: 不能使用AF.upload(multipartFormData..的方法,否则会报错Status Code: 415,这里调试了好久。。。
1
2
3
4
5
6
7
8
9
10
11
12
13
14
15
16
17
18
19
20
21
22
23
24
25
26
27
28
29
30
31
32
33
34
35
36
37
38
39
40
import Foundationimport AppKitimport Alamofirelet kTinyPNGCompressHost: String = "https://api.tinify.com/shrink" public struct TinyPNGUploadService static func uploadFile (with url : URL , apiKey : String , responseCallback : ((UploadResponseItem ?) -> Void )? ) let needBase64Str = "api:" + apiKey let authStr = "Basic " + needBase64Str.toBase64() let header: HTTPHeaders = [ "Authorization" : authStr, ] AF .upload(url, to: kTinyPNGCompressHost, method: .post, headers: header) .responseString(completionHandler: { response in print (response) responseCallback? (nil ) }) } } extension String func fromBase64 ()String ? { guard let data = Data (base64Encoded: self ) else { return nil } return String (data: data, encoding: .utf8) } func toBase64 ()String { return Data (self .utf8).base64EncodedString() } }
然后在点击开始压缩按钮时,调用封装的这个上传方法。
上传前判断是否选择待压缩对象,
判断是否输入 APIKEY,
展示 indicator
遍历选择的文件路径,如果是路径,则遍历路径下的文件;如果是文件,则直接判断
判断文件是否是支持压缩的格式,tinyPNG 支持png、jpg、jpeg、webp格式的图片压缩,其他文件格式则不做处理
如果是支持压缩的文件,则调用压缩方法,压缩成功后,更新进度到最底部的ContentTextView 中
所有图片都压缩后,隐藏 indicator
1
2
3
4
5
6
7
8
9
10
11
12
13
14
15
16
17
18
19
20
21
22
23
24
25
26
27
28
29
30
31
32
33
34
35
36
37
38
39
40
41
42
43
44
45
46
47
48
49
50
51
52
53
54
55
56
57
58
59
60
61
62
63
64
65
66
67
68
69
70
71
72
73
74
75
76
77
78
79
80
81
82
83
84
85
86
87
88
89
90
91
92
93
94
95
96
97
98
99
@IBAction func compressAction (_ sender : Any ) guard let urls = fileUrls, urls.count > 0 else { _privateShowAlert(with: "请选择要压缩的路径" ) return } let apiKey = keyTF.stringValue guard apiKey.count > 0 else { _privateShowAlert(with: "请输入 TinyPNG 的 APIKey" ) return } _privateIncatorAnimate(true ) let group = DispatchGroup () let fileManager = FileManager .default for url in urls { let urlStr = url.absoluteString if urlStr.hasSuffix("/" ) { let dirEnumator = fileManager.enumerator(at: url, includingPropertiesForKeys: nil ) while let subFileUrl = dirEnumator? .nextObject() as? URL { print (subFileUrl) if _privateIsSupportImageType(subFileUrl.pathExtension) { group.enter() _privateCompressImage(with: subFileUrl, apiKey: apiKey) { group.leave() } } } } else if _privateIsSupportImageType(url.pathExtension) { print (url) group.enter() _privateCompressImage(with: url, apiKey: apiKey) { group.leave() } } } group.notify(queue: DispatchQueue .main) { self ._privateIncatorAnimate(false ) } } fileprivate func _privateIncatorAnimate (_ isShow : Bool ) indicatorView.isHidden = ! isShow if isShow { indicatorView.startAnimation(self ) } else { indicatorView.stopAnimation(self ) } } fileprivate func _privateCompressImage (with url : URL , apiKey : String , callback : (() -> Void )? ) TinyPNGUploadService .uploadFile(with: url, apiKey: apiKey, responseCallback: { uploadResItem in let str = url.absoluteString + "压缩已完成\n " self .resultOutput += str self .contentTextView.string = self .resultOutput callback? () }) } fileprivate func _privateIsSupportImageType (_ typeStr : String )Bool { let supportLists: [String ] = [ "jpeg" , "JPEG" , "jpg" , "JPG" , "png" , "PNG" , "webp" , "WEBP" , ] if supportLists.contains(typeStr) { return true } else { return false } } fileprivate func _privateShowAlert (with str : String ) let alert = NSAlert () alert.messageText = str alert.addButton(withTitle: "确定" ) alert.beginSheetModal(for: NSApplication .shared.keyWindow! ) }
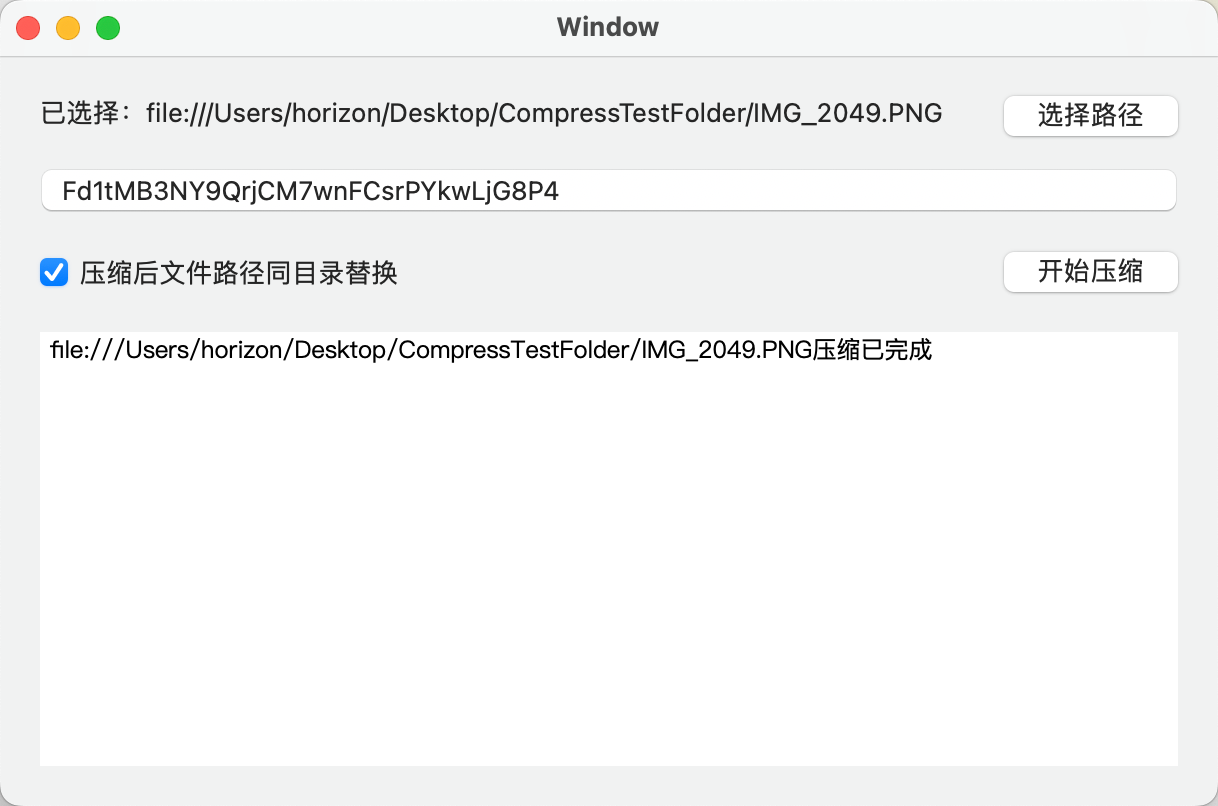
运行后选择一张图片,点击开始压缩,最后效果如下:
嗯哼,已经完成了30%,上传压缩的部分完成了,但是来看下上传后接口返回的数据
1
2
3
4
5
6
7
8
9
10
11
12
13
14
15
16
{ "input" : { "size" : 2129441 , "type" : "image/png" }, "output" : { "size" : 185115 , "type" : "image/png" , "width" : 750 , "height" : 1334 , "ratio" : 0.0869 , "url" : "https://api.tinify.com/output/59dt7ar44cvau1tmnhpfhp42f35bdpd7" } }
压缩后返回的数据中,input 是之前的图片大小和类型,output 是压缩后的图片数据,包含大小、类型、宽高、压缩比、图片链接。可以看到压缩后返回的是一个图片链接,所以剩下的部分,就是把压缩后的图片下载下来,保存到指定文件夹。
由于要用到返回的数据,所以声明一个 model 类用来解析返回的数据,如下:
1
2
3
4
5
6
7
8
9
10
11
12
13
14
15
16
17
18
19
20
21
22
import Foundationstruct UploadResponseItem : Codable var input: UploadReponseInputItem var output: UploadResponseOutputItem } struct UploadReponseInputItem : Codable var size: CLongLong var type: String } struct UploadResponseOutputItem : Codable var size: CLongLong var type: String var width: CLongLong var height: CLongLong var ratio: Double var url: String }
然后修改上传类TinyPNGUploadService中的方法,改为解析成 model 类,回调 model 类,如下:
1
2
3
4
5
6
7
8
9
10
11
12
13
14
15
16
17
18
19
20
21
22
23
24
25
26
27
28
public struct TinyPNGUploadService static func uploadFile (with url : URL , apiKey : String , responseCallback : ((UploadResponseItem ?) -> Void )? ) let needBase64Str = "api:" + apiKey let authStr = "Basic " + needBase64Str.toBase64() let header: HTTPHeaders = [ "Authorization" : authStr, ] AF .upload(url, to: kTinyPNGCompressHost, method: .post, headers: header) .responseDecodable(of: UploadResponseItem .self ) { response in switch response.result { case .success(let item): responseCallback? (item) case .failure(let error): print (error) responseCallback? (nil ) } } } }
下载逻辑的实现
然后来看下下载逻辑的实现,首先还是去tinypng api reference 中,看到Example download request中,示例中下载还写了Authorization(虽然实际上不需要,因为直接复制 URL,到隐私浏览器,可以直接打开),但是保险起见,还是按照示例的,在 header 中添加Authorization。
由于都需要 Authorization,所以把生成Authorization的方法封装,放到 String的 Extension 中,又因为都需要上传和下载都需要调用这个方法,所以把 Extension 单独抽成一个类String_Extensions,如下:
1
2
3
4
5
6
7
8
9
10
11
12
13
14
15
16
17
18
19
20
21
22
23
24
import Foundationpublic extension String func tinyPNGAuthFormatStr ()String { let needBase64Str = "api:" + self let authStr = "Basic " + needBase64Str.toBase64() return authStr } func fromBase64 ()String ? { guard let data = Data (base64Encoded: self ) else { return nil } return String (data: data, encoding: .utf8) } func toBase64 ()String { return Data (self .utf8).base64EncodedString() } }
然后把上传类中,生成 authStr的地方修改成如下:
1
2
3
let authStr = apiKey.tinyPNGAuthFormatStr()
再来创建下载类,TinyPNGDownloadService,下载方法需要三个参数,要下载图片的 URL,下载后保存的地址,以及 tiny png 的 apikey,
注意下载后保存地址如果存在同文件则移除。
注意需要设置HTTPHeader 中Content-Type为application/json,如果不设置,最后下载会错误,提示 contentType 不对。
注意下载返回不能用 responseString 打印,因为 string 是 pngdata,打印一长串看不懂的字符。
最终代码如下:
1
2
3
4
5
6
7
8
9
10
11
12
13
14
15
16
17
18
19
20
21
22
23
24
25
26
27
28
29
30
31
32
33
34
35
36
37
import Foundationimport AppKitimport Alamofirepublic struct TinyPNGDownloadService static func downloadFile (with url : URL , to destinationURL : URL , apiKey : String , responseCallback : (() -> Void )? ) let authStr = apiKey.tinyPNGAuthFormatStr() let header: HTTPHeaders = [ "Authorization" : authStr, "Content-type" : "application/json" ] let destination: DownloadRequest .Destination = { _ , _ in return (destinationURL, [.createIntermediateDirectories, .removePreviousFile]) } AF .download(url, method: .post, headers: header, to: destination) .response { response in switch response.result { case .success(_ ): responseCallback? () case .failure(let error): print (error) responseCallback? () } } } }
然后来考虑调用下载的时机;需要在上传完成后可以获取到要下载的链接,输出显示已完成前,应该先下载到本地。
下载文件目录,根据check 按钮是否选中,如果选中则是替换,直接返回当前文件 url 即可;如果未选中,则按照同目录添加 output 目录,保存在 output 下。
代码如下:
1
2
3
4
5
6
7
8
9
10
11
12
13
14
15
16
17
18
19
20
21
22
23
24
25
26
27
28
29
30
31
32
33
34
35
36
37
38
39
40
41
42
43
44
45
46
47
48
49
50
51
fileprivate var isSamePath: Bool = true @IBAction func checkBtnAction (_ sender : NSButton ) print (sender.state) isSamePath = (sender.state == .on) } fileprivate func _privateCompressImage (with url : URL , apiKey : String , callback : (() -> Void )? ) TinyPNGUploadService .uploadFile(with: url, apiKey: apiKey, responseCallback: { uploadResItem in if let tempUrlStr = uploadResItem? .output.url, let tempUrl = URL (string: tempUrlStr) { let destinationUrl = self ._privateGetDownloadDestinationPath(from: url) TinyPNGDownloadService .downloadFile(with: tempUrl, to: destinationUrl, apiKey: apiKey) { self ._privateUpdateContentOutDisplay(with: url) callback? () } } else { self ._privateUpdateContentOutDisplay(with: url) callback? () } }) } fileprivate func _privateUpdateContentOutDisplay (with url : URL ) let str = url.absoluteString + "压缩已完成\n " self .resultOutput += str self .contentTextView.string = self .resultOutput } fileprivate func _privateGetDownloadDestinationPath (from url : URL )URL { if isSamePath { return url } else { let fileName = url.lastPathComponent let subFolderPath = String (format: "output/%@" , fileName) let destinationUrl = URL (fileURLWithPath: subFolderPath, relativeTo: url) return destinationUrl } }
运行调试,首先是同文件替换的情况,发现下载成功,但是保存报错downloadedFileMoveFailed(error: Error Domain=NSCocoaErrorDomain Code=513 "“IMG_2049.PNG” couldn’t be removed because you don’t have permission to access it.",没有权限写入本地文件,同样还是需要修改Target——>Signing && Capabilities 中,修改App Sandbox 下的 File Access 选项中的User Selected File,权限改为Read/Write,如下:
再次尝试,发现同文件替换可以成功了。
再来尝试,保存到 output目录的情况。发现又报错downloadedFileMoveFailed(error: Error Domain=NSCocoaErrorDomain Code=513 "You don’t have permission to save the file “output” in the folder “CompressTestFolder”.",同样是没有权限,这个卡住了好久,一直不能创建文件夹,查了很久资料发现这个答案(Cannot Create New Directory in MacOS app)[https://stackoverflow.com/questions/50817375/cannot-create-new-directory-in-macos-app],Mac app 在 Sandbox模式下,不能自动创建目录,给出的解决办法有下面这些:
Depending on your use case you can
disable the sandbox mode——禁用安全模式
let the user pick a folder by opening an “Open” dialog (then you can write to this)——让用户自己指定写入目录,即提供选择路径按钮,选择文件或者目录;
enable read/write in some other protected user folder (like Downloads, etc.) or——换个目录,比如 Downloads 文件夹,开启读写权限
create the TestDir directly in your home directory without using any soft linked folder——直接在主目录中创建文件夹
按照给出的解决办法,采用最简单的,删除了 Sandbox 模式,Target——>Signing && Capabilities 中,删除App Sandbox模块,再次调试,即可创建文件夹成功。
优化,上面步骤完成后,整体的效果已经可以实现了,但是对于使用者来说,不太直观。一方面:中间包含了两步,上传和下载,用户可能更偏向于每一步都有反馈;另一方面,对于最终压缩的效果,没有一个直观的感受,只看到了某一步完成,但是压缩的程度没有显现出来。已经知道了上传成功后会返回原始图片和压缩后图片的大小和压缩比,所以可以进一步优化一下。
上传压缩后,显示压缩已完成,压缩了xx%的大小
下载保存到文件夹后,显示写入已完成,最终大小约为:xxKb
保存每一步的原始图片大小,和压缩后大小的差值,最后所有都压缩完成后,总体显示相比之前压缩掉了xxKb
1
2
3
4
5
6
7
8
9
10
11
12
13
14
15
16
17
18
19
20
21
22
23
24
25
26
27
28
29
30
31
32
33
34
35
36
37
38
39
40
41
42
43
44
45
46
47
48
49
50
51
52
53
54
55
56
57
58
59
fileprivate var totalCompressSize: CLongLong = 0 @IBAction func compressAction (_ sender : Any ) ... group.notify(queue: DispatchQueue .main) { self .resultOutput += String (format: "\n 总计:相比之前共压缩掉了%ldKb" , self .totalCompressSize/ 1024 ) self .contentTextView.string = self .resultOutput self ._privateIncatorAnimate(false ) } } fileprivate func _privateCompressImage (with url : URL , apiKey : String , callback : (() -> Void )? ) TinyPNGUploadService .uploadFile(with: url, apiKey: apiKey, responseCallback: { uploadResItem in let compressSize = (uploadResItem? .input.size ?? 0 ) - (uploadResItem? .output.size ?? 0 ) self .totalCompressSize += compressSize self ._privateUpdateContentOutDisplay(with: url, isCompressCompleted: false , item: uploadResItem? .output) if let tempUrlStr = uploadResItem? .output.url, let tempUrl = URL (string: tempUrlStr) { let destinationUrl = self ._privateGetDownloadDestinationPath(from: url) TinyPNGDownloadService .downloadFile(with: tempUrl, to: destinationUrl, apiKey: apiKey) { self ._privateUpdateContentOutDisplay(with: url, isCompressCompleted: true , item: uploadResItem? .output) callback? () } } else { callback? () } }) } fileprivate func _privateUpdateContentOutDisplay (with url : URL , isCompressCompleted : Bool , item : UploadResponseOutputItem ?) var suffixStr: String = "" if let outputItem = item { let ratio = 1.0 - outputItem.ratio suffixStr = "压缩已完成,压缩了: " + String (format: "%.0f" , ratio* 100 ) + "%的大小\n " if isCompressCompleted { suffixStr = String (format: "写入已完成,最终大小约为:%.ldKb \n " , outputItem.size/ 1024 ) } } else { suffixStr = "压缩已完成\n " if isCompressCompleted { suffixStr = "写入已完成\n " } } let str = url.absoluteString + suffixStr self .resultOutput += str self .contentTextView.string = self .resultOutput }
完整效果如下:
完整代码已放到Github:MWImageCompressUtil ,链接:https://github.com/mokong/MWImageCompressUtil
参考