说到导航,最常见就是类似于iOS中导航控制器的push和pop效果,同样Flutter中也有类似的效果,使用的就是Navigator组件。
下面,来看一下在Flutter中,导航效果Navigator.push和Navigator.pop的使用。
简单使用 代码如下:
1
2
3
4
5
6
7
8
9
10
11
12
13
14
15
16
17
18
19
20
21
22
23
24
25
26
27
28
29
30
31
32
33
34
35
36
37
38
39
40
41
42
43
44
45
46
47
48
49
class MyApp extends StatelessWidget @override Widget build (BuildContext context ) { return MaterialApp( title: '导航演示1' , home : new FirstScreen(), ); } } class FirstScreen extends StatelessWidget @override Widget build (BuildContext context ) { return new Scaffold( appBar: AppBar( title: Text('导航页面' ), ), body : Center( child: ElevatedButton( child: Text('查看商品详情页面' ), onPressed : () { Navigator.push(context, new MaterialPageRoute(builder: (context ) => new SecondScreen())); }, )), ); } } class SecondScreen extends StatelessWidget @override Widget build (BuildContext context ) { return Scaffold( appBar: AppBar( title: Text('SecondScreen' ), ), body : Center( child: OutlinedButton( child: Text('返回' ), onPressed : () { Navigator.pop(context); }, ), ), ); } }
注意使用Navigator.push时,要跳转的界面使用MaterialPageRoute包括起来了。SecondScreen添加了一个按钮,点击的实现方法中是Navigator.pop,用于返回;但是通常情况下,不需要专门实现Navigator.pop,因为在iOS中,当使用了AppBar的时候,会自动在左上角添加返回按钮;而在安卓中,使用系统返回按钮也可以直接返回。
使用名字导航 类似于路由跳转,使用名字而不是类名进行跳转。
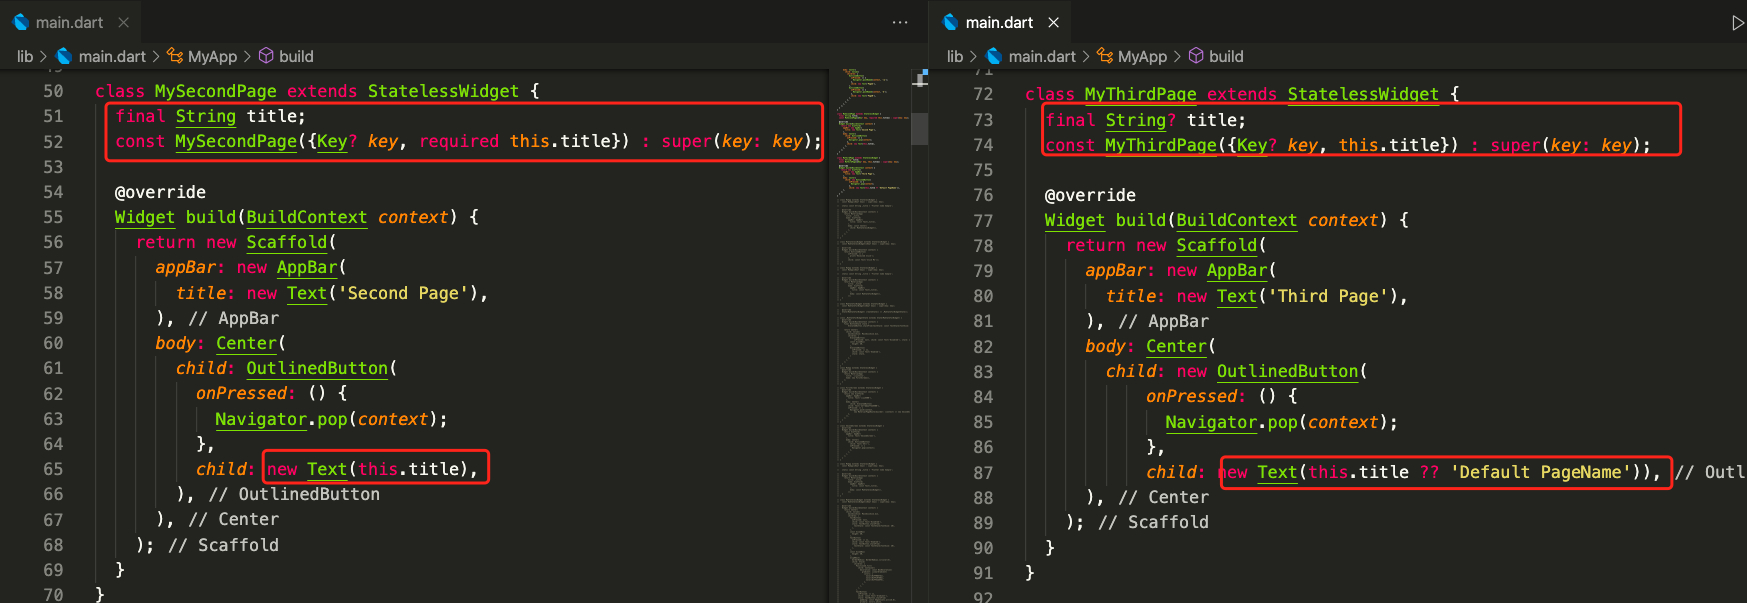
下面代码定义了三个界面,MyFirstPage是首页,MySecondPage和MyThirdPage是两个不同的界面,首页上面有两个按钮,分别对应跳转MySecondPage和MyThirdPage,同时跳转时传入参数,显示在对应页面中。
代码如下:
1
2
3
4
5
6
7
8
9
10
11
12
13
14
15
16
17
18
19
20
21
22
23
24
25
26
27
28
29
30
31
32
33
34
35
36
37
38
39
40
41
42
43
44
45
46
47
48
49
50
51
52
53
54
55
56
57
58
59
60
61
62
63
64
65
66
67
68
69
70
71
72
73
74
75
76
77
78
79
80
81
82
83
84
85
86
class MyApp extends StatelessWidget @override Widget build (BuildContext context ) { return MaterialApp( home: MyFirstPage(), routes : <String, WidgetBuilder>{ '/a': (BuildContext context) => MySecondPage(title: 'Page A'), 'b': (BuildContext context) => MyThirdPage(title: 'Page B'), }, ); } } class MyFirstPage extends StatelessWidget { @override Widget build(BuildContext context) { return new Scaffold( appBar: new AppBar( title: new Text('homepage'), ), body: Center( child: Column( children: [ OutlinedButton( onPressed: () { Navigator.pushNamed(context, '/a'); }, child: new Text('PageA'), ), OutlinedButton( onPressed: () { Navigator.pushNamed(context, 'b'); }, child: new Text('PageB'), ), ], ), ), ); } } class MySecondPage extends StatelessWidget { final String title; const MySecondPage({Key? key, required this.title}) : super(key: key); @override Widget build(BuildContext context) { return new Scaffold( appBar: new AppBar( title: new Text('Second Page'), ), body: Center( child: OutlinedButton( onPressed: () { Navigator.pop(context); }, child: new Text(this.title), ), ), ); } } class MyThirdPage extends StatelessWidget { final String? title; const MyThirdPage({Key? key, this.title}) : super(key: key); @override Widget build(BuildContext context) { return new Scaffold( appBar: new AppBar( title: new Text('Third Page'), ), body: Center( child: new OutlinedButton( onPressed: () { Navigator.pop(context); }, child: new Text(this.title ?? 'Default PageName')), ), ); } }
这里有几个点需要注意:
首先是routes的使用,类型为<String, WidgetBuilder>,前者是跳转页面的名字和后者是跳转的对应页面。而且跳转页面的名字中/不是必须的,即可以随便定义,但按照路由来理解的话,还是建议统一规则命名。
其次是跳转Navigator的使用,前面直接跳转的例子中,使用的方法是Navigator.push;而这里使用的是Navigator.pushNamed。
最后需要注意的是页面传值。
页面传值 就如同iOS开发,页面传值分为从上级界面到下级界面的传值和从下级界面到上级界面的回调传值。
从上级页面到下级页面的传值 上面的代码是从上级页面到下级页面到传值,但MySecondPage和MyThirdPage的写法还不一样,对比如下:
共有两个地方不一样:初始声明不同,具体使用的不同;
MySecondPage中声明的title属性是一个不可空的String,使用了required修饰(这个地方要注意,是required而不是@required,有些文章没有更新),使用的时候直接使用。
MyThirdPage中声明的title属性是可空的String,没有使用required修饰,但是使用的时候,添加了??提供默认值。
如果弄混了,使用的时候可能会遇到The parameter 'title' can't have a value of 'null' because of its type, but the implicit default value is 'null'. Try adding either an explicit non-'null' default value or the 'required' modifier.dart(missing_default_value_for_parameter)这种报错,原因就是可空和不可空的区别,修改方法就是,一种是选择声明为可空类型,使用时加上判断;一种是使用required修饰,声明不可空。
从下级页面到上级页面的传值 Navigator.Push方法是可以有返回值的,而且返回值是Future类型,当调用Navigator.Pop方法时,第二个可选参数传入了内容,则会在Navigator.Push中返回。
代码如下:
1
2
3
4
5
6
7
8
9
10
11
12
13
14
15
16
17
18
19
20
21
22
23
24
25
26
27
28
29
30
31
32
33
34
35
36
37
38
39
40
41
42
43
44
45
46
47
48
49
50
51
52
53
54
55
56
57
58
59
60
61
62
63
64
65
66
67
68
69
70
71
72
73
74
75
76
77
78
79
80
81
82
83
84
85
86
87
88
89
90
91
92
93
94
95
96
97
98
99
100
void main ( runApp(MyApp()); } class MyApp extends StatelessWidget @override Widget build (BuildContext context ) { return MaterialApp( home: MyFirstPage(), routes : <String, WidgetBuilder>{ '/a': (BuildContext context) => MySecondPage(title: 'Page A'), 'b': (BuildContext context) => MyThirdPage(title: 'Page B'), }, ); } } class MyFirstPage extends StatelessWidget { String callbackText = ''; @override Widget build(BuildContext context) { return new Scaffold( appBar: new AppBar( title: new Text('homepage'), ), body: Center( child: Column( children: [ OutlinedButton( onPressed: () { _pagePush(context, '/a'); }, child: new Text('PageA'), ), OutlinedButton( onPressed: () { // Navigator.pushNamed(context, 'b'); _pagePush(context, 'b'); }, child: new Text('PageB'), ), Text(callbackText), ], ), ), ); } } _pagePush(BuildContext context, String target) async { final result = await Navigator.pushNamed(context, target); ScaffoldMessenger.of(context).showSnackBar( new SnackBar(content: Text("$result")), ); } class MySecondPage extends StatelessWidget { final String title; const MySecondPage({Key? key, required this.title}) : super(key: key); @override Widget build(BuildContext context) { return new Scaffold( appBar: new AppBar( title: new Text('Second Page'), ), body: Center( child: OutlinedButton( onPressed: () { Navigator.pop(context, 'SecondPage Callback'); }, child: new Text(this.title), ), ), ); } } class MyThirdPage extends StatelessWidget { final String? title; const MyThirdPage({Key? key, this.title}) : super(key: key); @override Widget build(BuildContext context) { return new Scaffold( appBar: new AppBar( title: new Text('Third Page'), ), body: Center( child: new OutlinedButton( onPressed: () { Navigator.pop(context, 'ThirdPage Callback'); }, child: new Text(this.title ?? 'Default PageName')), ), ); } }
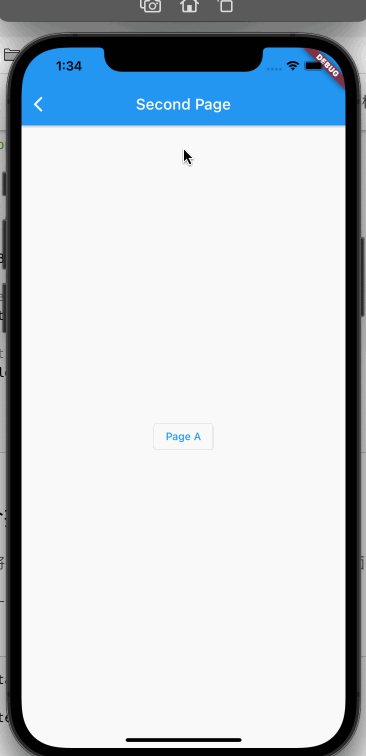
效果如下:
注意上面按钮点击方法的使用,单独封装了一个_pagePush的方法,并且使用async修饰,原因是Navigator.push的返回值是一个Futureawait,而await只能在async修饰的方法中使用,如果写过ReactNative的应该会熟悉这种写法。
参考 Navigator Dev Doc Flutter免费视频第四季-页面导航和其他 The parameter can’t have a value of ‘null’ because of its type in Dart 从新页面返回数据给上一个页面 Future class